Learn how to easily run a Keycloak Docker container with our step-by-step guide. Set up Keycloak for identity and access management in minutes using Docker. Perfect for beginners and experienced users. #centlinux #keycloak #docker
Table of Contents
What is Keycloak?
Keycloak is an open source software product to allow single sign-on with Identity Management and Access Management aimed at modern applications and services. As of March 2018 this JBoss community project is under the stewardship of Red Hat who use it as the upstream project for their RH-SSO product. From a conceptual perspective the tool’s intent is to make it easy to secure applications and services with little to no coding. (courtesy: Wikipedia)
By using Keycloak, developers can add authentication to applications and secure services with minimum efforts. No need to deal with storing users or authenticating users. It’s all available out of the box. You’ll even get advanced features such as User Federation, Identity Brokering and Social Login.
There are two main components of Keycloak.
- Keycloak Server – It is the Server component of the Keycloak
- Keycloak Application Adapter – These are the plugins for applications to access Keycloak Authentication services.
Recommended Online Training for You: Extending Keycloak: a Beginners’ Guide

Keycloak Features
Here are some of key features and benefits of Keycloak:
- Single Sign-On (SSO): Users can log in once and gain access to multiple applications without needing to log in again for each application.
- User Federation: Keycloak can connect to existing user databases, such as LDAP or Active Directory, allowing seamless integration with existing identity infrastructure.
- Identity Brokering and Social Login: Keycloak supports login via third-party identity providers like Google, Facebook, or GitHub, enabling users to log in with their existing accounts from these providers.
- Centralized Management: Administrators can manage all aspects of user authentication and authorization from a central Keycloak administration console.
- Support for Standard Protocols: Keycloak supports industry-standard protocols such as OAuth 2.0, OpenID Connect, and SAML, ensuring compatibility with a wide range of applications and services.
- Customizable and Extensible: Keycloak allows for extensive customization and extension, including custom authentication and authorization logic, themes, and user workflows.
- Security: Keycloak provides advanced security features like multi-factor authentication (MFA), password policies, and fine-grained access control to protect applications and data.
- Scalability: Keycloak can be deployed in a clustered environment to handle large numbers of users and high traffic loads, making it suitable for enterprise-level applications.
- User Self-Service: Users can manage their accounts, update profiles, change passwords, and configure their own security settings through a self-service portal.
- Community and Enterprise Support: As an open-source project, Keycloak has a vibrant community contributing to its development and providing support. Additionally, enterprise support options are available for organizations requiring professional services and guarantees.
By leveraging Keycloak, organizations can streamline their authentication and authorization processes, enhance security, and provide a better user experience across their applications and services.
Docker Host Specification
We are using a minimal Ubuntu Server virtual machine with following specification.
- CPU – 3.4 Ghz (2 cores)
- Memory – 2 GB
- Storage – 20 GB
- Operating System – Ubuntu Server 18.04 LTS
- Hostname – docker-01.centlinux.com
- IP Address – 192.168.116.218 /24
We have already installed Docker on this server, you can follow our previous article to install Docker on Ubuntu Server 18.04 LTS.
Pull required Keycloak images from Docker Hub
Connect with docker-01.centlinux.com as an admin user by using a ssh tool.
Since, we have already installed Docker, therefore, we can now access Docker Hub and download the required images.
Here, we are creating two containers,
- the actual Jboss/Keycloak server and
- MariaDB as data store for the Keycloak server
First, download mariadb official docker image.
$ sudo docker pull mariadb
Using default tag: latest
latest: Pulling from library/mariadb
...
Digest: sha256:6f80d059050b80fd8bd951323f6e4a7dde36d62e355cf01b92d26c34d3f702f6
Status: Downloaded newer image for mariadb:latest
Now, download jboss/keycloak docker image.
$ sudo docker pull jboss/keycloak
Using default tag: latest
latest: Pulling from jboss/keycloak
...
Digest: sha256:70171289054e77e2a091fd4b7d274807e777bd01d18719a7b7b139b67d1952d4
Status: Downloaded newer image for jboss/keycloak:latest
Create a Virtual Network in Docker
To interconnect MariaDB and Keycloak containers, we need to create a virtual network.
$ sudo docker network create keycloak-network
Run MariaDB Docker Container
Create a directory on docker host to store MariaDB database files, so we can use the same database files with other containers of MariaDB server.
$ mkdir /home/ahmer/keycloak_data
Create a MariaDB container and mount the keycloak_data directory in it.
$ sudo docker run -d
> --name mariadb
> --net keycloak-network
> -v /home/ahmer/keycloak_data:/var/lib/mysql
> -e MYSQL_ROOT_PASSWORD=Root@1234
> -e MYSQL_DATABASE=keycloak
> -e MYSQL_USER=keycloak
> -e MYSQL_PASSWORD=Keycloak@1234
> mariadb
The above command has been broken down as follows to describe for the readers.
- docker run -d -> Staring a container in Daemon mode
- –name mariadb -> Set the name of the container
- –net keycloak-network -> set the network that will be used by the container
- -v /home/ahmer/keycloak_data:/var/lib/mysql -> Mount the docker host directory in MariaDB container
- -e MYSQL_ROOT_PASSWORD -> Set mysql root user password
- -e MYSQL_DATABASE -> Creates a database with this name in MariaDB container
- -e MYSQL_USER -> Creates a database user with necessary privileges
- -e MYSQL_PASSWORD -> Sets the password of mysql user
- mariadb -> It is the image that will be used to create the docker container
By using Docker, we have successfully started a MariaDB Docker container that will serve as the data store for the Keycloak server.
Check the contains of keycloak_data directory now.
$ ls /home/ahmer/keycloak_data/
aria_log.00000001  ibdata1      ibtmp1             mysql
aria_log_control   ib_logfile0  keycloak           performance_schema
ib_buffer_pool     ib_logfile1  multi-master.info
You can see that the MariaDB container has created its database files in keycloak_data directory.
Run Keycloak Docker Container
Create and run a Jboss/Keycloak container using docker command.
$ sudo docker run -d
> --name keycloak
> --net keycloak-network
> -p 8080:8080
> -e KEYCLOAK_USER=admin
> -e KEYCLOAK_PASSWORD=Admin@1234
> -e DB_ADDR=mariadb
> -e DB_USER=keycloak
> -e DB_PASSWORD=Keycloak@1234
> jboss/keycloak
Above command has been broken down to describe for better understanding of the readers.
- docker run -d -> Start a docker container in Daemon mode
- –name keycloak -> Set name of the docker container
- –net keycloak-network -> Set the network used by the container
- -p 8080:8080 -> Port mapping of Docker container with the host machine
- -e KEYCLOAK_USER -> Set the name of the Keycloak’s Admin user
- -e KEYCLOAK_PASSWORD -> Set the password of Keycloak’s Admin user
- -e DB_ADDR -> set name of data store container
- -e DB_USER -> set DB username to access MariaDB data store
- -e DB_PASSWORD -> Set password of DB user
- jboss/keycloak -> It is the image that will be used to create the Keycloak container
We have created and started the Jboss/Keycloak container.
Check the status of the docker containers by using following command.
$ sudo docker ps
CONTAINER ID        IMAGE               COMMAND                  CREATED             STATUS              PORTS                              NAMES
e2b42254fa94        jboss/keycloak      "/opt/jboss/tools/doâ¦"   10 minutes ago      Up 10 minutes       0.0.0.0:8080->8080/tcp, 8443/tcp   keycloak
55de1ec4e0c9        mariadb             "docker-entrypoint.sâ¦"   26 minutes ago      Up 26 minutes       3306/tcp                           mariadb
Allow the 8080/tcp service port on docker host, so our Keycloak server can be accessed by the other computers across the network.
$ sudo ufw allow 8080/tcp
Rules updated
Rules updated (v6)
$ sudo ufw enable
Command may disrupt existing ssh connections. Proceed with operation (y|n)? y
Firewall is active and enabled on system startup
Access Keycloak Server Web UI
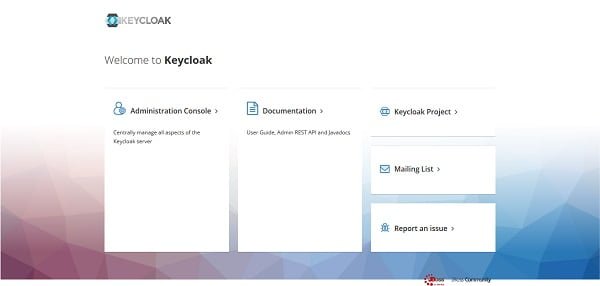
Open URL http://docker-01.centlinux.com:8080 in a web browser.

Click on ‘Administration Console’ to access it.

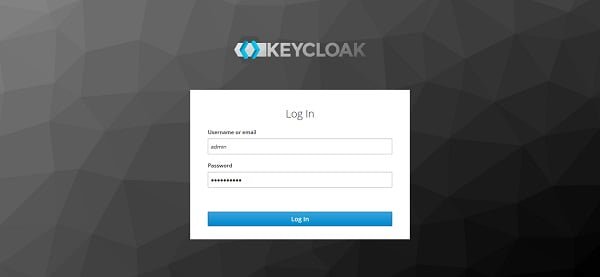
Login as admin user that we have defined while creating the docker container.

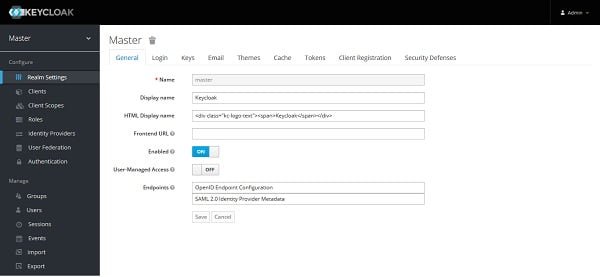
After successful login, we are now at the ‘Realm Settings’ page.
In this guide, you have learned how to install Keycloak on Docker container. You can now use it to create realms, users, roles, etc. For this you should refer to the Keycloak documentation.
Final Thoughts
Keycloak is an essential tool for managing user authentication and authorization across modern applications and services. Running Keycloak in a Docker container simplifies the setup and deployment process, making it accessible even for those new to identity and access management. By following our guide, you can quickly get Keycloak up and running, enhancing the security and user experience of your applications.
For a detailed, step-by-step guide on how to run a Keycloak Docker container, check out my Fiverr gig: How to run Keycloak Docker Container. Whether you’re a beginner or an experienced user, my comprehensive guide will help you set up and configure Keycloak with ease.
