Follow this comprehensive CentOS 7 installation guide with screenshots to easily set up and configure your CentOS 7 system. Perfect for beginners and advanced users alike. #centlinux #linux
Table of Contents
What is CentOS?
CentOS (Community Enterprise Operating System) is the famous distribution of Linux that provides a free, enterprise-class, community-supported computing platform, functionally compatible with it’s upstream source, Red Hat Enterprise Linux.

System Specification :
We are using a KVM virtual machine with following specification:
| CPU | 2.4 Ghz (2 Cores) |
| Memory | 2 GB |
| Storage | 50 GB |
Install CentOS 7 in VMWare:
First of all, you are required to download the CentOS 7 ISO from the their Official website.
We prefer to start with Minimal ISO, and then install only those packages when they are required by using yum command.
Insert CentOS 7 ISO/DVD in your virtual machine DVDROM and start it.

Select Install CentOS 7 and press Enter.

Select Language for the installation process. We selected English – English (United States).
Click on Continue.

Now, you are at the installation summary screen. You are required to make various customizations here. At first, click on Date/Time to adjust settings.

Select your timezone and adjust time and date (if required). Click on Done to get back to installation summary screen.

Click on Installation Destination to setup disk partitions.

At Installation Destination screen, the primary hard disk is already been selected by the installer, and at the Other Storage Options section Automatic Configure Partitioning is selected. But for the sake of demonstration we select I will configure partitioning and Click on Done.

In Manual Partitioning screen, select Standard Partition from drop down list. and Click on +.


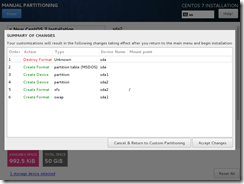
Add a swap partion of 4 GB and / root partition of 50 GB.

Review the storage structure and click on Done.

Click on Accept Changes.

At the Installation Summary screen again. Click on Network and Host name.

Turn on the Ethernet adaptor and you will notice that Linux Server will automatically acquire a dynamic IP and other network configurations from our DHCP Server.

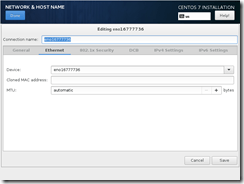
But usually, we required to assign a fixed IP to the Server, therefore, we assign another IP, that we have already reserved for it. Click on Configure.

Go to IPv4 Settings tab.

Select method Manual and Click on Add to add an IP address. Also add Gateway and DNS servers information on this screen. Our final configurations are as follows”:

We are not intented to use IPv6 networking, therefore go to IPv6 Settings tab and select method Ignore.
Click on Save.

Review Network settings and set the FQDN (Fully Qualified Hostname) of your Linux server.
Click on Done.

Click on Begin Installation to start CentOS 7 minimal installation.

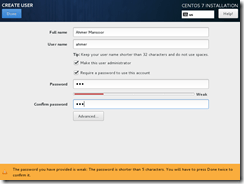
Two more configurations are available during the installation. i.e. Root Password and User Creation. So set a password for root user and create another Admin User as follows:


Click on Done at both screens.


At the end of CentOS 7 installation, Click on Reboot.


Conclusion – CentOS 7 Installation Guide with Screenshots:
CentOS 7 minimal installation completed successfully.

Leave a Reply
You must be logged in to post a comment.