Learn how to install Jenkins on Rocky Linux 9 with our detailed step-by-step guide. Streamline your continuous integration and continuous delivery (CI/CD) pipelines by setting up this powerful automation server on your Linux environment. #centlinux #linux #jenkins
Table of Contents
What is CI/CD?
In DevOps practices, the automated process of building, testing and delivering is called CI/CD (Continuous Integration / Continuous Delivery) pipeline.
- CI (Continuous integration) is a practice in which team members regularly commits their code changes to the version control repository (such as git or svn), after which automated builds and tests are performed using build tools (such as Apache Ant, Apache Maven, Gradle, Junit, etc).
- CD (Continuous delivery) is a series of practices where code changes are automatically built, tested and deployed to production.
What is Jenkins?
Jenkins is an open source automation server. It helps automate the parts of software development related to building, testing, and deploying, facilitating continuous integration and continuous delivery. It is a server-based system that runs in servlet containers such as Apache Tomcat. It supports version control tools, including AccuRev, CVS, Subversion, Git, Mercurial, Perforce, ClearCase and RTC, and can execute Apache Ant, Apache Maven and sbt based projects as well as arbitrary shell scripts and Windows batch commands. (Source: Wikipedia)
Plugins have been released for Jenkins that extend its use to projects written in languages other than Java. Plugins are available for integrating Jenkins with most version control systems and bug databases. Many build tools are supported via their respective plugins. Plugins can also change the way Jenkins looks or add new functionality. There are a set of plugins dedicated for the purpose of unit testing that generate test reports in various formats (for example, JUnit bundled with Jenkins, MSTest, NUnit, etc.) and automated testing that supports automated tests. Builds can generate test reports in various formats supported by plugins (JUnit support is currently bundled) and Jenkins can display the reports and generate trends and render them in the GUI.
Read Also:
Environment Specification
For this tutorial, we are working with a minimal installation of Rocky Linux 9, deployed on a virtual machine configured to provide optimal performance for our tasks. This setup ensures a clean and lightweight environment, free from unnecessary services and packages, making it an ideal base for server setups, testing, or development purposes. Below are the specifications of our virtual machine, which you can use as a reference to replicate this setup for your own use cases.
- CPU – 3.4 Ghz (2 cores)
- Memory – 2 GB
- Storage – 20 GB
- Operating System – Rocky Linux release 9.0 (Blue Onyx)
- Hostname – jenkins-01.centlinux.com
- IP Address – 192.168.116.131/24
To effectively run and experiment with Jenkins on Rocky Linux 9, setting up a reliable environment is essential. A Mini PC offers a powerful, compact, and energy-efficient option ideal for creating a dedicated Home Lab server where you can safely test and develop your Jenkins pipelines.
[Power Your Projects with the Best Mini PC – Shop Now!]
Alternatively, a VPS from Rose Hosting provides a flexible and scalable cloud-based environment that ensures high availability and remote access for your Jenkins setup.
[Discover the Power of Rose Hosting VPS – Limited Time Offer!]
Both options are excellent for hands-on learning and practical Linux server administration. If you’re interested, check out the recommended Mini PC and Rose Hosting VPS through the affiliate links above to support this blog at no extra cost to you.
Disclaimer: Some of the links in this post are affiliate links. If you decide to purchase through these links, I may earn a small commission at no additional cost to you. This helps support the blog and allows me to continue providing valuable Linux and DevOps content.
Update Linux Operating System
Connect with your Rocky Linux 9 server as root user by means of a ssh client.
Set a meaningful FQDN (Fully Qualified Domain Name) for your Linux machine by executing hostnamectl command.
hostnamectl set-hostname jenkins-01.centlinux.comRebuild cache of your yum package manager.
dnf makecache --refreshExecute following command to update your Rocky Linux operating system.
dnf upgrade -ySometimes, the above command also updates Linux Kernel. In this case, you should reboot your Linux operating system before moving forward.
rebootAfter reboot, verify the Operating system and Kernel versions.
cat /etc/rocky-release
uname -r
Output:
Rocky Linux release 9.0 (Blue Onyx)
5.14.0-70.26.1.el9_0.x86_64
Install OpenJDK on Rocky Linux 9
Jenkins is a Java application, thus it requires Java Virtual Machine (JVM) for execution.
Jenkins 2.3 is current stable version and it requires Java 11.
Luckily, OpenJDK Java 11 is available in standard yum repositories. Therefore, you can easily install it by using dnf command.
dnf install -y java-11-openjdk-devel java-11-openjdkAfter successful installation, verify the version of active Java on your Linux platform.
java --versionOutput:
openjdk 11.0.17 2022-10-18 LTS
OpenJDK Runtime Environment (Red_Hat-11.0.17.0.8-2.el9_0) (build 11.0.17+8-LTS)
OpenJDK 64-Bit Server VM (Red_Hat-11.0.17.0.8-2.el9_0) (build 11.0.17+8-LTS, mixed mode, sharing)
Install Jenkins on Rocky Linux 9
Jenkins can be install in three ways.
- Individual RPM: Individual RPMs are available for every version of Jenkins, but one has to resolve dependencies manually.
- Jenkins yum Repository: A Yum repository is provided for Jenkins packages. Here, dependent packages will be installed automatically.
- Generic Web Archive: This Java web archive requires to be executed either using java command or should be deployed on a Jave EE Server (e.g Apache Tomcat) to work.
We prefer to use Jenkins yum repository, because, it is quite simple to understand and in this method software dependencies will be resolved automatically.
You will need wget command to download Jenkins official yum repository. Therefore, install it now.
dnf install -y wgetBy using wget command, download Jenkins yum repository into /etc/yum.repos.d directory.
wget https://pkg.jenkins.io/redhat-stable/jenkins.repo -O /etc/yum.repos.d/jenkins.repoImport the GPG Key of Jenkins yum repository.
rpm --import https://pkg.jenkins.io/redhat-stable/jenkins.io.keyBuild the yum cache for recently added repositories.
dnf makecacheNow, you can easily install Jenkins by invoking dnf command.
dnf install -y jenkinsConfigure Systemd Service
Enable and start the Jenkins service.
systemctl enable --now jenkins.serviceVerify the status of Jenkins service.
systemctl status jenkins.serviceOutput:
● jenkins.service - Jenkins Continuous Integration Server
     Loaded: loaded (/usr/lib/systemd/system/jenkins.service; enabled; vendor p>
     Active: active (running) since Mon 2022-10-31 11:36:53 CDT; 8s ago
   Main PID: 2260 (java)
      Tasks: 43 (limit: 5736)
     Memory: 338.7M
        CPU: 1min 48.907s
     CGroup: /system.slice/jenkins.service
             └─2260 /usr/bin/java -Djava.awt.headless=true -jar /usr/share/java>

Oct 31 11:36:53 jenkins-01.centlinux.com systemd[1]: Started Jenkins Continuous>
Oct 31 11:36:55 jenkins-01.centlinux.com jenkins[2260]: 2022-10-31 16:36:55.032>
Configure Linux Firewall
Jenkins default service port is 8080/tcp. Therefore, you need to allow this port in Linux Firewall to make you Jenkins server accessible from the network.
Use firewall-cmd command to allow Jenkins service port in Linux firewall.
firewall-cmd --permanent --add-port=8080/tcp
firewall-cmd --reload
Access Jenkins Web Interface
To access Jenkins web interface, open URL http://jenkins-01.centlinux.com:8080 in a web browser.
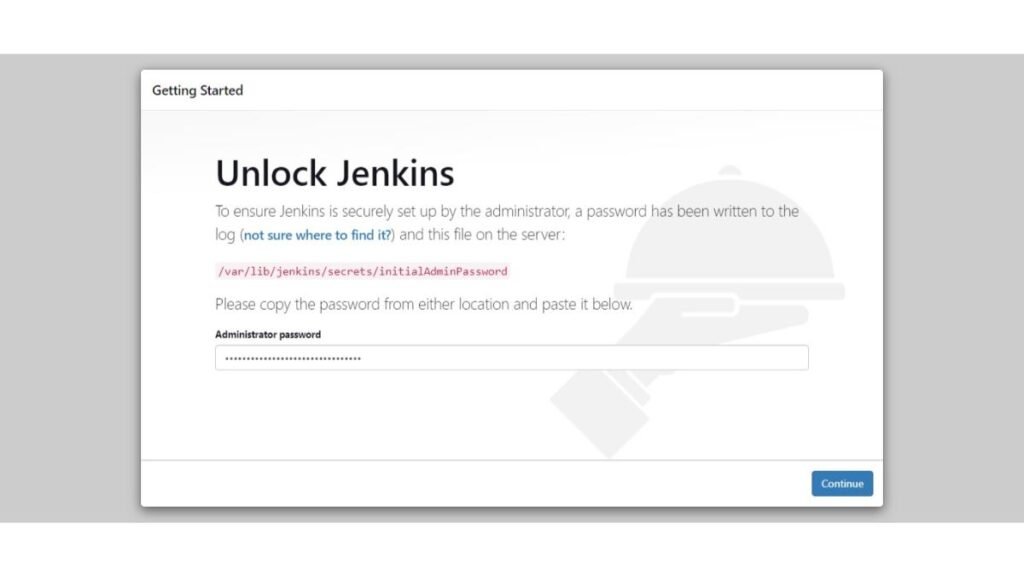
You can obtain the auto-generated password from the file, that was mentioned in above image.
cat /var/lib/jenkins/secrets/initialAdminPasswordEnter the auto-generated password and click on “Continue”.
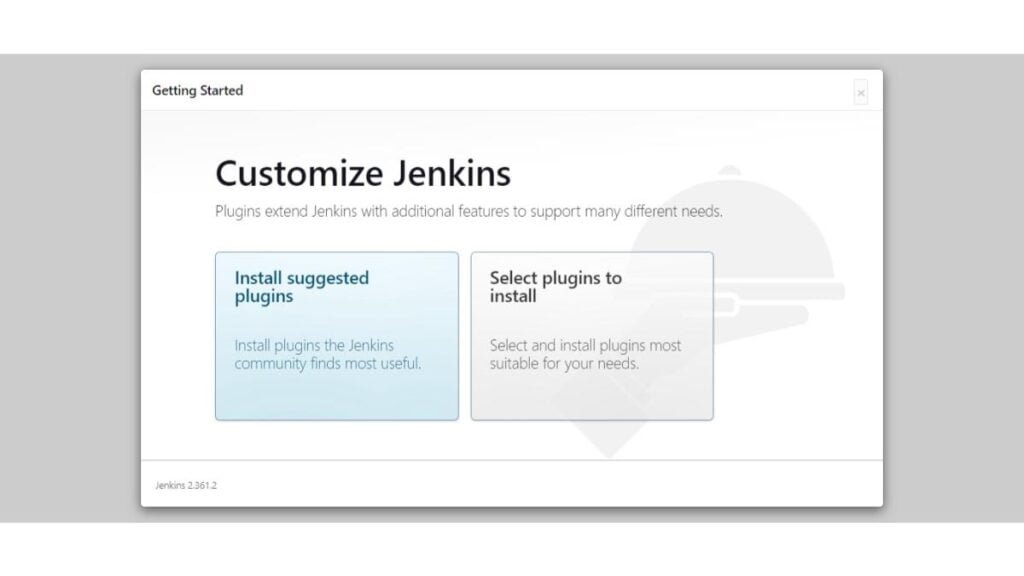
Jenkins setup is now asking for installing Plugins. You can either choose your required plugins or install suggested plugins.
Click on “Install suggested plugins”.
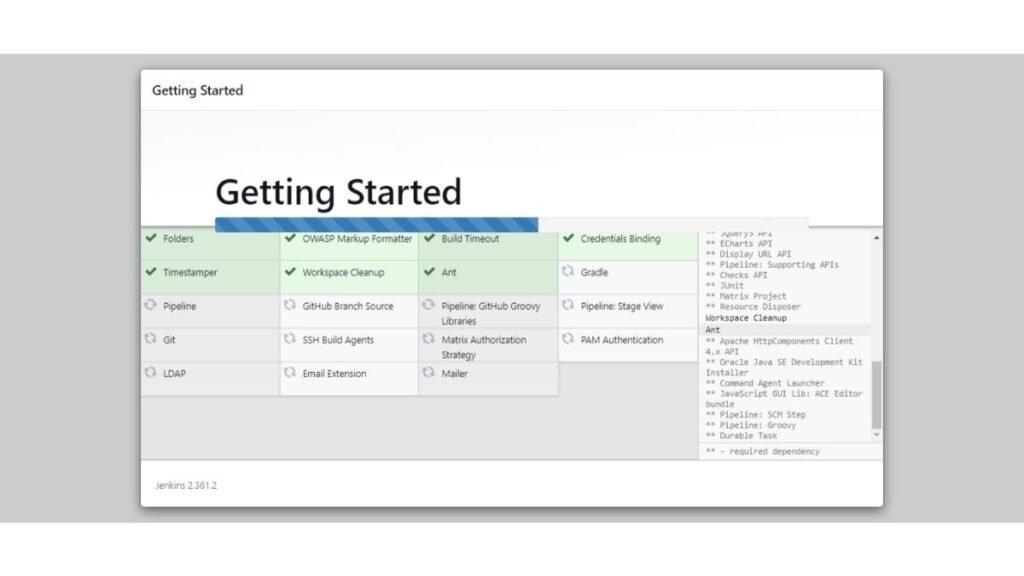
Jenkins setup is now installing commonly used plugins for your CI/CD software.
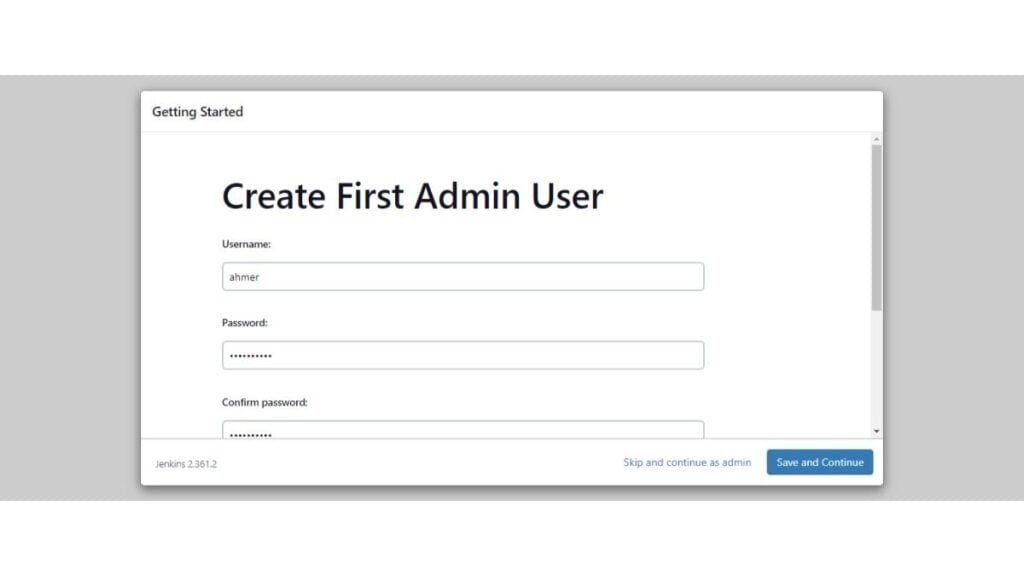
After installing plugins, Jenkins setup is now giving you the option to create an Admin user.
However, you can skip user creation and use the default admin user. But we strongly recommend that, you should create a custom admin user to improve security for your Jenkins web interface.
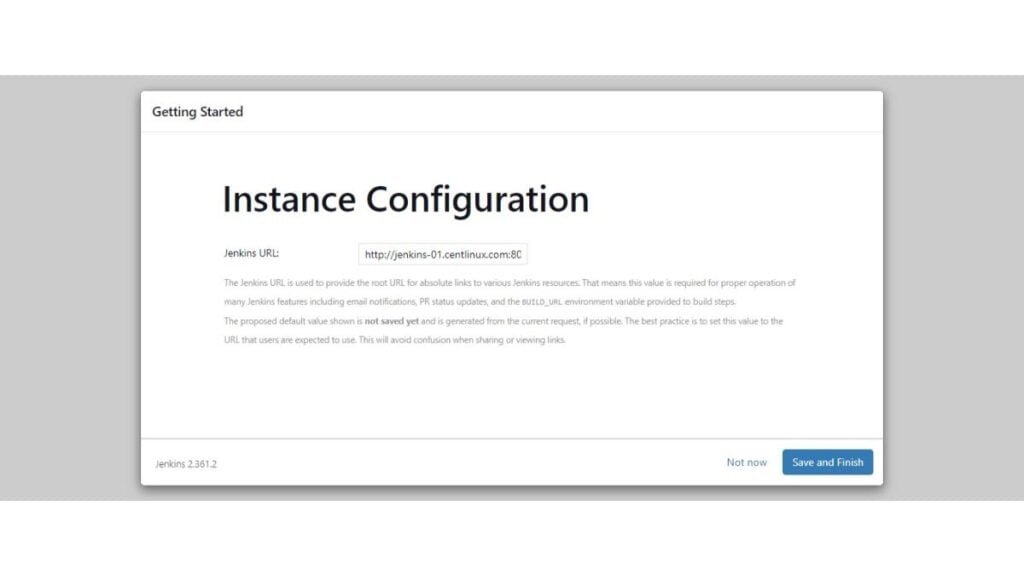
Verify the auto-generated Jenkins URL and click on “Save and Finish”.
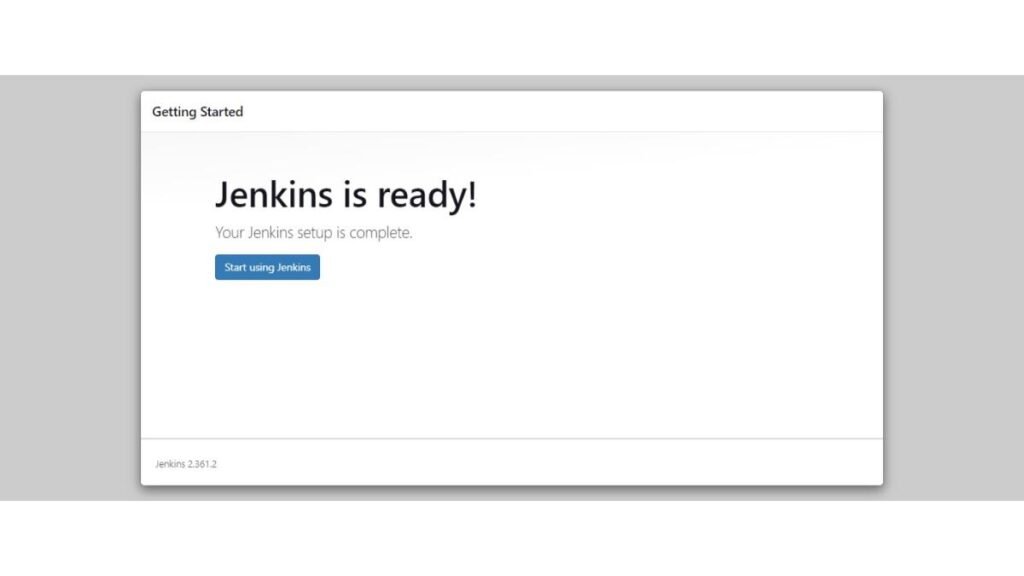
Jenkins setup has been completed. Click on “Start using Jenkins”.
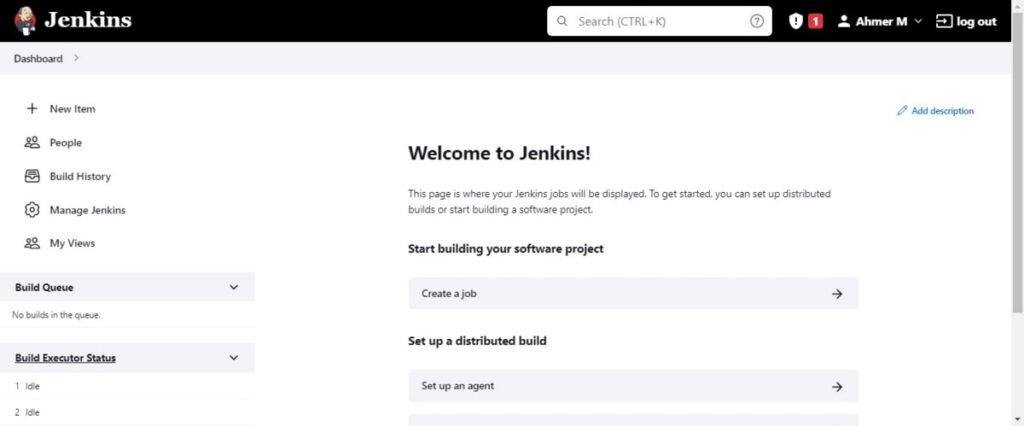
You have reached at the Dashboard of your Jenkins web interface.
Read Also: How to Run GitHub Actions Locally
Video Tutorial
To further assist you with the installation process, we recommend watching our step-by-step video tutorial on “How to Install Jenkins on Linux 9.” The video visually guides you through every stage of the installation, from setting up the required repositories to configuring Jenkins and accessing its web interface. It provides clear explanations and demonstrations, making it easier to follow along, even if you’re new to Jenkins or Linux administration. Watching the tutorial ensures you don’t miss any critical steps and helps clarify complex configurations. Be sure to check it out for a comprehensive understanding!
Frequently Asked Questions (FAQs)
1. How can you secure Jenkins in a production environment?
Use these best practices:
- Enable Role-Based Access Control (RBAC) with plugins like Role Strategy.
- Set up HTTPS for encrypted communication.
- Restrict builds using the Build Token Root plugin.
- Regularly update Jenkins and plugins to patch vulnerabilities.
- Use Credentials Manager to store secrets securely.
2. How do you optimize Jenkins performance for large-scale projects?
Key optimizations include:
- Distributed builds using Agents (workers) to offload jobs.
- Pipeline parallelization to run stages concurrently.
- Resource throttling with plugins like Throttle Concurrent Builds.
- Log rotation and cleanup to save disk space.
- Monitoring with tools like Prometheus + Grafana.
3. What is a Jenkins pipeline?
A Jenkins pipeline is a series of automated steps (defined in a Jenkinsfile) that runs code builds, tests, and deployments in a structured way.
4. How do I create a Jenkins job?
Go to the Jenkins dashboard, click New Item, choose a job type (e.g., Freestyle or Pipeline), configure settings (like Git repo), and save it.
5. How can I trigger a Jenkins job automatically?
You can set up triggers like:
- GitHub Webhooks (on code push)
- Poll SCM (checks repo changes periodically)
- Cron-based scheduling (time-based triggers)
Final Thoughts
Congratulations on successfully installing Jenkins on Rocky Linux 9! With Jenkins set up, you’re now equipped to streamline your continuous integration and continuous delivery (CI/CD) pipelines. This powerful automation server will enhance your development workflow, enabling you to build, test, and deploy applications more efficiently. Embrace the capabilities of Jenkins to boost your productivity and achieve smoother, more reliable software delivery. Happy automating!
Alternatively, you can also download our YAML script to automate installation and configuration of Jenkins Server using Ansible from CentLinux GitHub Repository.
What’s Next
If you’re serious about mastering CI/CD pipelines and advancing your DevOps career, “Jenkins, From Zero To Hero: Become a DevOps Jenkins Master” by Ricardo Andre is a course you don’t want to miss. It takes you step-by-step from the fundamentals of Jenkins to advanced automation techniques, giving you hands-on skills to stand out in today’s competitive IT market. Investing in this course could be the game-changer that helps you land better roles or streamline your automation workflows. Enroll today through this link and start your journey toward becoming a Jenkins expert.
Disclaimer: This post may contain affiliate links. If you purchase through these links, I may earn a small commission at no extra cost to you.


Leave a Reply
You must be logged in to post a comment.