Learn how to install Lilac Configurator for Nagios Core on CentOS 7 with our step-by-step guide. Simplify and enhance your Nagios monitoring setup with this user-friendly configuration tool. #centlinux #linux
Table of Contents
What is Lilac Configurator?
Lilac Configurator is a tool used for configuring Lilac, which is a web-based configuration manager for Nagios. Nagios is an open-source monitoring system that enables organizations to monitor and manage their IT infrastructure, ensuring systems, applications, services, and business processes are functioning properly. Lilac Configurator simplifies the configuration and management of Nagios by providing a graphical user interface.
Key features of Lilac Configurator include:
- Graphical Interface: Provides a web-based GUI for managing Nagios configurations, making it easier for users who prefer not to work directly with configuration files.
- Centralized Management: Allows for centralized management of Nagios configurations, enabling administrators to handle multiple configurations from a single interface.
- Ease of Use: Simplifies the process of adding, removing, and modifying hosts, services, and other configuration elements in Nagios.
- Template-Based Configuration: Supports the use of templates, which can streamline the configuration process and ensure consistency across different elements.
- Real-Time Monitoring: Integrates with Nagios to provide real-time monitoring and management capabilities.
- Customization and Extensibility: Offers options for customization and can be extended to meet specific monitoring needs.
Overall, Lilac Configurator enhances the usability of Nagios by providing a more user-friendly approach to configuration and management, making it accessible to a broader range of users, including those who may not be as comfortable with manual configuration file edits.
Nagios is an Industry Standard Server Monitoring Solution. It is very simple, lightweight and easy to configure. Its configurations are defined in plain text files by an Administrator (according to his Infrastructure) for each Host, Service, Command, Contact, etc. These configurations are not a big deal unless we are monitoring a large Infrastructure, where we have to frequently update definitions of devices, add new hosts, replace a faulty switch, etc. The task of maintaining configurations can be a nightmare, if we are not properly planned to organize our Nagios configurations.
Fortunately, there are some web-based configurators such as Fruity, Lilac Reloaded, NConf, etc. are available, that can ease the task of Nagios configuration management.

Nagios Server Specification
In this post, we will install Lilac Configurator on our Nagios Core Server over CentOS 7. Lilac Reloaded uses MySQL as its database backend, and it is written in PHP.
A working instance of Nagios monitoring Server on CentOS 7.
- Hostname – nagios03.example.com
- IP Address – 192.168.229.134/24
- Nagios Version – Nagios Core 4.4
If you’re serious about mastering IT infrastructure monitoring, the Zabbix Application and Network Monitoring by Sean Bradley course is a must-have resource. This practical training walks you through real-world scenarios to monitor servers, applications, and networks with confidence, making it ideal for system administrators, DevOps engineers, and IT professionals aiming to level up their skills. By enrolling, you’ll gain hands-on knowledge that can save countless hours in troubleshooting and system management. [Click here to check out the course]
Disclaimer: This link is an affiliate link, which means I may earn a small commission at no extra cost to you if you decide to purchase through it. This helps support my blog and allows me to continue creating useful content.
Read Also: How to install Nagios Core on CentOS 7
Install Lilac Configurator for Nagios Core
Login to Nagios Monitoring Server using Putty and install MySQL Database Server.
yum install –y mariadb-serverStart and enable mariadb service.
systemctl start mariadb.service
systemctl enable mariadb.service
Configure MySQL Server.
/usr/bin/mysql_secure_installationOutput:
NOTE: RUNNING ALL PARTS OF THIS SCRIPT IS RECOMMENDED FOR ALL MySQL
      SERVERS IN PRODUCTION USE!  PLEASE READ EACH STEP CAREFULLY!

In order to log into MySQL to secure it, we'll need the current
password for the root user.  If you've just installed MySQL, and
you haven't set the root password yet, the password will be blank,
so you should just press enter here.

Enter current password for root (enter for none):
OK, successfully used password, moving on...

Setting the root password ensures that nobody can log into the MySQL
root user without the proper authorisation.

Set root password? [Y/n] Y
New password:
Re-enter new password:
Password updated successfully!
Reloading privilege tables..
 ... Success!

By default, a MySQL installation has an anonymous user, allowing anyone
to log into MySQL without having to have a user account created for
them.  This is intended only for testing, and to make the installation
go a bit smoother.  You should remove them before moving into a
production environment.

Remove anonymous users? [Y/n] Y
 ... Success!

Normally, root should only be allowed to connect from 'localhost'.  This
ensures that someone cannot guess at the root password from the network.

Disallow root login remotely? [Y/n] Y
 ... Success!

By default, MySQL comes with a database named 'test' that anyone can
access.  This is also intended only for testing, and should be removed
before moving into a production environment.

Remove test database and access to it? [Y/n] Y
 - Dropping test database...
 ... Success!
 - Removing privileges on test database...
 ... Success!

Reloading the privilege tables will ensure that all changes made so far
will take effect immediately.

Reload privilege tables now? [Y/n] Y
 ... Success!

Cleaning up...

All done!  If you've completed all of the above steps, your MySQL
installation should now be secure.

Thanks for using MySQL!
Login to mysql database server.
mysql –u root -pCreate database and user for Lilac Reloaded.
create database lilac;
create user 'lilac'@'localhost' identified by 'lilac';
grant all on lilac.* to 'lilac'@'localhost';
flush privileges;
exit
Verify PHP version.
php -vOutput:
PHP 5.3.3 (cli) (built: Aug 11 2016 20:33:53)
Copyright (c) 1997-2010 The PHP Group
Zend Engine v2.3.0, Copyright (c) 1998-2010 Zend Technologies
Lilac Reloaded required PHP 5.5, therefore, to update PHP, I add the Webtatic yum repository to acquire PHP 5.5 packages.
rpm -Uvh https://mirror.webtatic.com/yum/el6/latest.rpmOutput:
Retrieving https://mirror.webtatic.com/yum/el6/latest.rpm
warning: /var/tmp/rpm-tmp.NZFWFl: Header V4 DSA/SHA1 Signature, key ID cf4c4ff9: NOKEY
Preparing...                ########################################### [100%]
   1:webtatic-release       ########################################### [100%]
Upgrade to PHP 5.5.
yum search php55
yum remove php php-common
yum install php55w php55w-pear php55w-pdo php55w-mysql
service httpd restart
Check PHP version Again.
php -vOutput:
PHP 5.5.38 (cli) (built: Jul 21 2016 12:51:12)
Copyright (c) 1997-2015 The PHP Group
Zend Engine v2.5.0, Copyright (c) 1998-2015 Zend Technologies
LG 27-Inch StanbyME 2 with Folio Cover, Portable Touch Screen, Dolby Vision, HDR10, Filmmaker Mode, Built-in Battery, Full Swivel Rotation (27LX6TYGA, 2025)
7% OffLilac required nmap for auto discovery of Network devices, therefore install it.
yum install nmapDownload Lilac Reloaded from https://sourceforge.net/projects/lilac–reloaded/
cd /soft
wget https://sourceforge.net/projects/lilac--reloaded/files/latest/download
tar xvf download
Move the lilac-reloaded directory to /var/www/html and change ownership of directory.
mv lilac-reloaded/ /var/www/html/
chown -R apache.apache /var/www/html/lilac-reloaded/
Like Nagios, Lilac Reloaded also don’t have any User Authentication Method of its own, so enable Basic HTTP Authentication, and use the same htpassword file, that we used with our Nagios Server.
cat  >> /etc/httpd/conf.d/lilac.conf << EOF
 <directory "/var/www/html/lilac-reloaded">
 AuthType Basic
 AuthName "Restricted Content"
 AuthUserFile /usr/local/nagios/etc/htpasswd.users
 Require valid-user
 </directory>
EOF

systemctl restart httpd.service
Browse to http://nagios03.example.com/lilac-reloaded/
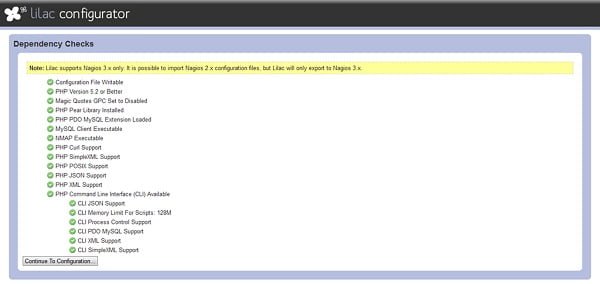
If this page show any dependency error, pls resolve it and click on Continue to Configuration….
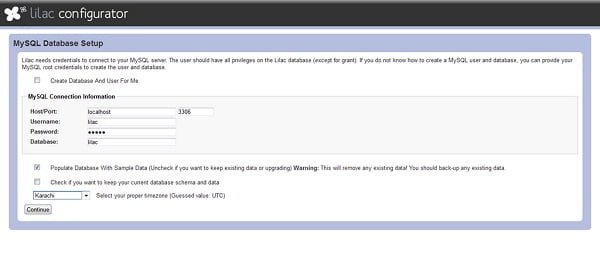
Define database and access credentials and click on Continue.
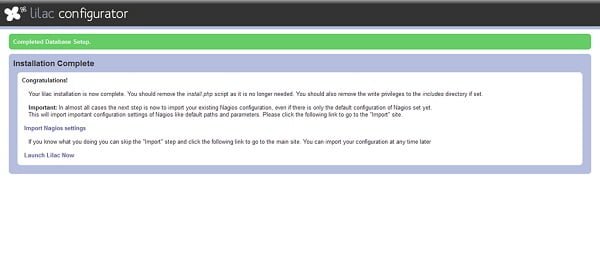
Click on Import Nagios Settings to import the configurations in lilac database.
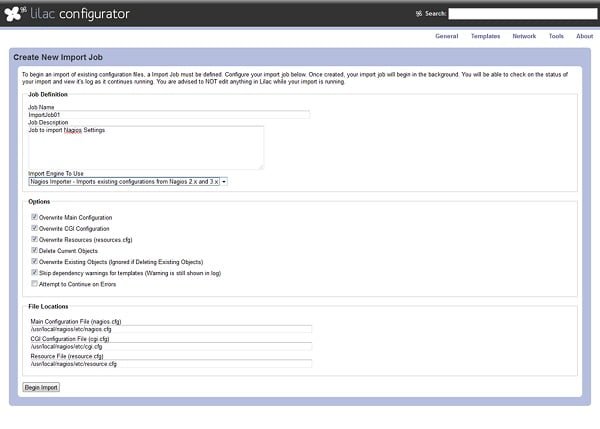
Create an import job and click on Begin Import.
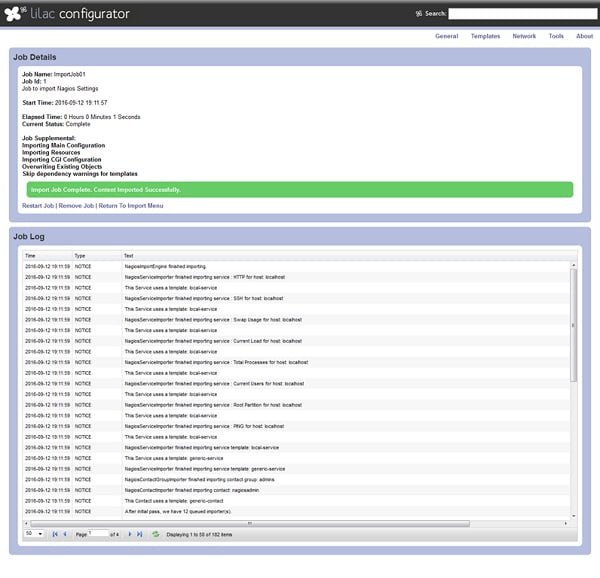
Nagios configurations have been imported.
Lilac Configurator for Nagios Core on CentOS 7 is installed and ready for use now.
Zen Brush
$2.99 (as of October 27, 2025 20:20 GMT +00:00 – More infoProduct prices and availability are accurate as of the date/time indicated and are subject to change. Any price and availability information displayed on [relevant Amazon Site(s), as applicable] at the time of purchase will apply to the purchase of this product.)Final Thoughts
Installing Lilac Configurator for Nagios Core on CentOS 7 can greatly simplify and enhance your Nagios monitoring setup, offering a user-friendly interface for managing configurations. This guide provides the steps you need to get started, making it easier to manage your IT infrastructure efficiently.
Struggling with AWS or Linux server issues? I specialize in configuration, troubleshooting, and security to keep your systems performing at their best. Check out my Freelancer profile for details.


Leave a Reply
Please log in to post a comment.