Learn how to install Linux over PXE server with this comprehensive guide. Follow step-by-step instructions for setting up and deploying Linux across your network efficiently and effortlessly. #centlinux #linux #pxe
Table of Contents
Problem Statement
In our previous posts, we have configured a PXE boot server for automated installation of RHEL 7.5 operating system that supports both BIOS and UEFI based clients. Now, we will add RHEL 6 installation option in our PXE boot server. We will also create a Kickstart file for automated installation of RHEL 6 operating system, and ensure that it will support both BIOS and UEFI based clients.
In this article, we are performing everything from CLI, therefore, it is highly recommended that, you should have Linux Pocket Guide: Essential Commands (PAID LINK) for quick reference.
Linux Server Specification
We use the same Linux server that we have configured as PXE Boot Server in our previous article. These specifications have been re-mentioned below for convenience of the readers.
- CPU – 2 Core (2.4 Mhz)
- Memory – 2 GB
- Storage – 50 GB
- Operating System – RHEL 7.5
- Hostname – pxe-server.itlab.com
- IP Address – 192.168.116.41/24
Read Also: How to install Ubuntu from PXE Server
Share Linux ISO via FTP Server
Connect to pxe-server.itlab.com using ssh.
Attach RHEL 6 ISO/DVD and mount it at /mnt/iso (you can use any mountpoint, according to your choice).
# mount -t iso9660 /dev/cdrom /mnt/iso
mount: /dev/sr0 is write-protected, mounting read-only
Copy contents of /mnt/iso directory to FTP server.
# cp -rf /mnt/iso /var/ftp/pub/rhel6
Create a Kickstart File for Automated Installation
We have to write a Kickstart file for RHEL 6 within the /var/ftp/pub/rhel6 directory, so it can be accessed by PXE clients via FTP service.
# vi /var/ftp/pub/rhel6/rhel6.cfg
A sample kickstart file is given below, you can modify it according to your requirements.
Read Also: Automate PXE Client Installations with Kickstart
#platform=x86, AMD64, or Intel EM64T
#version=DEVEL
# Install OS instead of upgrade
install
# Keyboard layouts
keyboard 'us'
# Root password
rootpw --iscrypted $1$vyNMLtgd$VmtByshddZSBK..uuFhoH0
# Use network installation
url --url="ftp://192.168.116.41/pub/rhel6"
# System language
lang en_US
# System authorization information
auth  --useshadow  --passalgo=sha512
# Use graphical install
graphical
firstboot --disable
# SELinux configuration
selinux --enforcing
# Firewall configuration
firewall --enabled --ssh
# Network information
network  --bootproto=dhcp --device=eth0
# Reboot after installation
reboot
# System timezone
timezone Asia/Karachi
# System bootloader configuration
bootloader --location=mbr
autopart
# Partition clearing information
clearpart --none --initlabel
# Packages to be installed
%packages
@core
%end
Copy boot images to tftpboot directory
We need to copy initrd.img and vmlinuz files from RHEL 6 ISO to /var/lib/tftpboot/networkboot/rhel6 directory. These files will be later referenced in the menu entry of PXE boot menu.
# mkdir /var/lib/tftpboot/networkboot/rhel6
# cp /var/ftp/pub/rhel6/images/pxeboot/vmlinuz /var/lib/tftpboot/networkboot/rhel6/
# cp /var/ftp/pub/rhel6/images/pxeboot/initrd.img /var/lib/tftpboot/networkboot/rhel6/
Create Linux Entry in PXE Menu
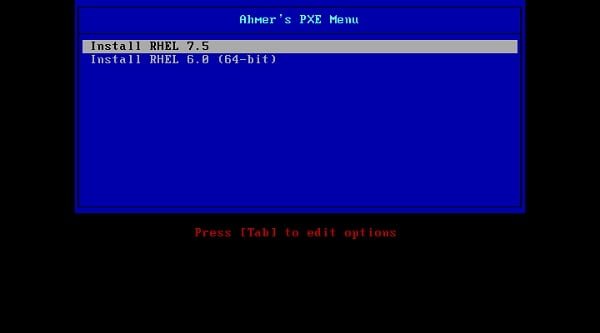
Edit PXE boot menu for BIOS based clients.
# vi /var/lib/tftpboot/pxelinux.cfg/default
add a menu entry for RHEL 6 installation therein.
default menu.c32
prompt 0
timeout 30
menu title Ahmer's PXE Menu
label Install RHEL 7.5
kernel /networkboot/rhel7/vmlinuz
append initrd=/networkboot/rhel7/initrd.img inst.repo=ftp://192.168.116.41/pub/rhel7 ks=ftp://192.168.116.41/pub/rhel7/rhel7.cfg
label Install RHEL 6.0 (64-bit)
kernel /networkboot/rhel6/vmlinuz
append initrd=/networkboot/rhel6/initrd.img inst.repo=ftp://192.168.116.41/pub/rhel6 ks=ftp://192.168.116.41/pub/rhel6/rhel6.cfg
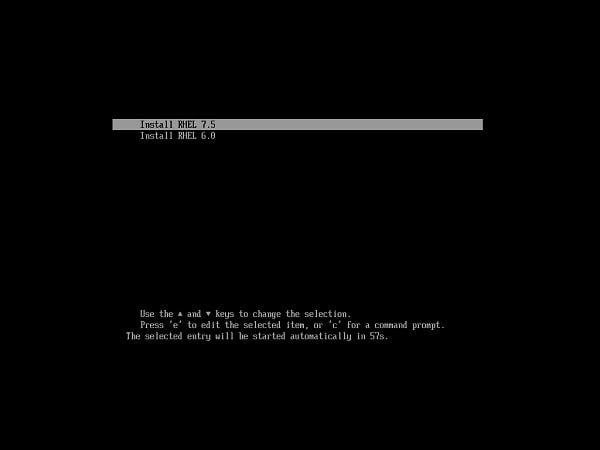
Edit PXE boot menu for UEFI based clients.
# vi /var/lib/tftpboot/grub.cfg
add a menu entry for RHEL 6 installation therein.
set timeout=60

menuentry 'Install RHEL 7.5' {
        linuxefi /networkboot/rhel7/vmlinuz inst.repo=ftp://192.168.116.41/pub/rhel7/ inst.ks=ftp://192.168.116.41/pub/rhel7/rhel7.cfg
        initrdefi /networkboot/rhel7/initrd.img
}

menuentry 'Install RHEL 6.0' {
        linuxefi /networkboot/rhel6/vmlinuz inst.repo=ftp://192.168.116.41/pub/rhel6/ inst.ks=ftp://192.168.116.41/pub/rhel6/rhel6.cfg
        initrdefi /networkboot/rhel6/initrd.img
}
Now, connect a BIOS based PXE client to network and boot it. It will display the following PXE boot menu.

Similarly, connect a UEFI based PXE client to network and boot it. It will display the following PXE boot menu.

We have successfully added the RHEL 6 installation option to our PXE boot server. You can add other versions of RHEL or CentOS in similar manner.
Recommended Online Training: Learn Bash Shell in Linux for Beginners

Final Thoughts: Install Linux over PXE Server
If you found this guide on installing Linux over a PXE server helpful and need further assistance, I’m here to help. I offer professional services to ensure your PXE server setup and Linux deployment are smooth and efficient. Visit my Fiverr profile for more details and to get started: Senior Linux Administrator. Let’s make your installation process seamless and hassle-free!

Hi Ahmer Thanks for supporting article.
My BIOS Boot works perfectly fine but I am unable to boot it from UEFI.. It throws error message EFI Network boot unsuccessful. (tried to fix but issue is not at VM end) I think some needful need at config end required. Much appreciate if you also address this thanks.
Please discuss it with me on our Facebook page.