Learn how to remove old kernels in Rocky Linux 9 with our step-by-step guide. Free up disk space, streamline system performance, and enhance security by safely removing outdated kernel versions from your Linux system. #centlinux #linux #linuxkernel
Table of Contents
What is a Linux Kernel?
Linux kernel is a free and open-source, monolithic, modular, multitasking, Unix-like operating system kernel. It was originally authored in 1991 by Linus Torvalds for his i386-based PC, and it was soon adopted as the kernel for the GNU operating system, which was written to be a free (libre) replacement for Unix.
Since the late 1990s, it has been included as part of a large number of operating system distributions, many of which are commonly also called Linux.
Linux is provided under the GNU General Public License version 2 only, but it contains files under other compatible licenses.
Linux is deployed on a wide variety of computing systems, such as embedded devices, mobile devices (including its use in the Android operating system), personal computers, servers, mainframes, and supercomputers. It can be tailored for specific architectures and for several usage scenarios using a family of simple commands (that is, without the need of manually editing its source code before compilation); privileged users can also fine-tune kernel parameters at runtime.
Most of the Linux kernel code is written using the GNU extensions of GCC to the standard C programming language and with the use of architecture-specific instructions (ISA) in limited parts of the kernel. This produces a highly optimized executable (vmlinux) with respect to utilization of memory space and task execution times. (Source: Wikipedia)

Why Remove Old Kernels in Linux?
Removing old Linux kernels can help in maintaining a clean and efficient system. Here are some reasons why removing old kernels might be beneficial:
- Disk Space: Each kernel installation occupies disk space. Over time, multiple kernel installations can accumulate and consume a significant amount of disk space. Removing old kernels frees up valuable disk space for other purposes.
- System Performance: The bootloader menu, such as GRUB, can become cluttered with numerous kernel options. This can increase the time it takes for the system to boot as it scans through the available kernels. Removing old kernels streamlines the bootloader menu and improves boot times.
- Security: Older kernels may contain vulnerabilities that have been patched in newer versions. By removing old kernels and keeping the system up-to-date with the latest kernel releases, you ensure that security patches are applied promptly, reducing the risk of exploitation.
- Maintenance: Managing multiple kernel versions can complicate system maintenance and troubleshooting. Removing old kernels simplifies system management and reduces the likelihood of conflicts or compatibility issues between different kernel versions.
- Backup and Restore: When performing system backups or snapshots, old kernel files are often included, increasing backup sizes and restore times. Removing old kernels reduces the backup size and makes backup and restore processes more efficient.
Overall, removing old Linux kernels helps optimize disk space usage, improve system performance, enhance security, simplify maintenance, and streamline backup and restore processes. It is recommended to periodically review and remove old kernels to keep the system clean and efficient.
Recommended Training: Linux Administration: The Complete Linux Bootcamp in 2025 from Andrei Dumitrescu, Crystal Mind Academy

Problem Definition:
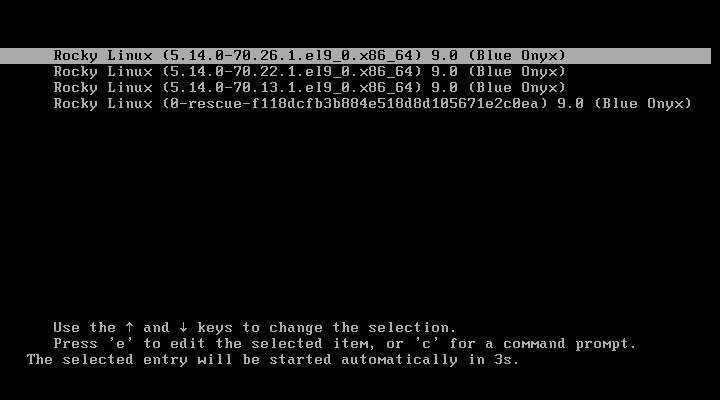
It is a very common practice to update Linux operating systems, periodically and especially at the time of installing a new software. On each installation of new Linux Kernel, the Yum keeps your previous Kernels intact and may keep maximum last 3 Kernels at a time. It is the default limit and you can customize it according to your requirement.
A typical GRUB menu with mutiple Linux Kernels may look like the following.

Continue reading this article to get rid of old Linux kernels and keep your GRUB boot menu tidy.
Environment Specification
We are using a minimal Rocky Linux 9 virtual machine with following specifications.
- CPU – 3.4 Ghz (2 cores)
- Memory – 2 GB
- Storage – 20 GB
- Operating System – Rocky Linux release 9.0 (Blue Onyx)
- Hostname – rocky-09.centlinux.com
- IP Address – 192.168.116.130/24
havit HV-F2056 15.6″-17″ Laptop Cooler Cooling Pad – Slim Portable USB Powered (3 Fans), Black/Blue
$27.99 (as of July 7, 2025 20:55 GMT +00:00 – More infoProduct prices and availability are accurate as of the date/time indicated and are subject to change. Any price and availability information displayed on [relevant Amazon Site(s), as applicable] at the time of purchase will apply to the purchase of this product.)Check installed Linux Kernels
To begin managing your Linux kernels, connect to your Rocky Linux 9 server as the root user. You can use any preferred SSH client, such as PuTTY, MobaXterm, or the native SSH command from a terminal. Logging in as the root user ensures you have the necessary privileges to perform kernel management tasks.
Once logged in, you can use the rpm command to list all the kernels currently installed on your Linux system. The rpm tool is a package manager used in Red Hat-based distributions, including Rocky Linux, to query, install, and manage software packages. To list the installed kernel versions, execute the following command:
rpm -q kernelOutput:
kernel-5.14.0-70.13.1.el9_0.x86_64
kernel-5.14.0-70.22.1.el9_0.x86_64
kernel-5.14.0-70.26.1.el9_0.x86_64
This command will display a list of all installed kernel packages on your system, including their version numbers. Usually the latest Linux Kernel should be active on your operating system. Unless someone has explicitly set an older version as default Linux kernel.
You can confirm it by executing following commands.
uname -r
grubby --default-kernel
Output:
5.14.0-70.26.1.el9_0.x86_64
/boot/vmlinuz-5.14.0-70.26.1.el9_0.x86_64
If the above command returns a kernel other than the latest one, then you have to set the default kernel for GRUB.
Set Default Linux Kernel
To view the Linux kernels currently available on your system, you can check the contents of the /boot directory. This directory contains important files related to the Linux kernel, including the kernel images and initramfs files, which are essential for booting your operating system. By listing the files in the /boot directory, you can identify the kernels installed on your system and their respective versions. Use the following command to display the contents of the /boot directory:
ls /boot/vm*Output:
/boot/vmlinuz-0-rescue-f118dcfb3b884e518d8d105671e2c0ea
/boot/vmlinuz-5.14.0-70.13.1.el9_0.x86_64
/boot/vmlinuz-5.14.0-70.22.1.el9_0.x86_64
/boot/vmlinuz-5.14.0-70.26.1.el9_0.x86_64
This command will output a list of kernel images (e.g., vmlinuz-*), initramfs files, and other boot-related files. Reviewing this list is a crucial step before removing older kernels, as it helps ensure that you only delete outdated versions while retaining the one currently in use.
Execute the following command to set a default kernel for GRUB.
grubby --set-default /boot/vmlinuz-5.14.0-70.26.1.el9_0.x86_64Output:
The default is /boot/loader/entries/f118dcfb3b884e518d8d105671e2c0ea-5.14.0-70.26.1.el9_0.x86_64.conf with index 0 and kernel /boot/vmlinuz-5.14.0-70.26.1.el9_0.x86_64
Ansible Essentials: A Practical Introduction to IT Automation
$19.99 (as of July 7, 2025 20:49 GMT +00:00 – More infoProduct prices and availability are accurate as of the date/time indicated and are subject to change. Any price and availability information displayed on [relevant Amazon Site(s), as applicable] at the time of purchase will apply to the purchase of this product.)Delete Old Linux Kernels
By default, Yum Package Manager installs Linux kernels separately, while keeping the old versions intact for fallback support.
This behavior can be controlled by two Yum Package Manager directives.
- installonlypkgs – Space separated list of packages who will never update by package manager.
- installonly_limit – Maximum number of versions that can be installed simultaneously for any single package listed in the installonlypkgs directive.
Check the current value of installonly_limit directive.
grep limit /etc/dnf/dnf.confOutput:
installonly_limit=3
Execute following dnf command at Linux Bash prompt to remove the old versions of Linux kernels.
dnf -y remove --oldinstallonly --setopt installonly_limit=2 kernelOutput:
Dependencies resolved.
================================================================================
 Package             Arch        Version                    Repository     Size
================================================================================
Removing:
 kernel              x86_64      5.14.0-70.13.1.el9_0       @minimal        0
 kernel              x86_64      5.14.0-70.22.1.el9_0       @baseos         0
 kernel-core         x86_64      5.14.0-70.13.1.el9_0       @minimal       73 M
 kernel-core         x86_64      5.14.0-70.22.1.el9_0       @baseos        73 M
 kernel-modules      x86_64      5.14.0-70.13.1.el9_0       @minimal       20 M
 kernel-modules      x86_64      5.14.0-70.22.1.el9_0       @baseos        20 M

Transaction Summary
================================================================================
Remove  6 Packages

Freed space: 185 M
Running transaction check
Transaction check succeeded.
Running transaction test
Transaction test succeeded.
Running transaction
  Preparing        :                                                        1/1
  Erasing          : kernel-5.14.0-70.22.1.el9_0.x86_64                     1/6
  Running scriptlet: kernel-5.14.0-70.22.1.el9_0.x86_64                     1/6
  Erasing          : kernel-5.14.0-70.13.1.el9_0.x86_64                     2/6
  Running scriptlet: kernel-5.14.0-70.13.1.el9_0.x86_64                     2/6
  Erasing          : kernel-modules-5.14.0-70.13.1.el9_0.x86_64             3/6
  Running scriptlet: kernel-modules-5.14.0-70.13.1.el9_0.x86_64             3/6
  Erasing          : kernel-modules-5.14.0-70.22.1.el9_0.x86_64             4/6
  Running scriptlet: kernel-modules-5.14.0-70.22.1.el9_0.x86_64             4/6
  Running scriptlet: kernel-core-5.14.0-70.22.1.el9_0.x86_64                5/6
  Erasing          : kernel-core-5.14.0-70.22.1.el9_0.x86_64                5/6
  Running scriptlet: kernel-core-5.14.0-70.22.1.el9_0.x86_64                5/6
  Running scriptlet: kernel-core-5.14.0-70.13.1.el9_0.x86_64                6/6
  Erasing          : kernel-core-5.14.0-70.13.1.el9_0.x86_64                6/6
  Running scriptlet: kernel-core-5.14.0-70.13.1.el9_0.x86_64                6/6
  Verifying        : kernel-5.14.0-70.13.1.el9_0.x86_64                     1/6
  Verifying        : kernel-5.14.0-70.22.1.el9_0.x86_64                     2/6
  Verifying        : kernel-core-5.14.0-70.13.1.el9_0.x86_64                3/6
  Verifying        : kernel-core-5.14.0-70.22.1.el9_0.x86_64                4/6
  Verifying        : kernel-modules-5.14.0-70.13.1.el9_0.x86_64             5/6
  Verifying        : kernel-modules-5.14.0-70.22.1.el9_0.x86_64             6/6

Removed:
  kernel-5.14.0-70.13.1.el9_0.x86_64
  kernel-5.14.0-70.22.1.el9_0.x86_64
  kernel-core-5.14.0-70.13.1.el9_0.x86_64
  kernel-core-5.14.0-70.22.1.el9_0.x86_64
  kernel-modules-5.14.0-70.13.1.el9_0.x86_64
  kernel-modules-5.14.0-70.22.1.el9_0.x86_64

Complete!
You may notice that, instead of altering the installonly_limit directive value in dnf.conf file, we are setting it at the runtime for current dnf command only.
Reboot your Linux operating system now.
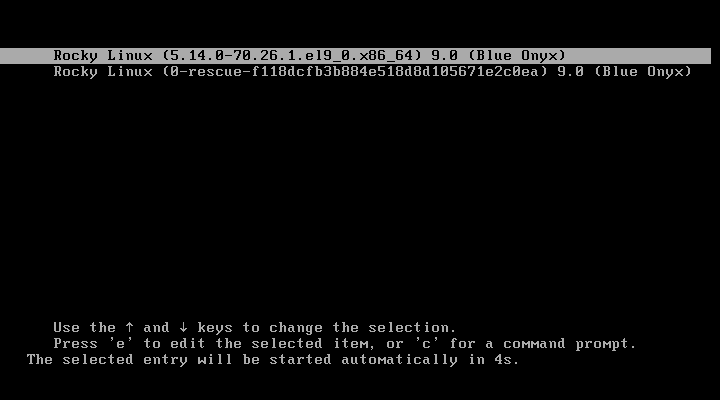
rebootCheck the GRUB boot menu, The old kernels has been removed from the list.

Video Tutorial: How to Remove Old Linux Kernels
If you’re looking for a step-by-step visual guide, check out our video tutorial on “How to Remove Old Kernels in Rocky Linux 9.” The tutorial walks you through the entire process, from checking your current kernel version to identifying and safely removing old kernels. It provides clear, easy-to-follow instructions, making it an excellent resource for both beginners and experienced Linux users. Watching the video will help you confidently clean up your system while avoiding any potential pitfalls.
Final Thoughts
Removing old kernels in Rocky Linux 9 is a crucial step in maintaining a clean and efficient system. By regularly cleaning up unused kernel versions, you free up disk space, reduce clutter, and prevent potential boot loader issues caused by excessive kernel entries. The process involves checking your current kernel version, identifying installed kernels, and safely removing outdated ones using the dnf package manager.
Always ensure you retain at least one older kernel as a fallback in case of issues with the current one. With these steps, you can streamline your system’s performance while keeping it optimized for future updates and operations. Regular maintenance like this ensures a stable and trouble-free Linux environment.
Struggling with AWS or Linux server issues? I specialize in configuration, troubleshooting, and security to keep your systems performing at their best. Check out my Fiverr profile for details.


Leave a Reply
You must be logged in to post a comment.