Learn about Zabbix installation on Ubuntu 20.04 Server with this detailed step-by-step guide. Ensure smooth installation and configuration of this powerful server monitoring tool for your infrastructure. #centlinux #linux #zabbix
Table of Contents
What is Server Monitoring Software?
Server monitoring software is a type of tool or application designed to monitor the performance, health, and availability of servers and IT infrastructure components. These software solutions continuously collect data from servers, network devices, databases, applications, and other system resources to provide insights into their operation and performance. Key features and functionalities of server monitoring software include:
- Real-time Monitoring: Constantly monitors server performance metrics such as CPU usage, memory usage, disk space, network traffic, and system uptime in real-time.
- Alerting and Notification: Alerts administrators or IT staff about any potential issues or anomalies detected on servers through email, SMS, or other communication channels.
- Historical Data Analysis: Collects and stores historical performance data, allowing administrators to analyze trends, identify patterns, and forecast future resource needs.
- Dashboards and Reporting: Provides intuitive dashboards and customizable reports to visualize server performance metrics and monitor the overall health of the IT infrastructure.
- Resource Utilization Tracking: Tracks resource utilization trends over time to optimize server resource allocation, capacity planning, and infrastructure scaling.
- Configuration Management: Manages server configurations and ensures compliance with predefined standards and policies to maintain security and stability.
- Automated Remediation: Offers automated remediation actions to address common server issues and minimize downtime, such as restarting services or reallocating resources.
- Integration with ITSM Tools: Integrates with IT service management (ITSM) tools and ticketing systems to streamline incident management and resolution processes.
- Scalability and Flexibility: Scales to support large, distributed server environments and adapts to different types of servers, operating systems, and network architectures.
- Security and Compliance: Ensures data security and compliance with regulatory requirements by monitoring server access, user activities, and security configurations.
Server monitoring software plays a crucial role in maintaining the reliability, performance, and security of IT infrastructure, enabling organizations to proactively identify and resolve issues before they impact business operations.

What is Zabbix Server?
Zabbix Server is a powerful open-source server monitoring solution designed to monitor the performance, health, and availability of IT infrastructure components in real-time. It serves as the central component of the Zabbix monitoring platform, coordinating the collection, processing, and analysis of monitoring data from various sources. Key features and functionalities of Zabbix Server include:
- Data Collection: Collects monitoring data from servers, network devices, virtual machines, databases, applications, and other IT resources using various monitoring methods such as SNMP, ICMP, JMX, and agent-based checks.
- Flexible Monitoring: Supports a wide range of monitoring scenarios, including server performance metrics (CPU, memory, disk, network), application monitoring, log file monitoring, and custom data collection.
- Alerting and Notification: Generates alerts and notifications based on predefined triggers and thresholds, alerting administrators or IT staff about potential issues or anomalies via email, SMS, or other communication channels.
- Real-time Monitoring: Provides real-time monitoring of IT infrastructure components, allowing administrators to quickly identify and respond to performance issues and outages.
- Dashboards and Reporting: Offers customizable dashboards and reports to visualize monitoring data, track performance trends, and analyze historical data for capacity planning and optimization.
- Scalability: Scales to support large-scale, distributed IT environments with thousands of monitored devices and millions of metrics, ensuring flexibility and reliability as infrastructure grows.
- Automation and Remediation: Supports automated actions and remediation workflows to address common issues and perform routine maintenance tasks, reducing manual intervention and downtime.
- Integration: Integrates with other IT management tools, services, and platforms through APIs and plugins, facilitating seamless integration into existing IT ecosystems and workflows.
- Security: Ensures data security and integrity by implementing robust authentication, encryption, and access control mechanisms, protecting monitoring data from unauthorized access and tampering.
- Open Source: Being open-source software, Zabbix Server offers flexibility, transparency, and cost-effectiveness, allowing organizations to leverage its capabilities without licensing fees or vendor lock-in.
Zabbix Server plays a critical role in maintaining the reliability, performance, and security of IT infrastructure, providing organizations with the visibility and control needed to ensure business continuity and operational efficiency.
Environment Specification
We are using a minimal Ubuntu 20.04 LTS virtual machine with following specifications.
- CPU – 3.4 Ghz (2 cores)
- Memory – 4 GB
- Storage – 40 GB
- Operating System – Ubuntu Server 20.04 LTS
- Hostname – zabbix-01.centlinux.com
- IP Address – 192.168.116.239 /24
For this Zabbix installation guide on Ubuntu 20.04 Server, the ideal environment is a dedicated Linux server. Whether you choose to set up a compact, power-efficient Mini PC at home or opt for a reliable Bluehost VPS, both options provide excellent platforms to run and experiment with your monitoring setup.
Mini PCs are perfect for hands-on home lab environments, offering full control and physical access.
[Start Your DevOps Lab with a Mini PC – Order Today!]
While Bluehost VPS offers flexibility and scalability for remote server management.
[Launch Your VPS Server with Bluehost – Reliable & Affordable!]
Using either of these setups can enhance your learning experience and provide a stable testing ground for Zabbix and other Linux server tools.
Disclosure: Some of the links in this post are affiliate links, which help support the blog at no extra cost to you.
Update Ubuntu 20.04 Software Packages
Connect with zabbix-01.centlinux.com as a privileged user by using a ssh client.
Execute apt command to update list of available packages.
sudo apt updateIn our Ubuntu server, there are 65 packages that can be upgraded. The output may vary on your Ubuntu operating system.
Execute following command at Linux bash prompt to upgrade the listed software packages.
sudo apt -y upgradeRead Also: How to install Zabbix on Rocky Linux 10
Install Zabbix APT Repository
Zabbix website provides installation package for various Linux distros. You can install this package to add it’s official repository in Package Management System of your Ubuntu operating system.
Download software package for Zabbix 5.0 repository from their official website.
wget https://repo.zabbix.com/zabbix/5.0/ubuntu/pool/main/z/zabbix-release/zabbix-release_5.0-1+focal_all.debUse dpkg command to install download package.
sudo dpkg -i zabbix-release_5.0-1+focal_all.debUpdate list of available software packages for your Ubuntu operating system by using apt command.
sudo apt updateStart Zabbix Installation on Ubuntu 20.04
You have successfully added Zabbix official repository in your Linux operating system. Therefore, you can now easily install Zabbix on Ubuntu this software by using apt command.
sudo apt install -y zabbix-server-mysql zabbix-frontend-php zabbix-apache-conf zabbix-agentInstall MySQL on Ubuntu 20.04
In this guide, we are using Apache web server and MySQL database server with Zabbix application. Therefore, you are required to have a MySQL database server.
If you do not have a MySQL database server in your network, then you have to install it on zabbix-01.centlinux.com machine.
sudo apt install -y mysql-serverAfter succesfull installation, check the status of MySQL service.
sudo systemctl status mysqlMySQL database service is already started.
Configure MySQL database server by using mysql_secure_installation command.
sudo mysql_secure_installationOutput:
Securing the MySQL server deployment.

Connecting to MySQL using a blank password.

VALIDATE PASSWORD COMPONENT can be used to test passwords
and improve security. It checks the strength of password
and allows the users to set only those passwords which are
secure enough. Would you like to setup VALIDATE PASSWORD component?

Press y|Y for Yes, any other key for No: Y

There are three levels of password validation policy:

LOW    Length >= 8
MEDIUM Length >= 8, numeric, mixed case, and special characters
STRONG Length >= 8, numeric, mixed case, special characters and dictionary                  file

Please enter 0 = LOW, 1 = MEDIUM and 2 = STRONG: 2
Please set the password for root here.

New password:

Re-enter new password:

Estimated strength of the password: 100
Do you wish to continue with the password provided?(Press y|Y for Yes, any other key for No) : Y
By default, a MySQL installation has an anonymous user,
allowing anyone to log into MySQL without having to have
a user account created for them. This is intended only for
testing, and to make the installation go a bit smoother.
You should remove them before moving into a production
environment.

Remove anonymous users? (Press y|Y for Yes, any other key for No) : Y
Success.


Normally, root should only be allowed to connect from
'localhost'. This ensures that someone cannot guess at
the root password from the network.

Disallow root login remotely? (Press y|Y for Yes, any other key for No) : Y
Success.

By default, MySQL comes with a database named 'test' that
anyone can access. This is also intended only for testing,
and should be removed before moving into a production
environment.


Remove test database and access to it? (Press y|Y for Yes, any other key for No) : Y
 - Dropping test database...
Success.

 - Removing privileges on test database...
Success.

Reloading the privilege tables will ensure that all changes
made so far will take effect immediately.

Reload privilege tables now? (Press y|Y for Yes, any other key for No) : Y
Success.

All done!
Create Database for Zabbix Server
Connect to MySQL database server by using mysql command.
sudo mysql -u root -pCreate ‘zabbix’ database to be used by your monitoring server.
create database zabbix character set utf8 collate utf8_bin;Create a database user ‘zabbix’ and set a strong password.
create user zabbix@localhost identified by 'P@ssw0rd';Grant all privileged on zabbix database to zabbix user.
grant all privileges on zabbix.* to zabbix@localhost;
quit;
Zabbix server documentation provides a SQL script to create it’s repository in MySQL database.
You can run this SQL script as follows.
zcat /usr/share/doc/zabbix-server-mysql/create.sql.gz | mysql -u zabbix -p zabbixEdit Zabbix server configuration file in nano text editor.
sudo nano /etc/zabbix/zabbix_server.confAnd set the zabbix database user’s password in this file.
DBPassword=P@ssw0rdEdit Apache configuration file in nano text editor.
sudo nano /etc/zabbix/apache.confUncomment and set your respective Time Zone. There are multiple occurrences of this directive, you should set each of them.
php_value date.timezone America/SantiagoRestart and Enable Zabbix Server, Agent and Apache services.
sudo systemctl restart zabbix-server zabbix-agent apache2
sudo systemctl enable zabbix-server zabbix-agent apache2
Allow Apache service in Ubuntu Firewall by executing ufw command.
sudo ufw allow apacheOutput:
Rules updated
Rules updated (v6)
Web Setup of Server Monitoring Tool
Open URL http://zabbix-01.centlinux.com/zabbix/ in a web browser.
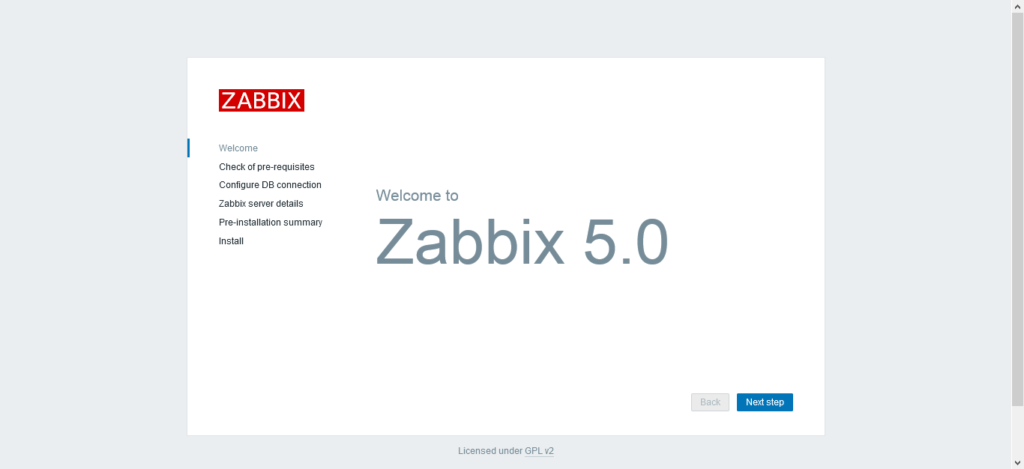
If you have performed the installation as described above, then you will see this welcome page of Zabbix web setup.
Click on ‘Next Step’.
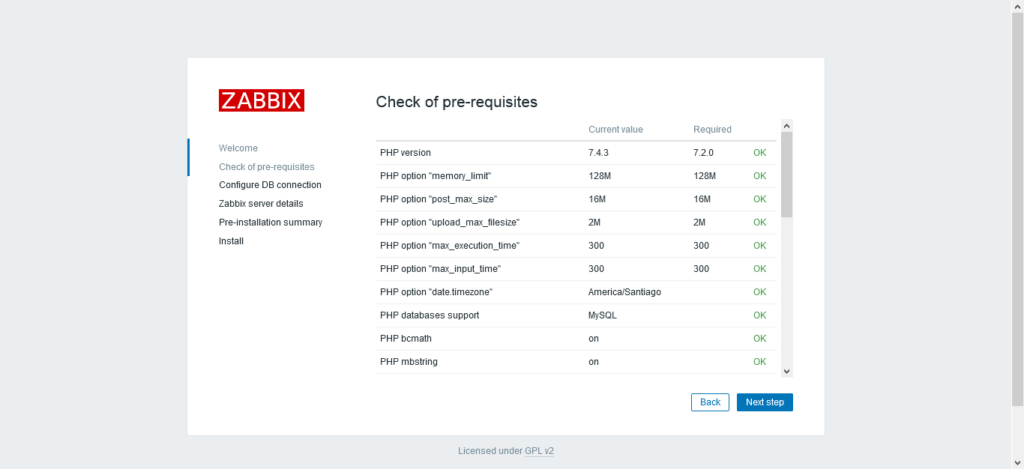
If you have performed the configurations correctly, then you will get the ‘OK’ status for all the Zabbix perquisites.
Move on to ‘Next Step’.
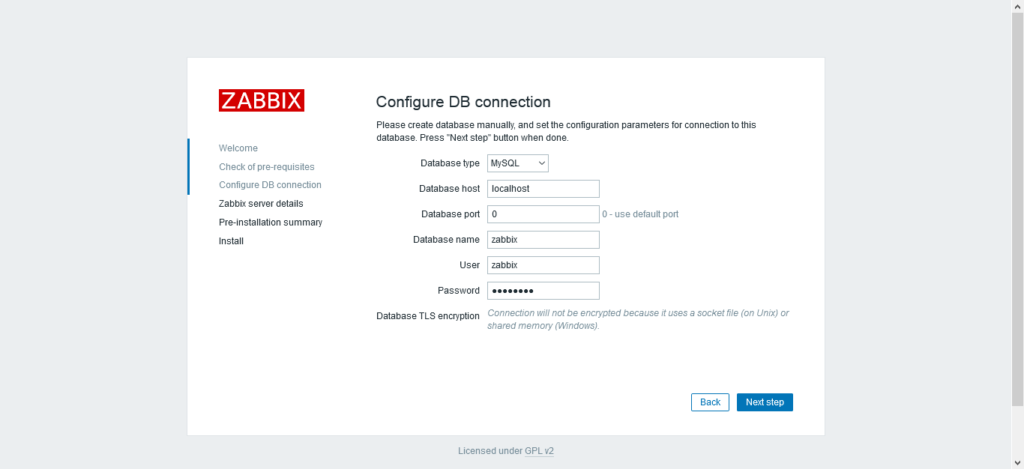
Provide the connection details of your MySQL server, including database and user credentials.
Click on ‘Next Step’.
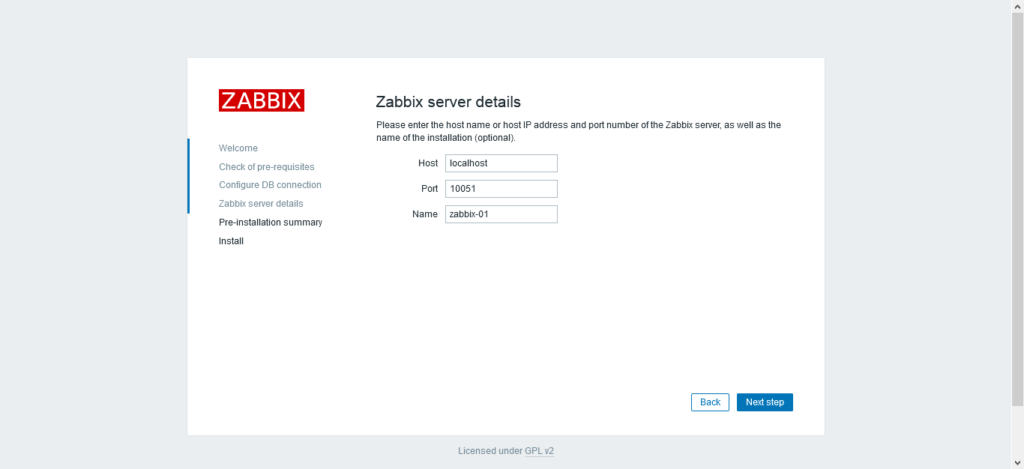
Enter the hostname/IP address and port number of the Linux server. You are required to provide the name of the installation (optional).
Continue to ‘Next Step’.
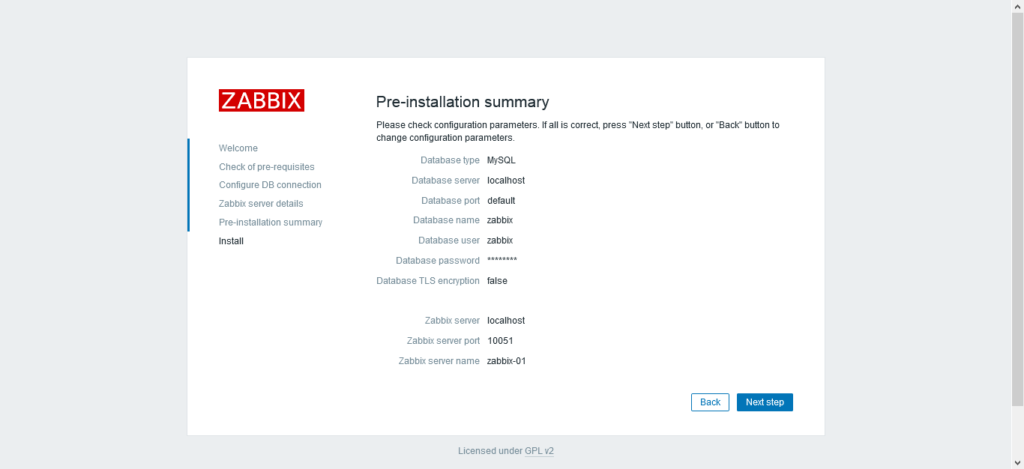
Web setup will display the configurations, that you have made so far.
Click on ‘Next Step’ if you are happy with them, otherwise go back and adjust them as per your requirement.
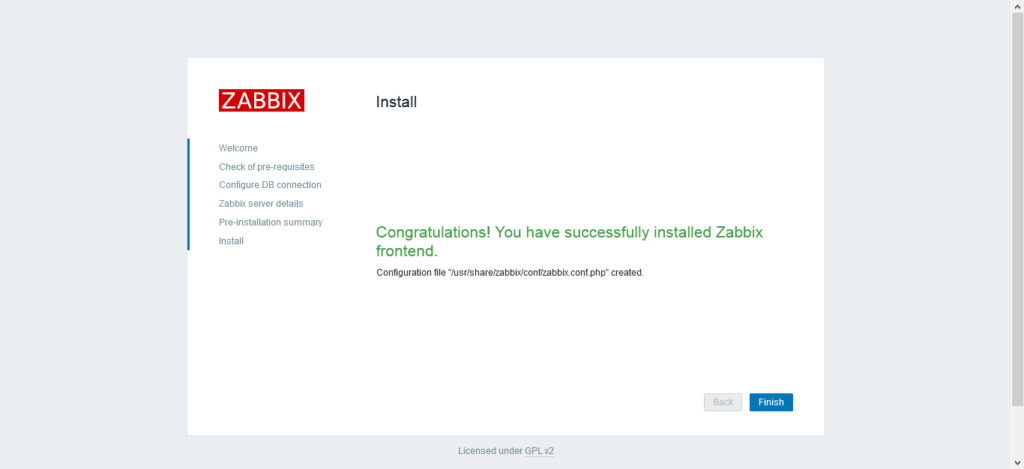
Configuration file has been created and the installation of Zabbix frontend completed successfully.
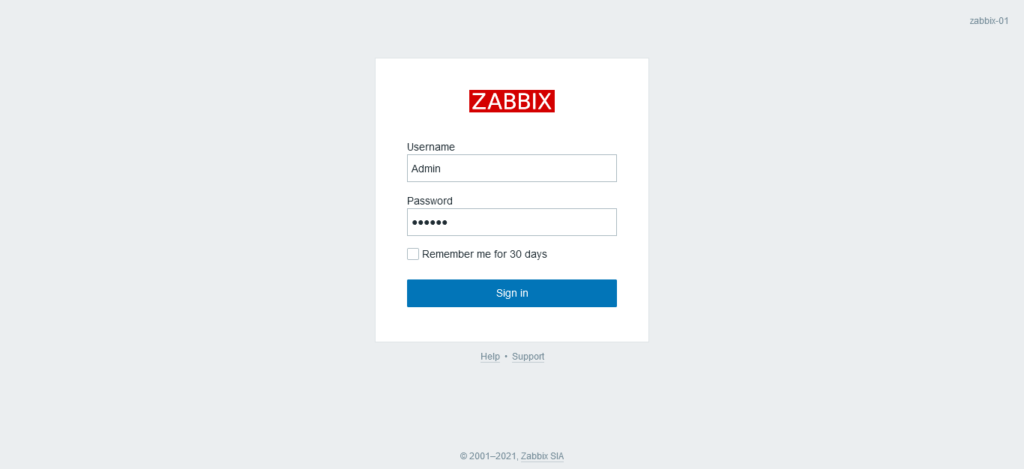
Login as default Zabbix user/password i.e. admin/zabbix.
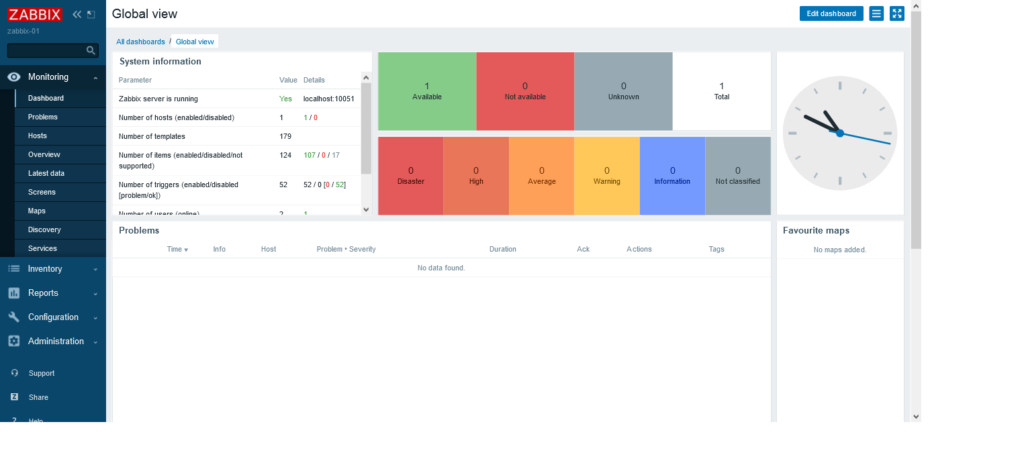
After successful login, you will reach at the Zabbix dashboard.
Read Also: Create Local APT Repository in Ubuntu 20.04
Final Thoughts
If you found this guide of Zabbix installation on Ubuntu 20.04 Server helpful and need further assistance, consider hiring a professional. I offer comprehensive installation, configuration, and troubleshooting services for Zabbix and other server monitoring solutions.
Struggling with Linux server management? I offer professional support to ensure your servers are secure, optimized, and always available. Visit my Freelancer profile to learn more!
Let’s ensure your server monitoring system is up and running smoothly!
FAQs
Q1: Can I install Zabbix server and agent on the same Ubuntu 20.04 machine?
Yes, you can install both Zabbix server and agent on the same Ubuntu server for basic monitoring needs or testing purposes.
Q2: How do I secure Zabbix web interface after installation?
You should enable HTTPS using SSL/TLS certificates and restrict access with firewall rules and strong user passwords.
Q3: What ports need to be open for Zabbix to function properly?
By default, open TCP ports 10051 (server) and 10050 (agent) on your firewall to allow communication.
Q4: Can Zabbix monitor non-Linux devices with this setup?
Yes, by installing compatible Zabbix agents or using SNMP traps, it can monitor Windows or network devices from your Ubuntu server.
Q5: How do I update Zabbix to the latest version on Ubuntu 20.04?
Use apt package manager after adding the official Zabbix repository and run:
sudo apt update && sudo apt upgradeRecommended Courses
If you’re serious about mastering IT infrastructure monitoring, I highly recommend the online course “Zabbix Application and Network Monitoring“ by Sean Bradley. This hands-on training is perfect for system administrators, DevOps engineers, and IT professionals who want to efficiently monitor applications, servers, and networks using Zabbix. With real-world examples and step-by-step guidance, you’ll gain practical skills that can immediately improve your monitoring workflows and career prospects.
Disclaimer: Some of the links in this post are affiliate links. This means if you click on them and make a purchase, I may earn a small commission at no extra cost to you. This helps support my work and allows me to keep creating helpful content.

Leave a Reply
Please log in to post a comment.