Learn how to install PostgreSQL on Rocky Linux 9 with our step-by-step guide. Set up this powerful, open-source relational database system to manage your data efficiently on Rocky Linux. #centlinux #linux #postgres
Table of Contents
What is PostgreSQL?
PostgreSQL, also known as Postgres, is a free and open-source relational database management system (RDBMS) emphasizing extensibility and SQL compliance. It was originally named POSTGRES, referring to its origins as a successor to the Ingres database developed at the University of California, Berkeley. In 1996, the project was renamed to PostgreSQL to reflect its support for SQL. After a review in 2007, the development team decided to keep the name PostgreSQL and the alias Postgres.
PostgreSQL features transactions with Atomicity, Consistency, Isolation, Durability (ACID) properties, automatically updatable views, materialized views, triggers, foreign keys, and stored procedures. It is designed to handle a range of workloads, from single machines to data warehouses or Web services with many concurrent users. It is the default database for macOS Server and is also available for Windows, Linux, FreeBSD, and OpenBSD. (Source: Wikipedia)
Read Also:
How to install PostgreSQL on CentOS 8
How to install PostgreSQL on CentOS 7

MongoDB vs PostgreSQL
MongoDB and PostgreSQL are two popular database management systems, but they serve different needs and have distinct characteristics. Here’s a comparison to help you understand their differences and choose the best one for your requirements:
MongoDB
Type
- NoSQL database (document-oriented)
Data Model
- Uses BSON (Binary JSON) to store data in flexible, JSON-like documents.
- Schema-less, allowing for easy modification and scalability.
Use Cases
- Ideal for applications that require high performance, scalability, and flexibility.
- Suitable for handling large volumes of unstructured or semi-structured data.
- Commonly used in web applications, content management systems, and big data applications.
Strengths
- Scalability: Horizontally scalable using sharding, making it suitable for handling large datasets across multiple servers.
- Flexibility: Schema-less design allows for dynamic data structures, making it easy to adapt to changing requirements.
- Speed: Optimized for read-heavy and write-heavy workloads.
Weaknesses
- Complex Transactions: Limited support for multi-document ACID transactions (although this has improved in recent versions).
- Consistency: Can favor eventual consistency over strong consistency, depending on configuration.
PostgreSQL
Type
- Relational database (SQL-based)
Data Model
- Uses tables with predefined schemas, supporting complex queries and transactions.
- Strong adherence to ACID properties (Atomicity, Consistency, Isolation, Durability).
Use Cases
- Ideal for applications that require complex queries, data integrity, and transactional consistency.
- Suitable for traditional business applications, financial systems, and data warehousing.
Strengths
- ACID Compliance: Ensures data integrity and reliability with robust transaction support.
- Advanced Features: Supports complex queries, full-text search, indexing, and extensions like PostGIS for geographic data.
- Data Integrity: Strong schema enforcement and data validation.
Weaknesses
- Scalability: Primarily vertically scalable, although recent versions have improved horizontal scaling capabilities.
- Flexibility: Schema-based design can be less flexible than NoSQL databases for certain types of data.
Feature Comparison
| Feature | MongoDB | PostgreSQL |
|---|---|---|
| Type | NoSQL (Document-oriented) | SQL (Relational) |
| Schema | Schema-less | Schema-based |
| Transactions | Limited multi-document ACID | Full ACID compliance |
| Query Language | MongoDB Query Language (MQL) | SQL |
| Scalability | Horizontal (sharding) | Primarily vertical, some horizontal |
| Performance | High performance for large datasets | Efficient for complex queries and transactions |
| Flexibility | High, with dynamic schemas | Moderate, with fixed schemas |
| Use Cases | Web apps, big data, content management | Business apps, financial systems, data warehousing |
Conclusion
- Choose MongoDB if you need a flexible, scalable, and high-performance database for handling large volumes of unstructured or semi-structured data, especially in web applications and big data scenarios.
- Choose PostgreSQL if you need a reliable, robust, and ACID-compliant relational database for applications that require complex queries, data integrity, and strong transactional support, such as business applications and financial systems.
Both databases have their strengths and are suited to different types of projects. The best choice depends on your specific use case, data structure, and requirements for performance and scalability.
Recommended Training: SQL and PostgreSQL for Beginners: Become a SQL Expert from Jon Avis

Environment Specification
We are using a minimal Rocky Linux 9 virtual machine with following specifications.
- CPU – 3.4 Ghz (2 cores)
- Memory – 2 GB
- Storage – 20 GB
- Operating System – Rocky Linux release 9.0 (Blue Onyx)
- Hostname – postgres-01.centlinux.com
- IP Address – 192.168.116.131/24
Update your Rocky Linux Server
It is a best practice to update your Linux operating system before performing any server configurations.
By using a SSH Client, connect with postgres-01.centlinux.com as root user.
Execute dnf command to refresh the yum cache of your Linux server.
dnf makecacheNow you can update your Rocky Linux server with the help of following dnf command.
dnf update -yThe above command may update your Linux Kernel. If it does than reboot your Linux machine once to load the Latest Linux Kernel.
rebootAfter reboot, login as root user and check Linux Kernel and operating system versions.
uname -r
cat /etc/rocky-release
Output:
5.14.0-70.26.1.el9_0.x86_64
Rocky Linux release 9.0 (Blue Onyx)
JSAUX 65W USB C Charger for Nintendo Switch 2, ROG Ally, Steam Deck, Tablets, Laptops, Samsung Galaxy, Pixel, 65 Watt PD Wall Fast Charger with 6.6FT USB C to C Cable, EU & UK Plug
$25.99 (as of June 30, 2025 20:05 GMT +00:00 – More infoProduct prices and availability are accurate as of the date/time indicated and are subject to change. Any price and availability information displayed on [relevant Amazon Site(s), as applicable] at the time of purchase will apply to the purchase of this product.)Install PostgreSQL on Rocky Linux 9
In Rocky Linux 9, PostgreSQL 13 is available in standard yum repositories that you can easily install by throwing a dnf command.
You can verify the version of available PostgreSQL server as follows.
dnf info postgresql-serverOutput:
Last metadata expiration check: 0:49:27 ago on Fri 23 Sep 2022 09:48:01 AM CDT.
Available Packages
Name         : postgresql-server
Version      : 13.7
Release      : 1.el9_0
Architecture : x86_64
Size         : 5.7 M
Source       : postgresql-13.7-1.el9_0.src.rpm
Repository   : appstream
Summary      : The programs needed to create and run a PostgreSQL server
URL          : http://www.postgresql.org/
License      : PostgreSQL
Description  : PostgreSQL is an advanced Object-Relational database management
             : system (DBMS). The postgresql-server package contains the
             : programs needed to create and run a PostgreSQL server, which will
             : in turn allow you to create and maintain PostgreSQL databases.
But, in this configuration guide, we are installing the PostgreSQL 14 on Rocky Linux 9.
PostgreSQL 14 is the latest PostgreSQL version at the time of this writing and is not available in standard yum repositories.
To setup Postgres 14 database, you need to install their official yum repository as follows.
dnf install -y https://download.postgresql.org/pub/repos/yum/reporpms/EL-9-x86_64/pgdg-redhat-repo-latest.noarch.rpmNow, you can install Postgres 14 by using dnf command.
dnf install -y postgresql14-serverAfter successful installation, you need to initialize your PostgreSQL database instance.
/usr/pgsql-14/bin/postgresql-14-setup initdbOutput:
Initializing database ... OK
Enable and start PostgreSQL database service.
systemctl enable --now postgresql-14Check the status of your database service.
systemctl status postgresql-14Output:
● postgresql-14.service - PostgreSQL 14 database server
     Loaded: loaded (/usr/lib/systemd/system/postgresql-14.service; enabled; ve>
     Active: active (running) since Fri 2022-09-23 10:43:23 CDT; 20s ago
       Docs: https://www.postgresql.org/docs/14/static/
    Process: 5148 ExecStartPre=/usr/pgsql-14/bin/postgresql-14-check-db-dir ${P>
   Main PID: 5153 (postmaster)
      Tasks: 8 (limit: 7495)
     Memory: 16.6M
        CPU: 64ms
     CGroup: /system.slice/postgresql-14.service
             ├─5153 /usr/pgsql-14/bin/postmaster -D /var/lib/pgsql/14/data/
             ├─5154 "postgres: logger "
             ├─5156 "postgres: checkpointer "
             ├─5157 "postgres: background writer "
             ├─5158 "postgres: walwriter "
             ├─5159 "postgres: autovacuum launcher "
             ├─5160 "postgres: stats collector "
             └─5161 "postgres: logical replication launcher "

Sep 23 10:43:23 postgres-01.centlinux.com systemd[1]: Starting PostgreSQL 14>
Sep 23 10:43:23 postgres-01.centlinux.com postmaster[5153]: 2022-09-23 10:43>
Sep 23 10:43:23 postgres-01.centlinux.com postmaster[5153]: 2022-09-23 10:43>
Sep 23 10:43:23 postgres-01.centlinux.com systemd[1]: Started PostgreSQL 14 >
Verify the version of installed database software by using psql command.
psql -VOutput:
psql (PostgreSQL) 14.5
Set Database Admin User Password
Switch to postgres user and set DBA password as follows.
su - postgresConnect to psql prompt.
psqlExecute following commands to set PostgreSQL DBA Password and exit from psql prompt.
ALTER USER postgres WITH PASSWORD '123';
q
Exit from postgres user shell.
exitConfigure Network Access for PostgreSQL Server
By default the Postgres service listens on the localhost network interface.
You can verify it by executing ss command at Linux bash prompt.
ss -tulpn | grep 5432Output:
tcp   LISTEN 0      244        127.0.0.1:5432      0.0.0.0:*    users:(("postmaster",pid=5153,fd=7))
tcp   LISTEN 0      244            [::1]:5432         [::]:*    users:(("postmaster",pid=5153,fd=6))
To enable network access to your database server, you need to perform following configurations.
Open postgresql.conf file in vim text editor.
vi /var/lib/pgsql/14/data/postgresql.confSearch for following directive therein.
# listen_addresses = 'localhost'And replace it with the following directive.
listen_addresses = '*'Allow network clients to access database service in pg_hba.conf file.
echo "host all all 192.168.116.0/24 md5" >> /var/lib/pgsql/14/data/pg_hba.confRestart database service to apply changes.
systemctl restart postgresql-14.serviceNow, check the status of service again by executing ss command.
ss -tulpn | grep 5432Output:
tcp   LISTEN 0      244          0.0.0.0:5432      0.0.0.0:*    users:(("postmaster",pid=5539,fd=6))
tcp   LISTEN 0      244             [::]:5432         [::]:*    users:(("postmaster",pid=5539,fd=7))
You can see that, now the database service is listening on all network interfaces.
One last thing is to allow the service port in Linux firewall.
There is a preconfigured firewall service, postgresql, that you can use to allow PostgreSQL default port i.e 5432/tcp in Linux firewall.
firewall-cmd --permanent --add-service=postgresql
firewall-cmd --reload
How Linux Works, 3rd Edition: What Every Superuser Should Know
$28.22 (as of June 29, 2025 20:00 GMT +00:00 – More infoProduct prices and availability are accurate as of the date/time indicated and are subject to change. Any price and availability information displayed on [relevant Amazon Site(s), as applicable] at the time of purchase will apply to the purchase of this product.)Install pgAdmin 4: PostgreSQL GUI
Although, you have setup PostgreSQL server on your Linux operating system. But it doesn’t provides a GUI based database management environment and you have to perform DBA tasks straight from the psql command prompt.
There are many third party web user interfaces are available for Postgres, but pgAdmin 4 is the most popular among them due to it’s rich database management features.
You can install pgAdmin 4 as follows or you can obtain an alternate download link from their official download page, if you are installing on some other Linux distribution.
dnf install -y https://ftp.postgresql.org/pub/pgadmin/pgadmin4/yum/pgadmin4-redhat-repo-2-1.noarch.rpmpgAdmin 4 also requires some software packages from EPEL (Extra Packages for Enterprise Linux) yum repository. Therefore, you should install it first before moving forward with server configurations.
dnf install -y epel-releaseBuild your yum cache for the newly installed repositories.
dnf makecacheNow, you can install pgAdmin 4 software by using dnf command.
dnf install -y pgadmin4pgAdmin 4 configuration script requires semanage command to configure SELinux context for the software files. Therefore, you need to install policycoreutils-python-utils package before installing the Postgres web user interface.
dnf install -y policycoreutils-python-utilsExecute following script to setup pgAdmin 4 web user interface.
/usr/pgadmin4/bin/setup-web.shOutput:
Setting up pgAdmin 4 in web mode on a Redhat based platform...
Creating configuration database...
NOTE: Configuring authentication for SERVER mode.

Enter the email address and password to use for the initial pgAdmin user account:

Email address: ahmer@postgres-01.centlinux.com
Password:
Retype password:
pgAdmin 4 - Application Initialization
======================================

Creating storage and log directories...
Configuring SELinux...
The Apache web server is not running. We can enable and start the web server for you to finish pgAdmin 4 installation. Continue (y/n)? y
Created symlink /etc/systemd/system/multi-user.target.wants/httpd.service → /usr/lib/systemd/system/httpd.service.
Apache successfully enabled.
Apache successfully started.
You can now start using pgAdmin 4 in web mode at http://127.0.0.1/pgadmin4
Allow the HTTP server in Linux firewall by using firewall-cmd command.
firewall-cmd --permanent --add-service=http
firewall-cmd --reload
Open URL http://postgres-01.centlinux.com/pgadmin4/ in a web browser.

Login as user that you have created during pgAdmin setup.
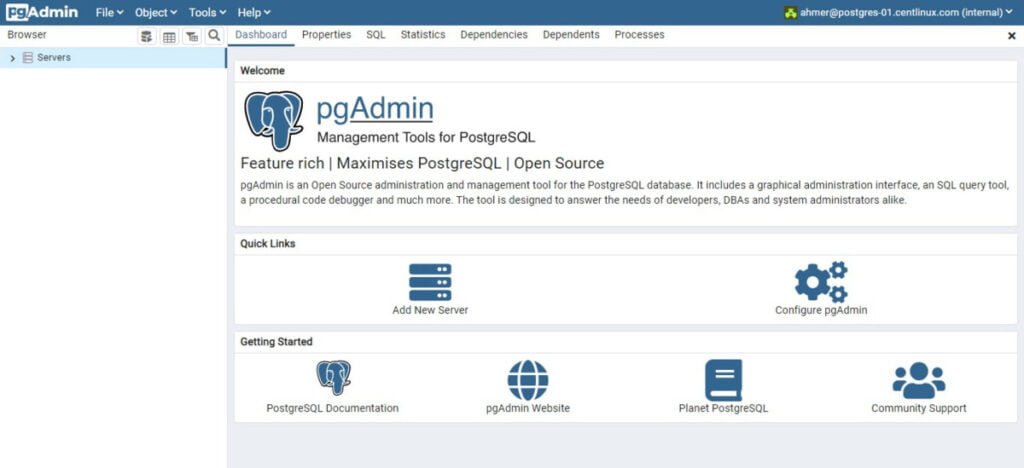
After successful login, you will redirected to the pgAdmin dashboard.
Currently, there are no PostgreSQL servers in the list. Click on “Add New Server” to add your database server.
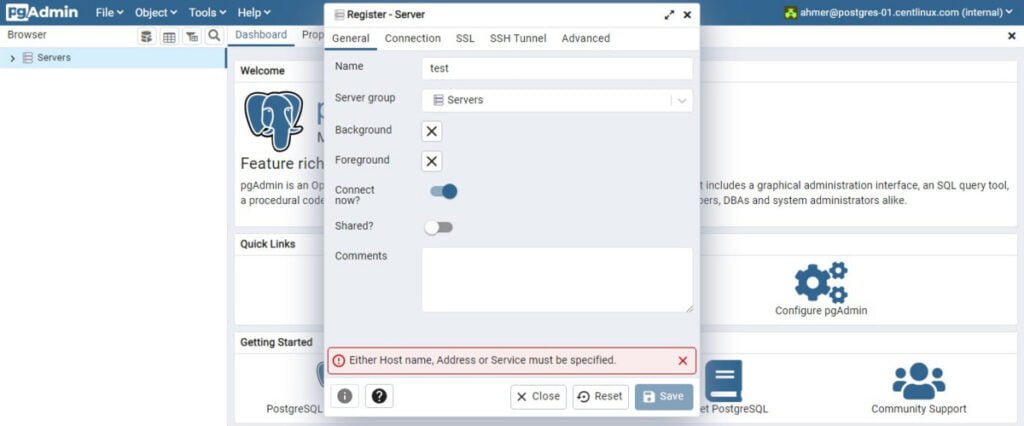
At the “General” Tab, provide a name for your database server.
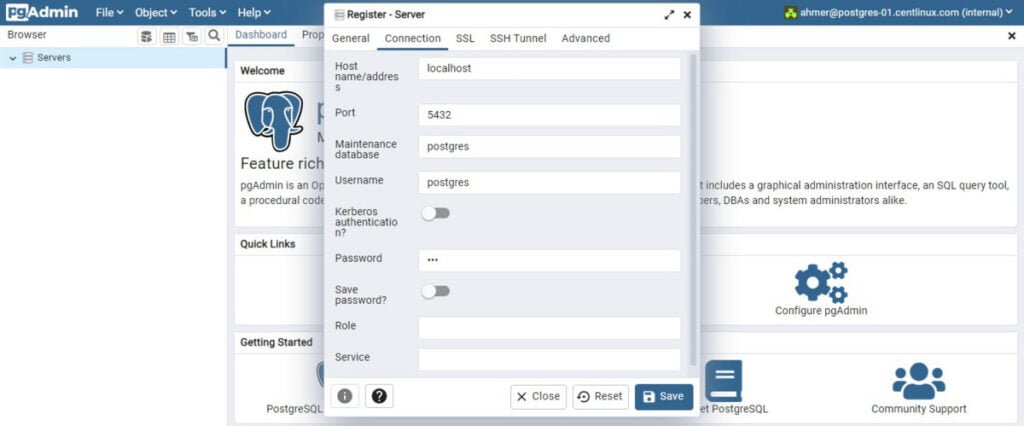
At the “Connection” Tab, provide the database user and the password to create a connection.
Click on “Save”.
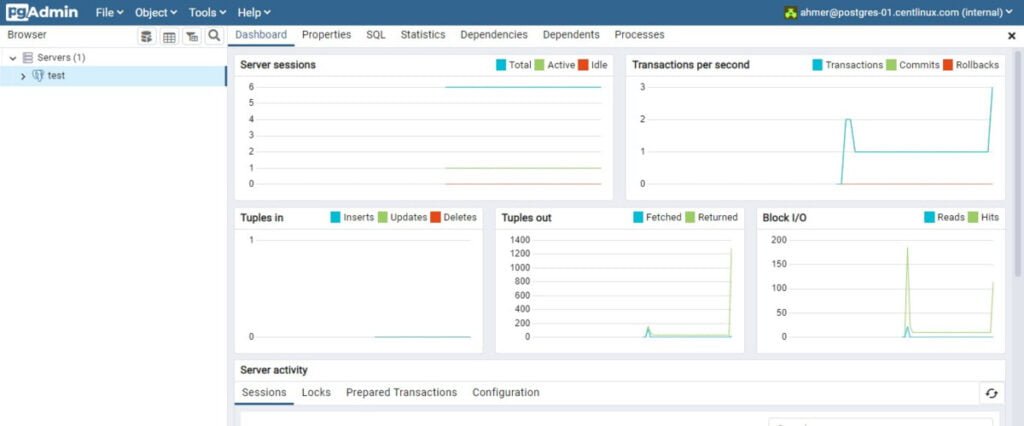
Your PostgreSQL database server has been added in pgAdmin 4 web user interface.
Video Tutorial
Final Thoughts
Congratulations on successfully installing PostgreSQL on Rocky Linux 9! With PostgreSQL set up, you now have a powerful and reliable relational database management system at your disposal. Use PostgreSQL’s advanced features and robust performance to manage your data effectively. Whether you’re developing applications, managing data warehouses, or running complex queries, PostgreSQL will support your needs with efficiency and stability. Keep exploring its capabilities to maximize the potential of your database system.
Looking for a Linux server expert? I provide top-tier administration, performance tuning, and security solutions for your Linux systems. Explore my Fiverr profile for details!


Leave a Reply
You must be logged in to post a comment.