Discover a comprehensive guide on how to install SuiteCRM on Rocky Linux 9. Follow step-by-step instructions to set up this powerful customer relationship management solution and optimize your business processes seamlessly. #centlinux #linux #suitecrm
Table of Contents
What is SuiteCRM?
SuiteCRM is a software fork of the popular customer relationship management (CRM) system from SugarCRM and its base is built on the last open-source SugarCRM release. The SuiteCRM project began when SugarCRM decided to stop the development of its open-source version. (Open-source CRM is often used as an alternative to proprietary CRM software from major corporations such as HubSpot, Salesforce, and Microsoft Dynamics CRM applications.)
It was originally released on October 21, 2013, as version 7.0 and provides upgrade paths for existing SugarCRM users. It is an extended version of SugarCRM which contains additional security fixes not available in SugarCRM.
SuiteCRM comprises the last release of the SugarCRM Community Edition plus the following additional modules:
- Products
- Quotes
- Contracts
- Invoices
- PDF Templates
- Workflow
- Reporting
- Search
- Events
- Google Maps
- Teams Security
- Portal
- Responsive Theme
- Outlook plugin
- Surveys
A six-month release cycle is maintained with bug fix and security releases being made available between major releases. (Source: SuiteCRM Wiki)
Is SuiteCRM free?
Yes, SuiteCRM is free and open-source software. It is released under the AGPLv3 license, which means it can be freely used, modified, and distributed by anyone. SuiteCRM offers a powerful set of features for managing customer relationships, sales, marketing, and support, making it a popular choice for businesses seeking a cost-effective CRM solution.
Read Also: How to install SuiteCRM on CentOS 7
SuiteCRM Alternatives
Some alternatives to SuiteCRM include:
- SugarCRM: Another popular open-source CRM platform with a focus on flexibility and customization.
- VTiger CRM: An open-source CRM software that offers features for sales, marketing, and customer support.
- Zoho CRM: A cloud-based CRM solution with a wide range of features for small to large businesses.
- Salesforce: A leading cloud-based CRM platform known for its robust features and scalability.
- HubSpot CRM: A user-friendly CRM solution with built-in marketing, sales, and customer service tools.
- Microsoft Dynamics 365: A comprehensive suite of CRM and ERP applications designed for businesses of all sizes.
These alternatives offer varying features, pricing models, and levels of customization, allowing you to choose the CRM solution that best fits your business needs.
Environment Specification
We are using a minimal Rocky Linux OS with following specifications.
- CPU – 3.4 Ghz (2 cores)
- Memory – 4 GB
- Storage – 40 GB
- Operating System – Rocky Linux release 9.2 (Blue Onyx)
- Hostname – suitecrm-01.centlinux.com
- IP Address – 192.168.18.107/24
For experimenting with SuiteCRM and managing your Linux server environment, using a dedicated Mini PC or a reliable VPS can be highly beneficial.
A Mini PC offers the advantage of a compact, energy-efficient device you can keep on your desk for hands-on practice and development. [Check our recommended Mini PC at Amazon]
Alternatively, a VPS like Rose Hosting provides a powerful, always-on remote server optimized for Linux, ensuring stable performance and easy scalability for testing SuiteCRM without needing physical hardware. [Get a VPS at Rose Hosting Now!]
Both options are excellent for learning, development, and running your CRM system smoothly, making them ideal system additions when following this installation guide.
Disclaimer: This post contains affiliate links. If you make a purchase through these links, I may earn a small commission at no extra cost to you.
Pre-installation Configuration
Configure Linux Server
By using a ssh client, login to your Rocky Linux 9 server as root user.
Set a Fully Qualified Domain Name (FQDN) for your Linux machine and set Local DNS resolution for it.
hostnamectl set-hostname suitecrm-01.centlinux.com
echo "192.168.18.107 suitecrm-01 suitecrm-01.centlinux.com" >> /etc/hosts
Update software packages in your operating system before installing SuiteCRM sofware.
dnf update -yIf the above command updates your Linux Kernel, then you should reboot before moving forward with this article.
rebootAfter reboot, check and note down the Linux OS and Kernel versions.
cat /etc/os-release
uname -r
Output:
NAME="Rocky Linux"
VERSION="9.2 (Blue Onyx)"
ID="rocky"
ID_LIKE="rhel centos fedora"
VERSION_ID="9.2"
PLATFORM_ID="platform:el9"
PRETTY_NAME="Rocky Linux 9.2 (Blue Onyx)"
ANSI_COLOR="0;32"
LOGO="fedora-logo-icon"
CPE_NAME="cpe:/o:rocky:rocky:9::baseos"
HOME_URL="https://rockylinux.org/"
BUG_REPORT_URL="https://bugs.rockylinux.org/"
SUPPORT_END="2032-05-31"
ROCKY_SUPPORT_PRODUCT="Rocky-Linux-9"
ROCKY_SUPPORT_PRODUCT_VERSION="9.2"
REDHAT_SUPPORT_PRODUCT="Rocky Linux"
REDHAT_SUPPORT_PRODUCT_VERSION="9.2"

5.14.0-284.30.1.el9_2.x86_64
You can also Upgrade Rocky Linux 9 to 10 by following our step-by-step guide.
Install SuiteCRM Prerequisites
The Open Source CRM Software requires some packages, therefore, install SuiteCRM prerequisites now with the help of dnf command.
dnf install -y wget unzip zlib-develInstalling MariaDB Server
Before you can install SuiteCRM on Linux, you may need a MySQL database as it’s backend data store. Therefore, we are installing MariaDB Server on the same Linux machine.
dnf install -y mariadb-serverEnable and start MariaDB database service.
systemctl enable --now mariadb.servicePerform initial configurations of the most popular Open Source database server.
mariadb-secure-installationOutput:
NOTE: RUNNING ALL PARTS OF THIS SCRIPT IS RECOMMENDED FOR ALL MariaDB
      SERVERS IN PRODUCTION USE!  PLEASE READ EACH STEP CAREFULLY!

In order to log into MariaDB to secure it, we'll need the current
password for the root user. If you've just installed MariaDB, and
haven't set the root password yet, you should just press enter here.

Enter current password for root (enter for none):
OK, successfully used password, moving on...

Setting the root password or using the unix_socket ensures that nobody
can log into the MariaDB root user without the proper authorisation.

You already have your root account protected, so you can safely answer 'n'.

Switch to unix_socket authentication [Y/n] n
 ... skipping.

You already have your root account protected, so you can safely answer 'n'.

Change the root password? [Y/n] Y
New password:
Re-enter new password:
Password updated successfully!
Reloading privilege tables..
 ... Success!


By default, a MariaDB installation has an anonymous user, allowing anyone
to log into MariaDB without having to have a user account created for
them.  This is intended only for testing, and to make the installation
go a bit smoother.  You should remove them before moving into a
production environment.

Remove anonymous users? [Y/n] Y
 ... Success!

Normally, root should only be allowed to connect from 'localhost'.  This
ensures that someone cannot guess at the root password from the network.

Disallow root login remotely? [Y/n] Y
 ... Success!

By default, MariaDB comes with a database named 'test' that anyone can
access.  This is also intended only for testing, and should be removed
before moving into a production environment.

Remove test database and access to it? [Y/n] Y
 - Dropping test database...
 ... Success!
 - Removing privileges on test database...
 ... Success!

Reloading the privilege tables will ensure that all changes made so far
will take effect immediately.

Reload privilege tables now? [Y/n] Y
 ... Success!

Cleaning up...

All done!  If you've completed all of the above steps, your MariaDB
installation should now be secure.

Thanks for using MariaDB!
Check the version of your MariaDB RDBMS.
mariadb --versionOutput:
mariadb Ver 15.1 Distrib 10.5.16-MariaDB, for Linux (x86_64) using EditLine wrapper
Login to MySQL Shell.
mysql -u root -pOutput:
Enter password:
Welcome to the MariaDB monitor.  Commands end with ; or g.
Your MariaDB connection id is 12
Server version: 10.5.16-MariaDB MariaDB Server

Copyright (c) 2000, 2018, Oracle, MariaDB Corporation Ab and others.

Type 'help;' or 'h' for help. Type 'c' to clear the current input statement.

MariaDB [(none)]>
Execute following set of commands at MySQL prompt to create a database and user for SuiteCRM application.
CREATE DATABASE suitedb;
CREATE USER 'suiteuser'@'localhost' IDENTIFIED BY 'Ahmer@1234';
GRANT ALL PRIVILEGES ON suitedb.* TO 'suiteuser'@'localhost';
FLUSH PRIVILEGES;
exit;
Installing Apache HTTP Server
For deployment of SuiteCRM web application, you need a PHP supported web server. Therefore, we are installing Apache web server on the same Linux server.
dnf install -y httpdEnable and start Apache web service.
systemctl enable --now httpd.serviceCheck the version of your open source web server.
httpd -vOutput:
Server version: Apache/2.4.53 (Rocky Linux)
Server built:   Apr 28 2023 00:00:00
Read Also: Install LAMP Server on Rocky Linux 9
Installing PHP
SuiteCRM 8.4 supports PHP 7.0 or later. Fortunately, PHP 8.0 is available in standard yum repositories of Rocky Linux 9. Therefore, we are installing PHP 8.0 along with necessary plugins by executing following dnf command.
dnf install -y php-fpm php-mysqlnd \
php-bcmath php-xml php-zip php-curl \
php-mbstring php-gd php-intl php-cli \
php-opcache php-soap php-ldap
Enable and start php-fpm service.
systemctl enable --now php-fpmCheck the version of PHP.
php --versionOutput:
PHP 8.0.27 (cli) (built: Jan  3 2023 16:17:26) ( NTS gcc x86_64 )
Copyright (c) The PHP Group
Zend Engine v4.0.27, Copyright (c) Zend Technologies
    with Zend OPcache v8.0.27, Copyright (c), by Zend Technologies
Execute following set of commands to configure PHP according to SuiteCRM requirement.
sed -i 's/memory_limit = 128M/memory_limit = 256M/' /etc/php.ini
sed -i 's/max_execution_time = 30/max_execution_time = 60/' /etc/php.ini
sed -i 's/upload_max_filesize = 2M/upload_max_filesize = 25M/g' /etc/php.ini
sed -i 's/post_max_size = 8M/post_max_size = 25M/g' /etc/php.ini
Restart php-fpm service to apply changes.
systemctl restart php-fpmConfigure Linux Firewall
To make your CRM accessible from the network, you must allow the http service in your Linux firewall.
firewall-cmd --permanent --add-service=http
firewall-cmd --reload
Read Also: 3 ways to Create a Linux Firewall Service
SuiteCRM Installation on Rocky Linux 9
If you have installed above prerequisites correctly, then, you can now easily install SuiteCRM on Linux.
Create a directory in document root of Apache web server.
mkdir -p /var/www/html/suitecrm
cd /var/www/html/suitecrm/
Download SuiteCRM 8 with the help of wget command.
wget https://suitecrm.com/download/142/suite84/563421/suitecrm-8-4-1.zipUnzip downloaded file of open source CRM software in current directory.
unzip suitecrm-8-4-1.zipAdjust ownership and file permissions of extracted files.
chown -R apache:apache .
chmod -R 755 .
Create SELinux policies for SuiteCRM directories.
semanage fcontext -a -t httpd_sys_rw_content_t '/var/www/html/suitecrm/public/legacy/cache(/.*)?'
semanage fcontext -a -t httpd_sys_rw_content_t '/var/www/html/suitecrm/public/legacy/custom(/.*)?'
semanage fcontext -a -t httpd_sys_rw_content_t '/var/www/html/suitecrm/public/legacy/modules(/.*)?'
semanage fcontext -a -t httpd_sys_rw_content_t '/var/www/html/suitecrm/public/legacy/upload(/.*)?'
Apply SELinux policies on the SuiteCRM directory.
restorecon -R .You also need to enable two SELinux booleans.
setsebool -P httpd_can_network_connect_db 1
setsebool -P httpd_can_network_connect 1
Configure SuiteCRM
After completing SuiteCRM installation on Linux, you need to configure the application as follows.
Temporary disable SELinux, so the web installer can create necessary directories during SuiteCRM installation.
setenforce 0Open URL http://suitecrm-01.centlinux.com/suitecrm/public/index.php in a web browser.
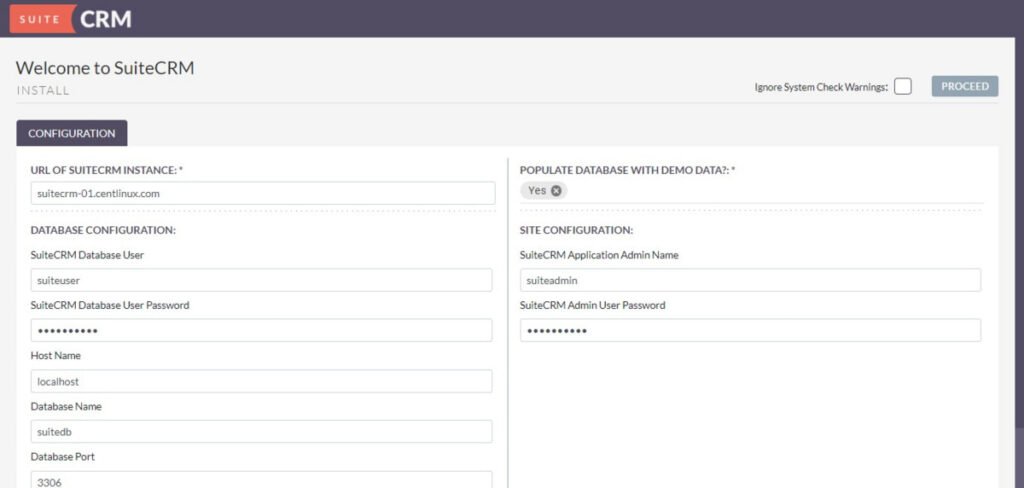
Configure SuiteCRM settings according to your requirement and click on “Proceed”.
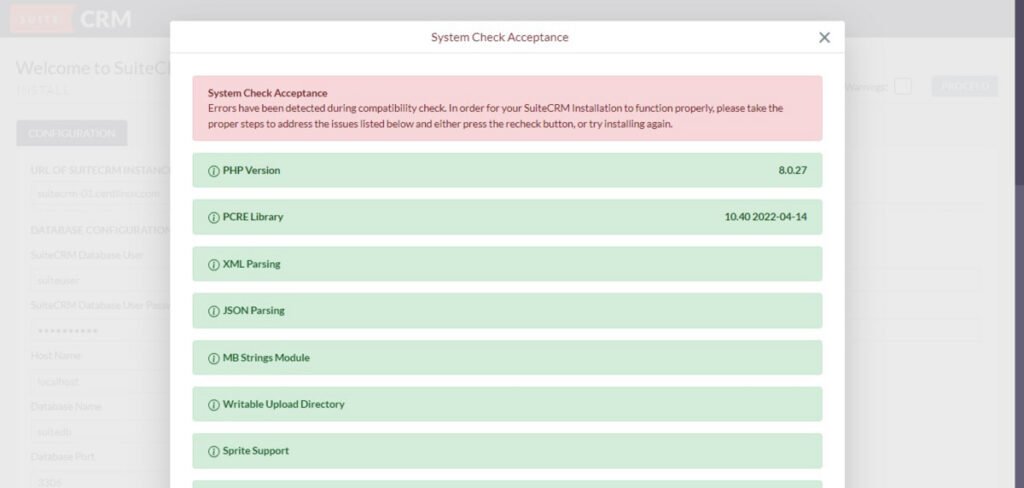
Resolve any failed system checks.
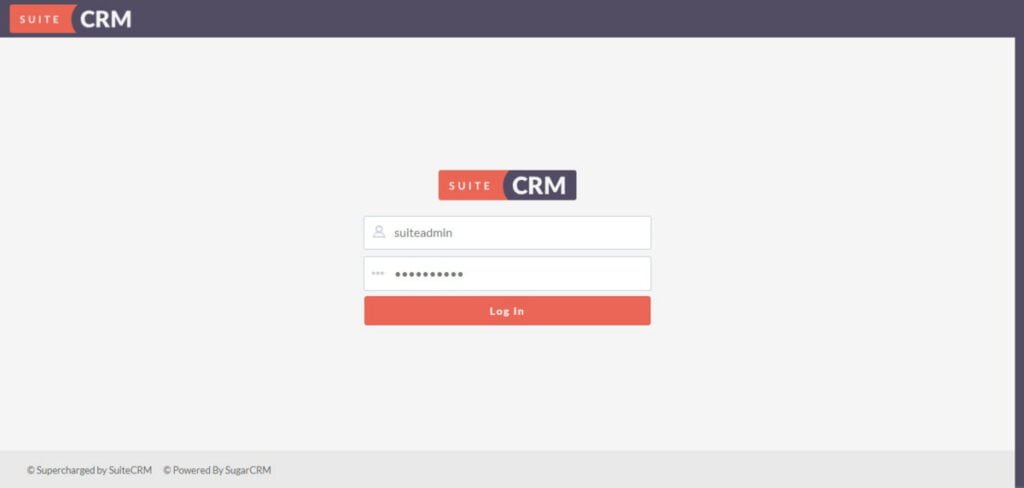
Login as suiteadmin user that you have created in previous configuration page.
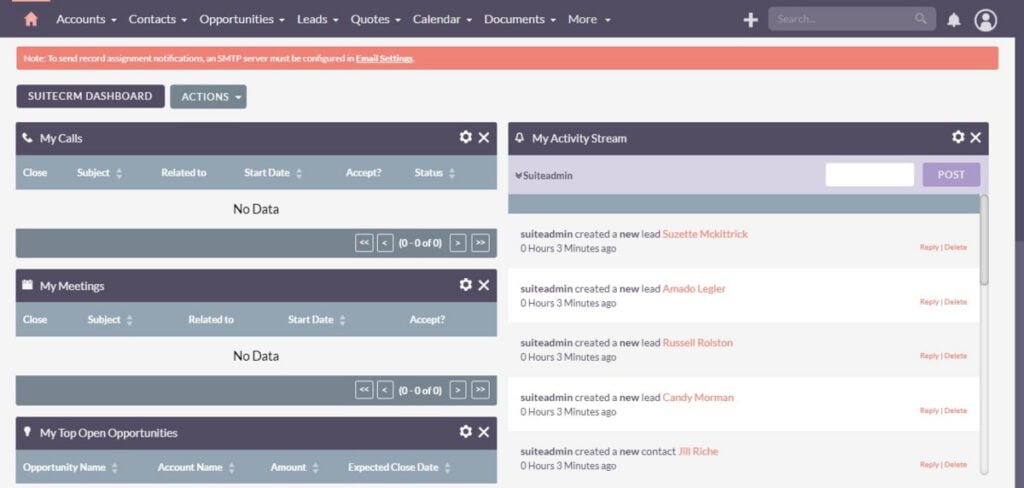
After successful login, you have reached at the SuiteCRM dashboard.
Enable SELinux after completing SuiteCRM installation.
setenforce 1Important Links
If you’re serious about building a career in IT, the Complete Linux Training Course to Get Your Dream IT Job 2025 by Imran Afzal is one of the best investments you can make in yourself. This highly rated course takes you from the basics of Linux to advanced system administration skills, preparing you for real-world IT roles and certifications.
Whether you’re a beginner or brushing up your skills, the structured lessons, hands-on labs, and career-oriented approach make it a perfect choice to boost your confidence and job readiness. Enroll now and start your Linux journey today!
Disclaimer: This post contains affiliate links. If you purchase through these links, I may earn a small commission at no additional cost to you. This helps support the site and allows me to continue creating valuable content.
Video Tutorial
Final Thoughts
As you conclude the process of how to install SuiteCRM on Rocky Linux 9, you’ve taken a significant step towards streamlining your business operations and enhancing customer relationship management. SuiteCRM installation offers a comprehensive suite of features designed to empower your organization, from managing leads and contacts to automating workflows and improving customer engagement.
By following the steps outlined in this guide, you’ve equipped yourself with the tools and knowledge needed to deploy SuiteCRM successfully on your Rocky Linux 9 server. Now, you’re ready to leverage the full potential of SuiteCRM to drive growth, efficiency, and success in your business endeavors.
Whether you need cloud optimization, server management, or automation, I provide comprehensive AWS and Linux services. Hire me to elevate your systems.


Leave a Reply
You must be logged in to post a comment.