Learn how to seamlessly install Cacti monitoring software on Rocky Linux 9 with our step-by-step guide. Elevate your system monitoring capabilities and ensure optimal performance with this comprehensive tutorial tailored for efficient integration on your Linux environment. #centlinux #linux #nagios
Table of Contents
What is Cacti Monitoring Tool?
Cacti is an open-source, web-based network monitoring and graphing tool designed as a front-end application for the open-source, industry-standard data logging tool RRDtool. Cacti allows a user to poll services at predetermined intervals and graph the resulting data. It is generally used to graph time-series data of metrics such as CPU load and network bandwidth utilization. A common usage is to monitor network traffic by polling a network switch or router interface via Simple Network Management Protocol (SNMP).
The front end can handle multiple users, each with their own graph sets, so it is sometimes used by web hosting providers (especially dedicated server, virtual private server, and colocation providers) to display bandwidth statistics for their customers. It can be used to configure the data collection itself, allowing certain setups to be monitored without any manual configuration of RRDtool. Cacti can be extended to monitor any source via shell scripts and executables.
Cacti can use one of two back ends: “cmd.php”, a PHP script suitable for smaller installations, or “Spine” (formerly Cactid), a C-based poller which can scale to thousands of hosts.

How to use Cacti Monitoring Tool?
Using Cacti as a monitoring tool involves several steps, from installation to configuration and utilization. Here’s a basic guide on how to use Cacti:
- Installation: First, you need to install Cacti on your system. This typically involves installing the required software dependencies (such as web server, PHP, and MySQL or MariaDB) and then installing the Cacti software itself. Refer to the official documentation or follow a tutorial for your specific operating system (in this case, Rocky Linux 9) for detailed installation instructions.
- Configuration: Once Cacti is installed, you’ll need to configure it to monitor your network devices, servers, and other resources. This involves setting up data sources, creating graphs, and configuring polling intervals. You’ll also need to configure SNMP (Simple Network Management Protocol) on your devices if you plan to monitor them using SNMP.
- Adding Devices: After configuring Cacti, you can start adding devices to monitor. This typically involves adding the IP addresses or hostnames of your network devices, servers, switches, routers, etc., into Cacti’s device management interface. You may also need to configure SNMP credentials or other monitoring parameters for each device.
- Creating Graphs: Once devices are added, Cacti will begin polling them at regular intervals to collect data. You can then create graphs to visualize this data, such as CPU usage, memory usage, network traffic, etc. Cacti provides a web-based interface for creating and managing graphs, allowing you to customize their appearance and layout.
- Monitoring and Analysis: With your devices and graphs configured, you can now monitor and analyze the data collected by Cacti. You can view real-time and historical data, identify trends, and troubleshoot performance issues. Cacti provides various tools and features for analyzing and interpreting monitoring data, such as zooming, data export, and alerting.
- Maintenance and Optimization: Regularly review and maintain your Cacti installation to ensure optimal performance and accuracy. This includes updating software, optimizing polling intervals, adding new devices or graphs as needed, and reviewing alerts and notifications.
Overall, using Cacti as a monitoring tool involves a combination of installation, configuration, and utilization tasks. By following these steps and regularly monitoring your network and systems, you can leverage Cacti to ensure the health, performance, and reliability of your IT infrastructure.
Recommended Training: Nagios | Ultimate IT monitoring guide with EyesOfNetwork from Tech Academy

Environment Specification
We are using a minimal Rocky Linux 9 virtual machine with following specifications.
- CPU – 3.4 Ghz (2 cores)
- Memory – 2 GB
- Storage – 20 GB
- Operating System – Rocky Linux release 9.1 (Blue Onyx)
- Hostname – cacti-01.centlinux.com
- IP Address – 192.168.116.135/24
Read Also: How to install Centreon on CentOS 8
Preparing Your Rocky Linux Server
By using a ssh client, Login to cacti-01.centlinux.com as root user.
Set a FQDN (Fully Qualified Domain Name) for your Linux Server.
hostnamectl set-hostname cacti-01.centlinux.comRefresh your yum cache by executing following command at Linux Bash prompt.
dnf makecacheUpdate software packages in your Linux operating system with the help of dnf command.
dnf update -ySometimes, above command also updates the Linux Kernel. In such scenario, you should reboot your Linux operating system before continue with Cacti monitoring server installation.
rebootAftrer reboot, check the versions of your Linux operating system and Kernel, that are being used in this tutorial.
cat /etc/rocky-release
uname -r
Output:
Rocky Linux release 9.1 (Blue Onyx)
5.14.0-162.6.1.el9_1.0.1.x86_64
15.6 Inch Laptop with Office 365, 4GB RAM, 128GB Storage Expandable 1TB, 5205U Processor, HD Display, Windows 11 Laptops Computer, Wi-Fi 5, BT4.2, Numpad, Type-C, for Business and Students.
$209.99 (as of July 4, 2025 20:44 GMT +00:00 – More infoProduct prices and availability are accurate as of the date/time indicated and are subject to change. Any price and availability information displayed on [relevant Amazon Site(s), as applicable] at the time of purchase will apply to the purchase of this product.)Prerequisites of Cacti Network Monitoring Tool
There is a long list of dependencies of Cacti Monitoring software including apache, php and mariadb.
We have aggregated these prerequisites in a single command for you, to install all of them in one shot.
dnf install -y httpd httpd-devel mariadb-server \
php-fpm php-common php-mysqlnd php-xml php-ldap php-json \
php-cli php-gd php-gmp php-mbstring php-process php-intl \
net-snmp php-snmp net-snmp-utils rrdtool libicu
Enable and start prerequisite services as follows.
systemctl enable --now httpd mariadb php-fpm snmpdOutput:
Created symlink /etc/systemd/system/multi-user.target.wants/httpd.service → /usr/lib/systemd/system/httpd.service.
Created symlink /etc/systemd/system/mysql.service → /usr/lib/systemd/system/mariadb.service.
Created symlink /etc/systemd/system/mysqld.service → /usr/lib/systemd/system/mariadb.service.
Created symlink /etc/systemd/system/multi-user.target.wants/mariadb.service → /usr/lib/systemd/system/mariadb.service.
Created symlink /etc/systemd/system/multi-user.target.wants/php-fpm.service → /usr/lib/systemd/system/php-fpm.service.
Created symlink /etc/systemd/system/multi-user.target.wants/snmpd.service → /usr/lib/systemd/system/snmpd.service.
Install Cacti Monitoring Software on Rocky Linux 9
Latest stable release of Cacti monitoring tool is available in EPEL (Extra Packages for Enterprise Linux) yum repository.
Therefore, you need to enable EPEL yum repository to install Cacti on Rocky Linux.
dnf install -y epel-releaseBuild cache of newly installed yum repository.
dnf makecacheSearch for the cacti software by using dnf command.
dnf search cactiOutput:
Last metadata expiration check: 0:00:15 ago on Wed 07 Dec 2022 10:56:39 PM CST.
========================= Name Exactly Matched: cacti ==========================
cacti.noarch : An rrd based graphing tool
======================== Name & Summary Matched: cacti =========================
cacti-spine.x86_64 : Threaded poller for Cacti written in C
Get detailed info about Cacti Package.
dnf info cactiOutput:
Last metadata expiration check: 0:00:22 ago on Wed 07 Dec 2022 10:56:39 PM CST.
Available Packages
Name         : cacti
Version      : 1.2.22
Release      : 1.el9
Architecture : noarch
Size         : 32 M
Source       : cacti-1.2.22-1.el9.src.rpm
Repository   : epel
Summary      : An rrd based graphing tool
URL          : https://www.cacti.net/
License      : GPLv2+
Description  : Cacti is a complete frontend to RRDTool. It stores all of the
             : necessary information to create graphs and populate them with
             : data in a MySQL database. The frontend is completely PHP
             : driven.
You can see that, Cacti 1.2.22 is the latest stable release and it is available in EPEL yum repository.
Execute following command to install Cacti Network Monitor on Rocky Linux 9.
dnf install -y cactiEURPMASK Rotating Headphone Stand – PC Gaming Headset Holder, Adjustable Clamp-on Under Desk Hanger With 360 Degree Swivel & Cable Clip Organizer – Black
$12.99 (as of July 4, 2025 23:12 GMT +00:00 – More infoProduct prices and availability are accurate as of the date/time indicated and are subject to change. Any price and availability information displayed on [relevant Amazon Site(s), as applicable] at the time of purchase will apply to the purchase of this product.)Configure PHP Directives
Edit PHP configuration file by using vim text editor.
vi /etc/php.iniLocate and set following directives in this file.
date.timezone = "Asia/Karachi"  ; Define timezone to avoid warnings on time/date functions
file_uploads = On               ; Allow import of templates
memory_limit = 512M             ; maximum amount of memory a PHP script can consume
max_execution_time = 60         ; maximum execution time (in seconds) of a PHP script
Configure MariaDB Database Server
Configure your MariaDB database instance by executing mariadb-secure-installation command.
mariadb-secure-installationOutput:
NOTE: RUNNING ALL PARTS OF THIS SCRIPT IS RECOMMENDED FOR ALL MariaDB
      SERVERS IN PRODUCTION USE!  PLEASE READ EACH STEP CAREFULLY!

In order to log into MariaDB to secure it, we'll need the current
password for the root user. If you've just installed MariaDB, and
haven't set the root password yet, you should just press enter here.

Enter current password for root (enter for none):
OK, successfully used password, moving on...

Setting the root password or using the unix_socket ensures that nobody
can log into the MariaDB root user without the proper authorisation.

You already have your root account protected, so you can safely answer 'n'.

Switch to unix_socket authentication [Y/n] n
 ... skipping.

You already have your root account protected, so you can safely answer 'n'.

Change the root password? [Y/n] Y
New password:
Re-enter new password:
Password updated successfully!
Reloading privilege tables..
 ... Success!


By default, a MariaDB installation has an anonymous user, allowing anyone
to log into MariaDB without having to have a user account created for
them.  This is intended only for testing, and to make the installation
go a bit smoother.  You should remove them before moving into a
production environment.

Remove anonymous users? [Y/n] Y
 ... Success!

Normally, root should only be allowed to connect from 'localhost'.  This
ensures that someone cannot guess at the root password from the network.

Disallow root login remotely? [Y/n] Y
 ... Success!

By default, MariaDB comes with a database named 'test' that anyone can
access.  This is also intended only for testing, and should be removed
before moving into a production environment.

Remove test database and access to it? [Y/n] Y
 - Dropping test database...
 ... Success!
 - Removing privileges on test database...
 ... Success!

Reloading the privilege tables will ensure that all changes made so far
will take effect immediately.

Reload privilege tables now? [Y/n] Y
 ... Success!

Cleaning up...

All done!  If you've completed all of the above steps, your MariaDB
installation should now be secure.

Thanks for using MariaDB!
Edit MariaDB configuration file by using vim text editor.
vi /etc/my.cnf.d/mariadb-server.cnfAdd following directives under [mysqld] section.
join_buffer_size=64M
innodb_file_format=Barracuda
innodb_buffer_pool_size=512M
innodb_buffer_pool_instances=1
innodb_flush_log_at_timeout=3
innodb_read_io_threads=32
innodb_write_io_threads=16
innodb_io_capacity=5000
innodb_io_capacity_max=10000
innodb_large_prefix=1
innodb_doublewrite=OFF
character_set_client=utf8mb4
character_set_server=utf8mb4
collation_server=utf8mb4_unicode_ci
max_heap_table_size=32M
tmp_table_size=32M
Restart MariaDB service to load modified settings.
systemctl restart mariadbBy using mysql command, login to MariaDB database server as root user.
mysql -u root -pLoad time zone tables by executing the respective script, that was provided with MariaDB software.
use mysql;
source /usr/share/mariadb/mysql_test_data_timezone.sql;
Create a database and user for Cacti monitoring server backend.
create database cactidb;
grant all on cactidb.* to cacti@localhost identified by 'P@ssw0rd';
grant select on mysql.time_zone_name to cacti@localhost;
flush privileges;
exit
Locate the cacti.sql. The file is installed with the Cacti monitoring software to create the required objects in backend database.
rpm -ql cacti | grep cacti.sqlOutput:
/usr/share/doc/cacti/cacti.sql
Execute SQL script to create data objects in cactidb database.
mysql -u root -p cactidb < /usr/share/doc/cacti/cacti.sqlEdit config.php file by using vim text editor to define database credentials.
vi /usr/share/cacti/include/config.phpSet following directives in this file.
$database_default  = 'cactidb';
$database_username = 'cacti';
$database_password = 'P@ssw0rd';
Configure Apache Web Server
Cacti installer also added a configuration file for Apache web server.
Edit it with the help of vim text editor.
vi /etc/httpd/conf.d/cacti.confFind ‘Require host localhost’ and replace it with ‘Require all granted’.
Similarly, find ‘Allow from Localhost’ and replace it with ‘Allow from 192.168.116.0/24’
Restart Apache and PHP services to apply changes.
systemctl restart httpd.service php-fpm.serviceMastering DevOps and CI/CD: Complete guide on Docker, Jenkins, and GitHub Actions
$2.99 (as of July 4, 2025 20:44 GMT +00:00 – More infoProduct prices and availability are accurate as of the date/time indicated and are subject to change. Any price and availability information displayed on [relevant Amazon Site(s), as applicable] at the time of purchase will apply to the purchase of this product.)Set Directory Permissions
Cacti requires WRITE permissions on /usr/share/cacti/log/ directory.
Execute following set of commands to make this directory writable by Apache processes.
chown -R apache.apache /usr/share/cacti/log/
semanage fcontext -m -t httpd_sys_rw_content_t "/var/log/cacti(/.*)?"
restorecon -R /var/log/cacti
Enable Cacti Poller Cron Job
Cacti software adds a cron job during installation.
This cron job executes Cacti Poller after every 5 minutes.
But initially this cron job is comment out.
Therefore, edit this cron job using vim text editor.
vi /etc/cron.d/cactiThere is only one line in this file. Remove the ‘#’ to uncomment it.
*/5 * * * * apache /usr/bin/php /usr/share/cacti/poller.php > /dev/null 2>&Configure Linux Firewall
Allow Apache web service in Linux firewall, to make Cacti server accessible across the network.
firewall-cmd --permanent --add-service=http
firewall-cmd --reload
Start Cacti Server Web Setup
Open URL http://cacti-01.centlinux.com/cacti in a web browser to start Cacti web setup.
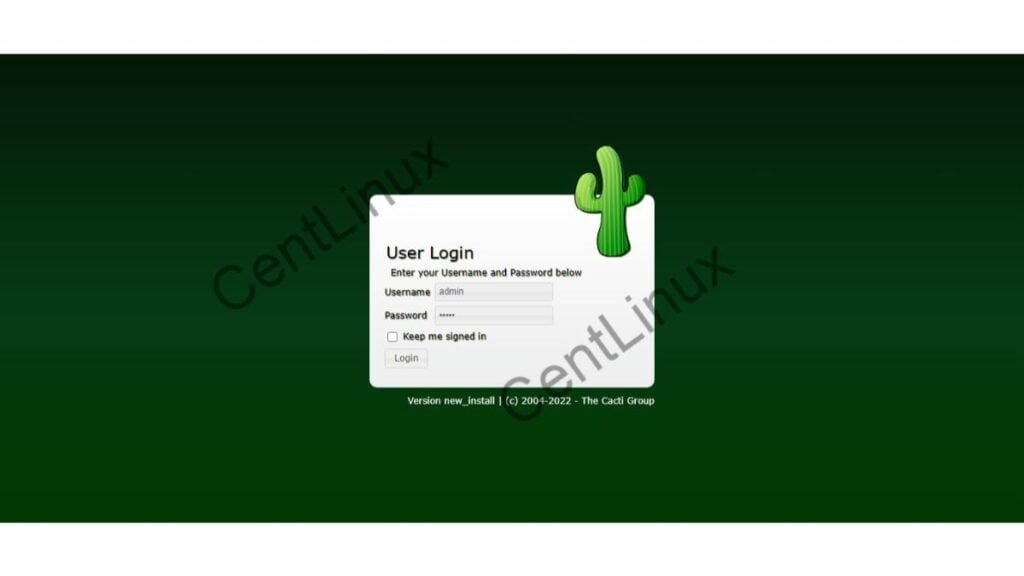
Login by using Cacti default username/password i.e. admin/admin
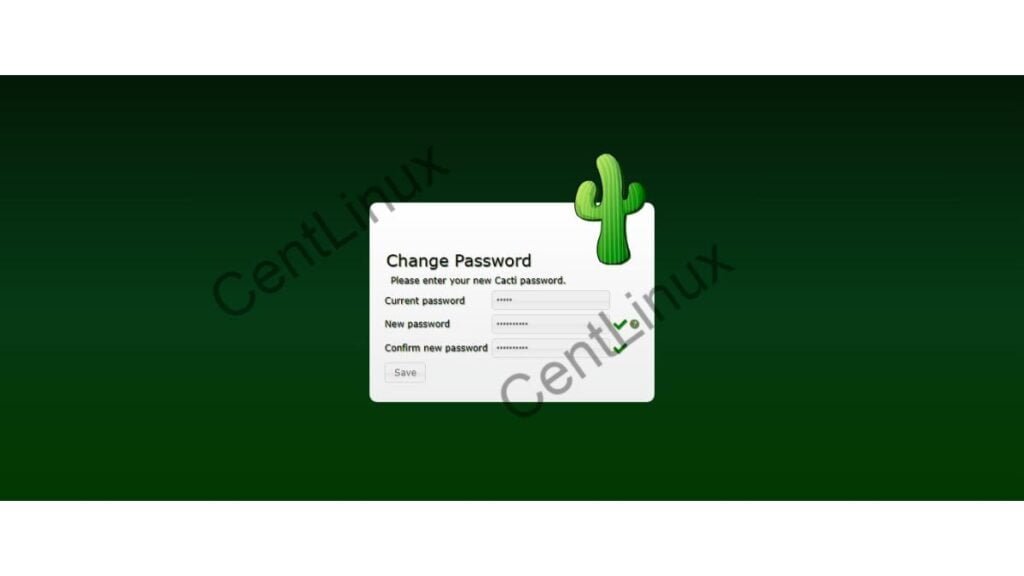
Since, you are login to Cacti web interface for the first time, therefore, you are required to change the default password of admin user.
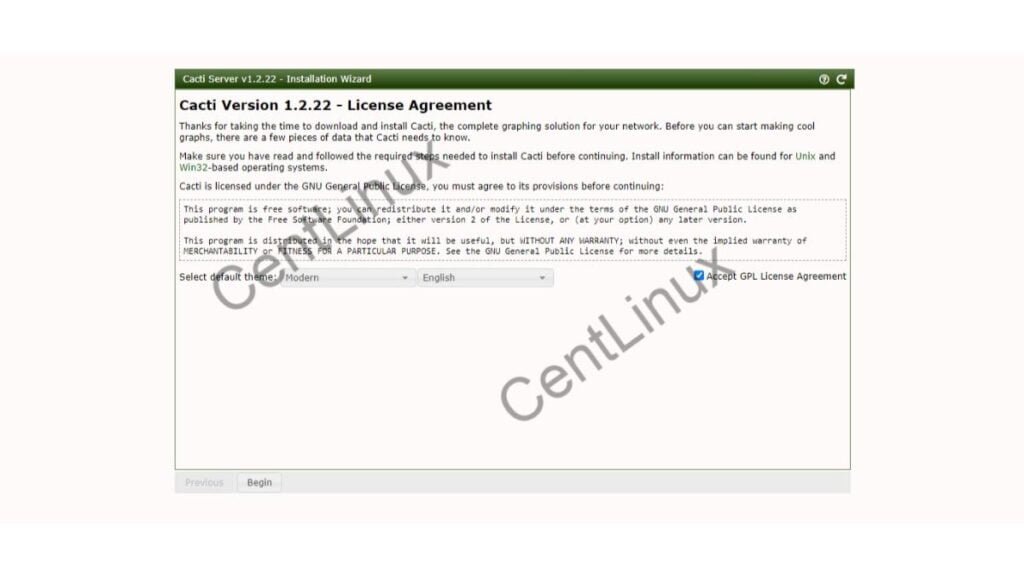
Read and accept the License Agreement of Cacti network monitoring software.
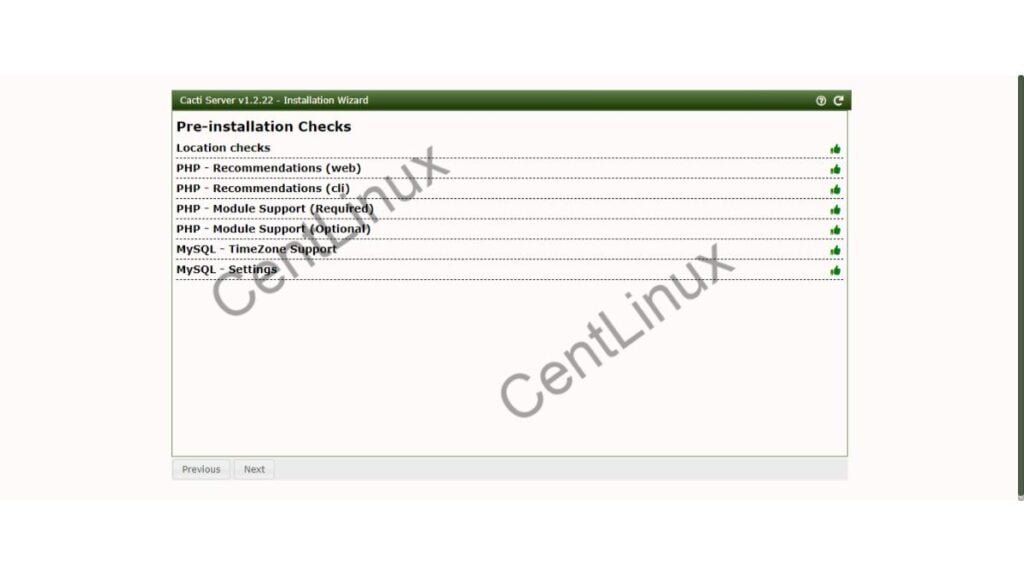
The web setup performs pre-installation checks and will inform you about if there is any failure.
If you have followed the installation steps in this article correctly, then you won’t found any warning on this page.
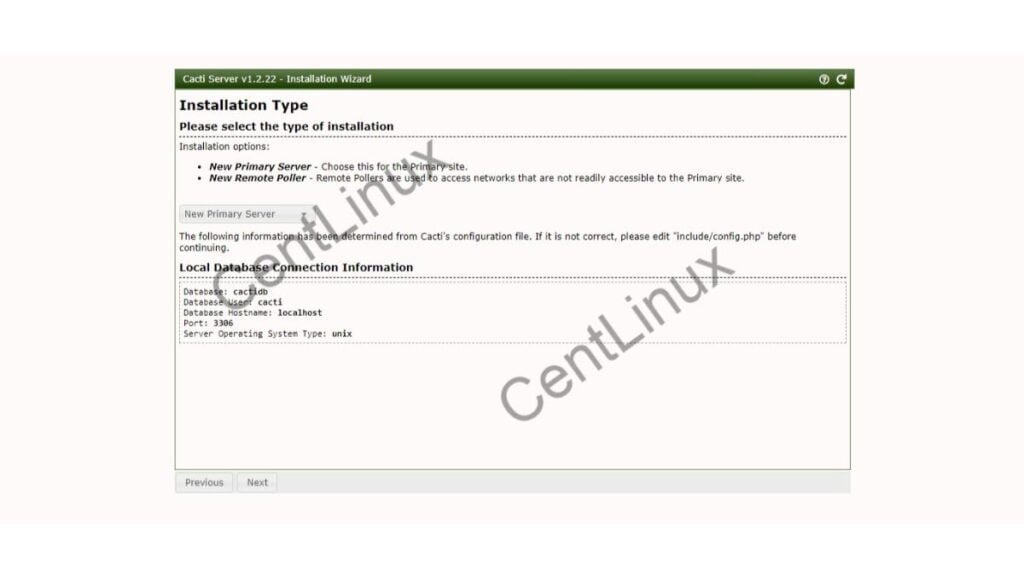
Choose your preferred installation type. Since, this is your first Cacti monitoring server therefore, you should select “New Primary Server”.
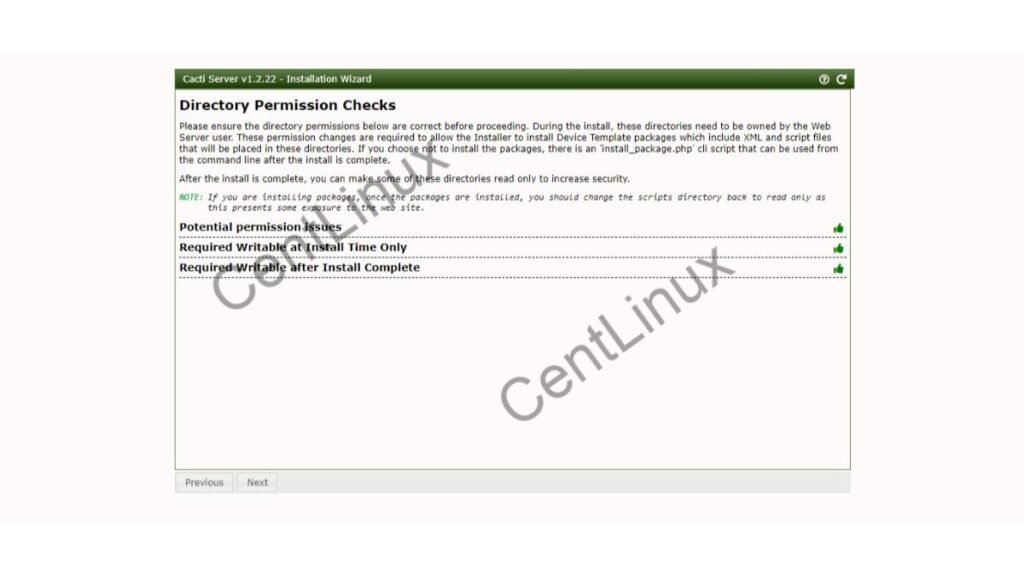
If you have set the file permissions correctly, then there won’t be any warnings.
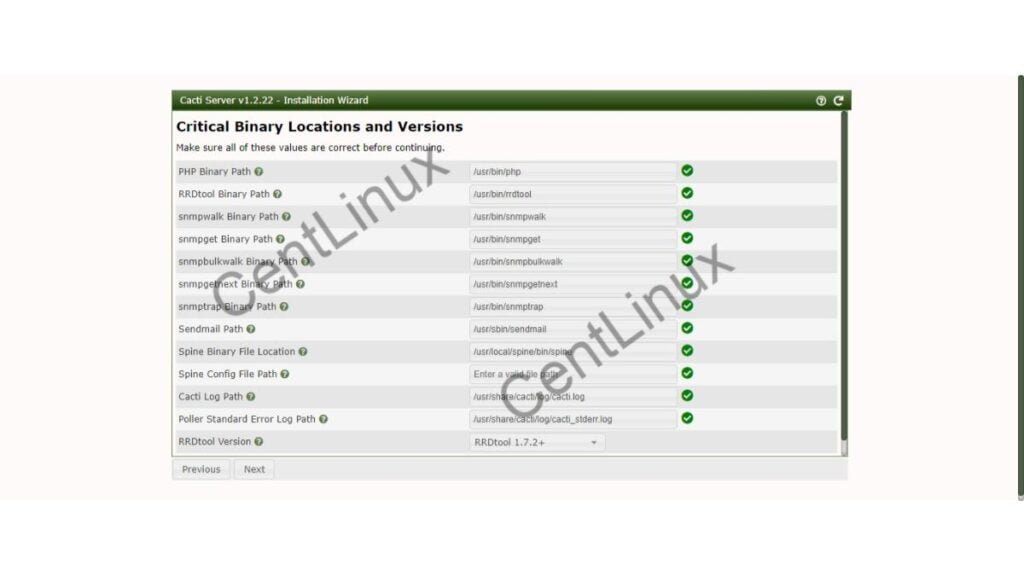
Setup is checking for required binaries, their locations and required versions.
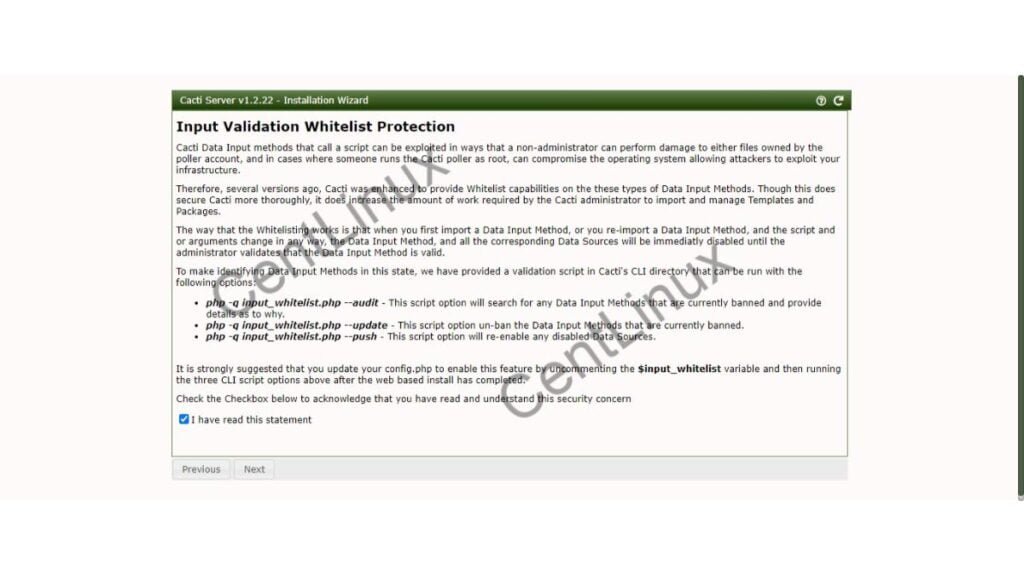
Setup will inform you about a security concern and how to handle it. Accept it and continue.
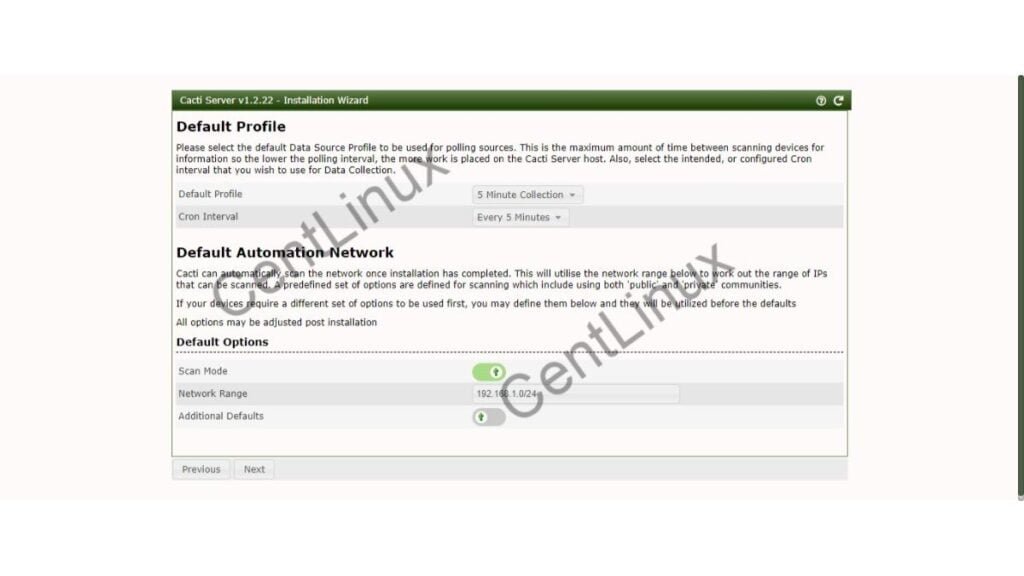
Adjust your default profile and continue.
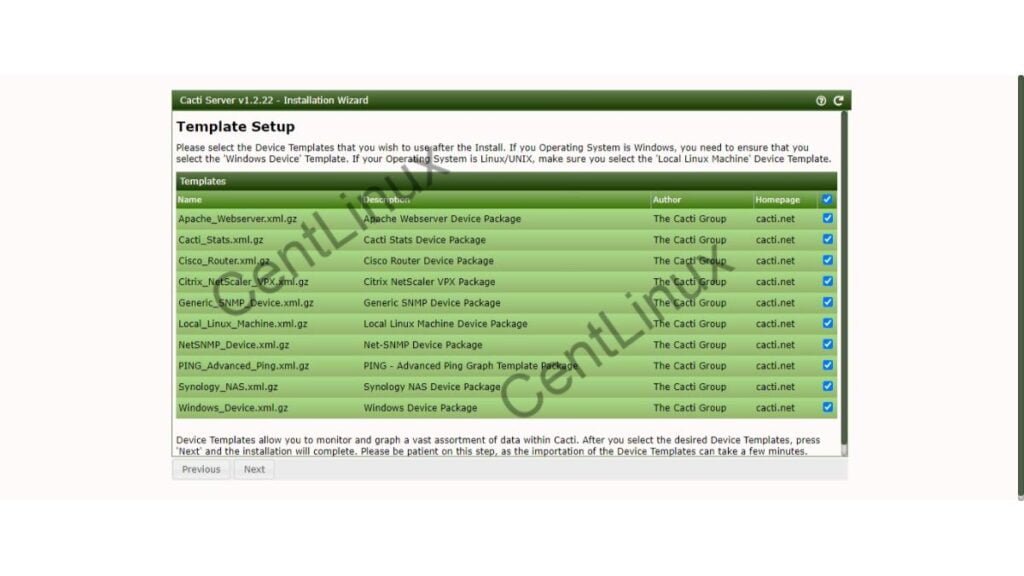
Select the required device templates and continue.
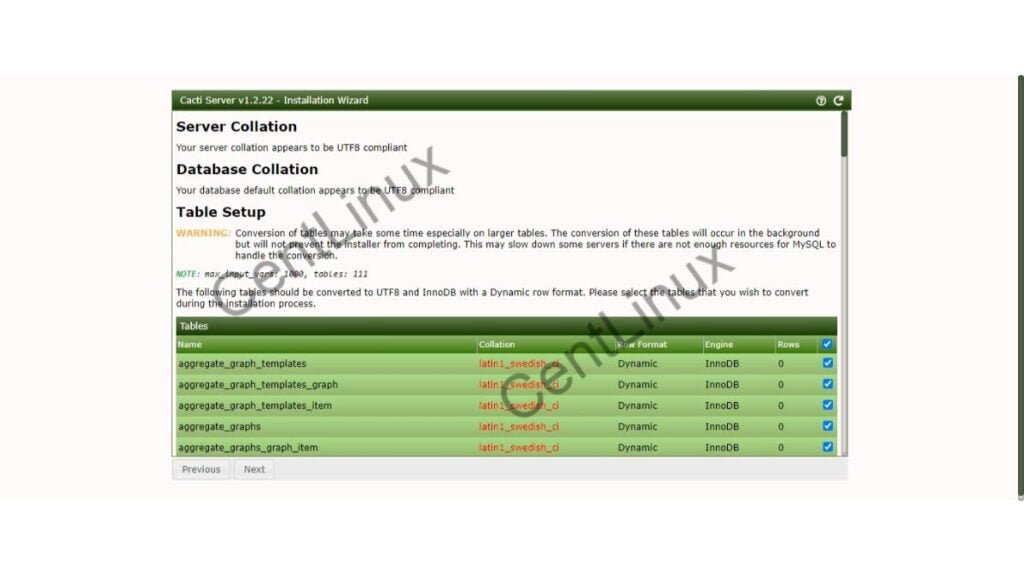
Setup is checking the MariaDB server and database collation along with the Table setup.
Select all tables that required conversion and continue.
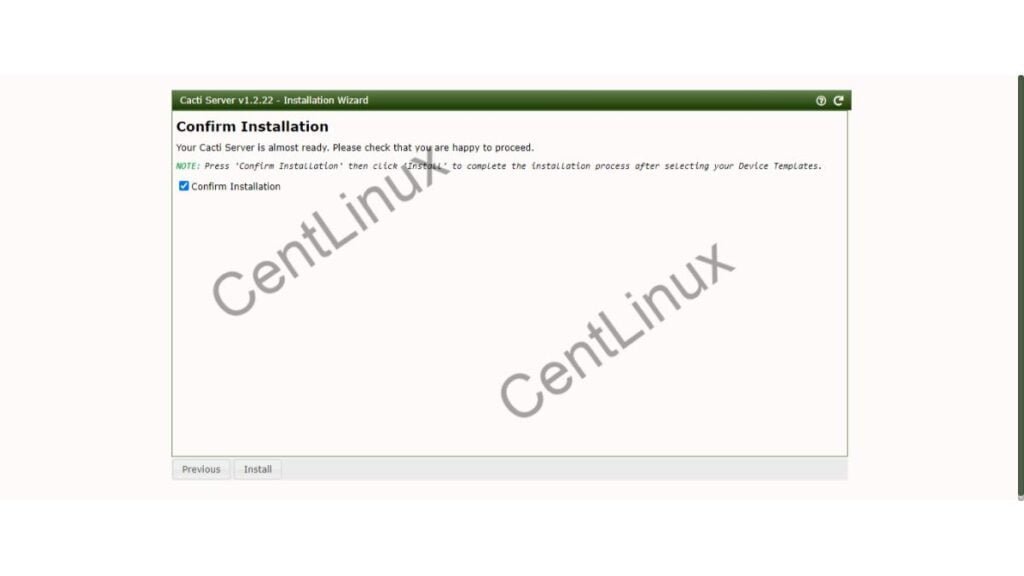
If your configurations are correct, then the setup displays this page to confirm installation of your network monitoring tool.
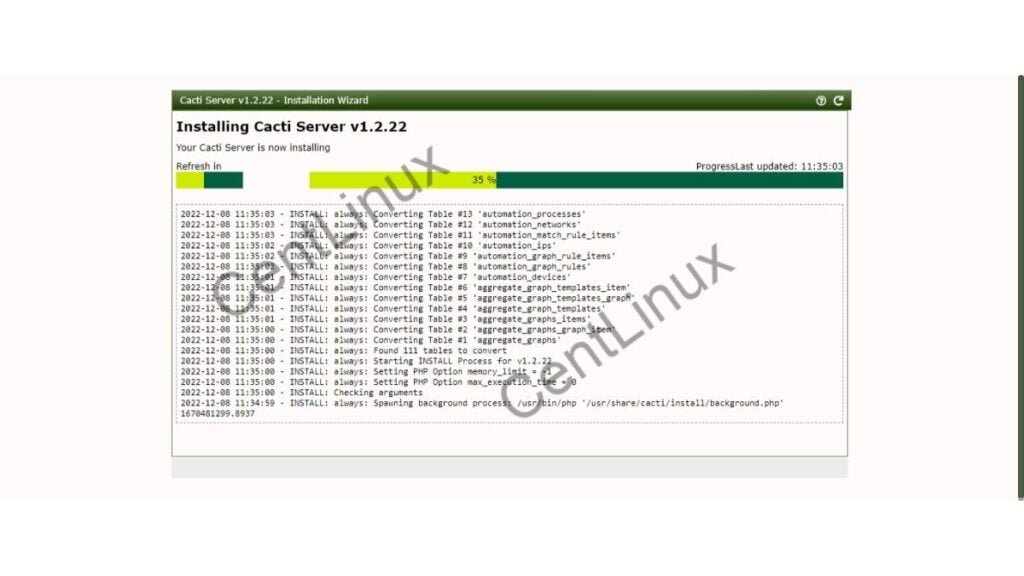
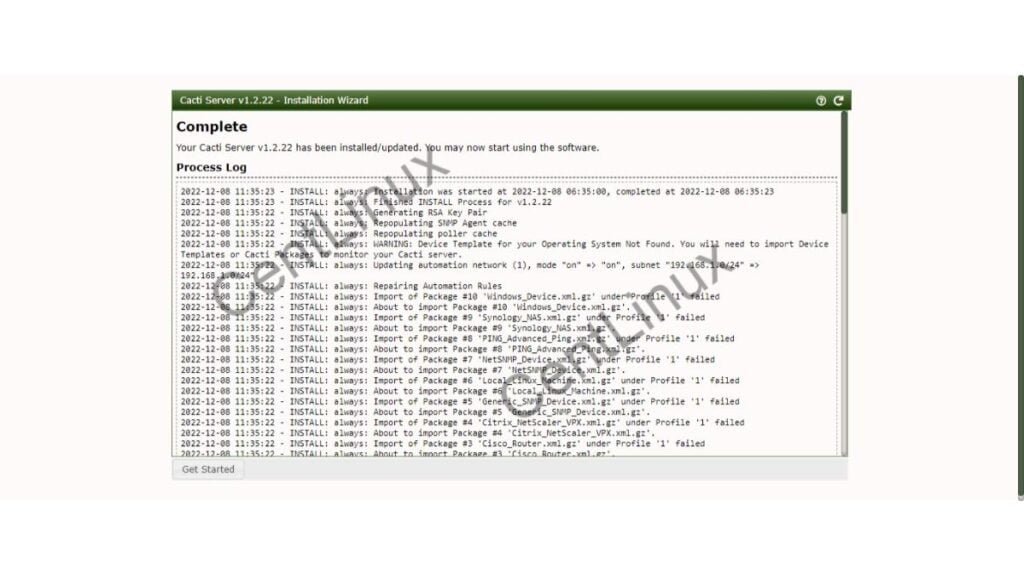
Cacti network monitoring server has been installed on Rocky Linux 9.
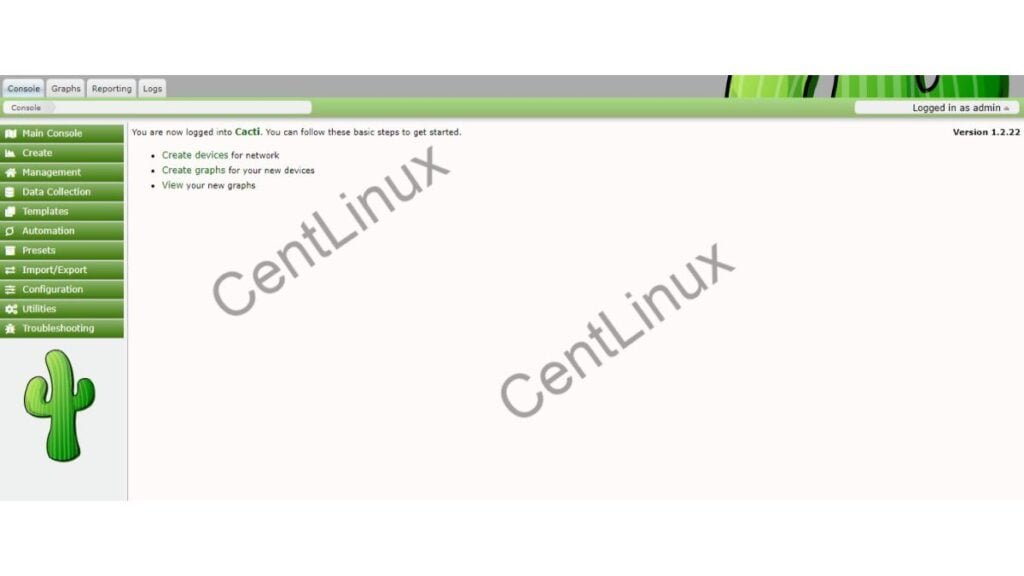
After successful installation, you will reached at the Cacti monitoring Dashboard.
Read Also: How to install Cacti Server on CentOS 8
Final Thoughts
Congratulations on completing the installation of Cacti monitoring software on Rocky Linux 9! With Cacti network monitor up and running, you’re now equipped with a powerful tool to monitor and manage your network devices, servers, and other resources. Harness the insights provided by Cacti to optimize performance, troubleshoot issues, and ensure the reliability of your IT infrastructure. Happy monitoring!
Need a dependable Linux system administrator? I specialize in managing, optimizing, and securing Linux servers to keep your operations running flawlessly. Check out my services on Fiverr!


Leave a Reply
You must be logged in to post a comment.