Discover how to install ejabberd on CentOS 7 with our detailed guide. Follow our step-by-step instructions to set up ejabberd smoothly on your CentOS 7 server. #centlinux #linux #xmpp
Table of Contents
What is ejabberd?
ejabberd is a free and open source XMPP application server. ejabberd is developed by ProcessOne and distibuted under the terms of GNU GPL license. ejabberd is written in ERlang programming language. The name ejabberd is stands for Erlang Jabber Daemon.
ejabberd is a robust and highly scalable XMPP (Extensible Messaging and Presence Protocol) server. It is designed to facilitate real-time communication applications, such as instant messaging, presence information, and group chat. Here are some key features and aspects of ejabberd:
- Scalability: ejabberd can handle large numbers of simultaneous users and messages, making it suitable for both small and large-scale deployments.
- High Availability: It supports clustering and failover, ensuring continuous service availability and reliability.
- Extensibility: ejabberd can be extended with custom modules to add new features or integrate with other systems.
- Compliance: It adheres to the XMPP standards, ensuring compatibility with other XMPP servers and clients.
- Security: ejabberd includes security features such as SSL/TLS encryption, SASL authentication, and access control lists (ACLs).
- Cross-Platform: It runs on various operating systems, including Linux, Windows, and macOS.
- Open Source: ejabberd is open-source software, allowing users to modify and distribute it under the terms of the GNU General Public License (GPL).
ejabberd is commonly used for applications that require real-time communication, such as messaging apps, social networks, gaming platforms, and IoT (Internet of Things) networks.
As of year 2009, ejabberd is one of the most popular open source applications written in ERlang. Since the release of version 3 of ejabberd the versioning scheme was changed to reflect the dates as “Year.Month-Revision”. Latest stable release 19.05 is available through ejabberd official download page, whereas, we can download the latest in-development version of ejabberd from Github.
In this article, we will install ejabberd on CentOS 7 with MariaDB Server as backend database and then test the configurations using Spark IM Client.

Environment Specification
We have provisioned a CentOS 7 virtual machine with following specifications:
- Hostname: – ejabberd-01.example.com
- IP Address – 192.168.116.172 /24
- Operating System – CentOS 7.6
To ensure a smooth installation and reliable performance of ejabberd on CentOS 7, it is essential to use a robust server environment optimized for Linux workloads. The HPE ProLiant MicroServer Gen10 Plus offers excellent performance and scalability with Linux compatibility, making it a popular choice among system administrators managing messaging servers. Additionally, the iRasptek Raspberry Pi 5 Single Board Computer with 16GB RAM is a budget-friendly yet powerful option for hobbyists or small-scale deployments aiming to experiment with ejabberd in a compact setup. Both these devices are best sellers on Amazon and align perfectly with the interests of CentOS and open-source enthusiasts.
Disclaimer: Please note, this post contains Amazon affiliate links; at no extra cost to you, purchases help support our blog.
Read Also: How to install Mattermost Server on CentOS 8
Install ejabberd Prerequisites
Connect with ejabberd-01.example.com using ssh as root user.
We will use MariaDB as the backend database for ejabberd software. Therefore, we are installing mariadb-server software package.
ejabberd also required glibc package to function properly.
We are installing both software packages using yum command.
yum install -y mariadb-server glibcNote: Please refer to our previous article, if you want to install the latest version of MariaDB on CentOS 7.
Enable and start MariaDB service.
systemctl enable mariadb.service
systemctl start mariadb.service
Configure MariaDB instance as follows.
mysql_secure_installationOutput:
NOTE: RUNNING ALL PARTS OF THIS SCRIPT IS RECOMMENDED FOR ALL MariaDB
      SERVERS IN PRODUCTION USE!  PLEASE READ EACH STEP CAREFULLY!

In order to log into MariaDB to secure it, we'll need the current
password for the root user.  If you've just installed MariaDB, and
you haven't set the root password yet, the password will be blank,
so you should just press enter here.

Enter current password for root (enter for none):
OK, successfully used password, moving on...

Setting the root password ensures that nobody can log into the MariaDB
root user without the proper authorisation.

Set root password? [Y/n] Y
New password:
Re-enter new password:
Password updated successfully!
Reloading privilege tables..
 ... Success!


By default, a MariaDB installation has an anonymous user, allowing anyone
to log into MariaDB without having to have a user account created for
them.  This is intended only for testing, and to make the installation
go a bit smoother.  You should remove them before moving into a
production environment.

Remove anonymous users? [Y/n] Y
 ... Success!

Normally, root should only be allowed to connect from 'localhost'.  This
ensures that someone cannot guess at the root password from the network.

Disallow root login remotely? [Y/n] Y
 ... Success!

By default, MariaDB comes with a database named 'test' that anyone can
access.  This is also intended only for testing, and should be removed
before moving into a production environment.

Remove test database and access to it? [Y/n] Y
 - Dropping test database...
 ... Success!
 - Removing privileges on test database...
 ... Success!

Reloading the privilege tables will ensure that all changes made so far
will take effect immediately.

Reload privilege tables now? [Y/n] Y
 ... Success!

Cleaning up...

All done!  If you've completed all of the above steps, your MariaDB
installation should now be secure.

Thanks for using MariaDB!
Prerequisite software packages have been installed on our CentOS 7 server.
Install ejabberd on CentOS 7
ejabberd Community Server 19.05 is released at the time of this writeup.
We can download Linux x86 64-bits RPM Package from ProcessOne’s ejabberd official download page.
cd /tmp
wget https://www.process-one.net/downloads/downloads-action.php?file=/ejabberd/19.05/ejabberd-19.05-0.x86_64.rpm
Install ejabberd software package using rpm command.
rpm -ivh ejabberd-19.05-0.x86_64.rpmOutput:
Retrieving https://www.process-one.net/downloads/ejabberd/19.05/ejabberd-19.05-0.x86_64.rpm
Preparing...                          ################################# [100%]
Updating / installing...
   1:ejabberd-19.05-0                 ################################# [100%]
ejabberd software has been installed on CentOS 7.
Configure ejabberd Backend Database
We have already installed MariaDB Server.
Login to mysql database server.
mysql -u root -p123Create a database and user for ejabberd.
CREATE DATABASE ejabberd;
GRANT ALL ON ejabberd.* TO 'ejabberd'@'localhost' IDENTIFIED BY '123';
FLUSH PRIVILEGES;
EXIT;
Connect as ejabberd user.
mysql -u ejabberd -p123Create the ejabberd database schema using the script, provided within ejabberd installation directory.
USE ejabberd;
SOURCE /opt/ejabberd-19.05/lib/ejabberd-19.05/priv/sql/mysql.sql;
exit
Our MariaDB database is successfully configured and ready to use by ejabberd software.
Now, its time to connect ejabberd with our MariaDB database.
ejabberd default internal database backend is Mnesia. But ejabberd XMPP server is very flexible and support MySQL, PostgreSQL and a few others as ejabberd database backend.
Add the following parameters in ejabberd.yml file to configure MariaDB database backend.
cat >> /opt/ejabberd/conf/ejabberd.yml << EOF
sql_type: mysql
sql_server: "localhost"
sql_database: "ejabberd"
sql_username: "ejabberd"
sql_password: "123"
EOF
ejabberd XMPP server has been configured to use MariaDB database backend.
Create Systemd Service for ejabberd
Now, we need to create a systemd service for ejabberd.
There is a predefined systemd service for ejabberd XMPP server has been provided within ejabberd directory.
Copy the ejabberd.service to systemd services directory.
cp /opt/ejabberd-19.05/bin/ejabberd.service /usr/lib/systemd/system/ejabberd.serviceEnable and start ejabberd service.
systemctl enable ejabberd.service
systemctl start ejabberd.service
ejabberd systemd service has been started.
If you encounter any error during startup of ejabberd.service, it is most probably due to the typo static or syntax error in ejabberd.yml file.
Configure Firewall for ejabberd on CentOS 7
Configure Linux Firewall to allow ejabberd following service ports.
firewall-cmd --permanent --add-port={5280,5222}/tcp
firewall-cmd --reload
Create an Admin User for ejabberd
We can create users to access ejabberd Admin Console using ejabberdctl command.
export PATH=$PATH:/opt/ejabberd-19.05/bin/
ejabberdctl register admin ejabberdexample.com 123
Output:
User admin@ejabberdexample.com successfully registered
We are using the predefined host ejabberdexample.com in ejabberd.yml file.
If you are not happy with that, then you can add a custom host in ejabberd.yml file.
Browse URL http://ejabberd-01.example.com:5280/admin in a client’s browser.
Login as admin@ejabberdexample.com user with 123 password.

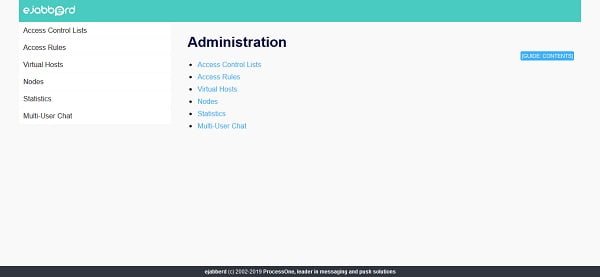
After successful login, you will be at the dashboard of ejabberd Admin console.

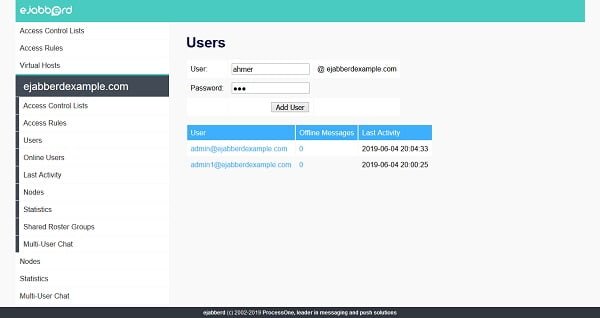
Go to Virtual Hosts > ejabberdexample.com > Users and add an IM (Instant Messaging) user as follows.

Test ejabberd Server using an IM client
To test our ejabberd XMPP server, we need an IM (Instant Messaging) client software.
There are many free IM clients are available over the Internet. But we are using Spark IM client for MS Windows.
Download Spark client from Ignite Realtime Official Website.
Spark installation is pretty straight forward, thus we are skipping the installation steps.
After Spark installation, run it using the shortcut on the Desktop.
The Spark software will display a login prompt.

But before login, we have to do some settings therein.
Click on Advanced settings.

Adjust the settings as per the above screenshot.
Click on Ok.

We are again at the Login screen.
Login as ahmer user.

We are successfully logged in to ejabberd XMPP Server.
Final Thoughts
Installing ejabberd on CentOS 7 gives you a robust and scalable XMPP server for real-time messaging, presence, and collaboration. In this guide, we walked through installing the necessary dependencies, setting up ejabberd, configuring basic settings, and starting the service.
With ejabberd now up and running, you have a reliable platform ready to support secure and efficient communication. To maintain optimal performance and security, remember to regularly update ejabberd, monitor server activity, and fine-tune your configurations based on your deployment needs.
Struggling with AWS or Linux server issues? I specialize in configuration, troubleshooting, and security to keep your systems performing at their best. Check out my Freelancer profile for details.

Leave a Reply
You must be logged in to post a comment.