Learn how to effortlessly install ImageMagick on Rocky Linux 9 with our detailed step-by-step guide. Enhance your image processing capabilities and unlock creative potential today! #centlinux #linux #imagemagick #imagick
Table of Contents
What is ImageMagick?
ImageMagick is a powerful open-source software suite for displaying, converting, and editing raster image files. It can read and write over 200 image file formats, making it a versatile tool for working with images. ImageMagick is commonly used for tasks such as converting between different image formats, resizing and cropping images, applying various effects and filters, and generating thumbnails. It provides a command-line interface for batch processing as well as libraries for integration into programming languages like Python, PHP, and Perl. ImageMagick is widely used in web development, graphic design, and scientific applications due to its flexibility and extensive capabilities.

ImageMagick Features
ImageMagick offers a wide range of features for image processing and manipulation. Here are some key features:
- Image Conversion: ImageMagick supports conversion between over 200 image formats, including popular formats like JPEG, PNG, GIF, TIFF, and BMP.
- Image Editing: It provides tools for basic image editing tasks such as resizing, cropping, rotating, flipping, and adjusting colors.
- Image Effects: ImageMagick allows users to apply a variety of effects and filters to images, including blur, sharpen, emboss, edge detection, and more.
- Image Composition: Users can composite multiple images together, overlay text or graphics onto images, and create complex image compositions.
- Batch Processing: ImageMagick supports batch processing, allowing users to apply operations to multiple images simultaneously.
- Image Analysis: It provides tools for analyzing images, including extracting metadata, identifying colors, measuring image properties, and performing basic image recognition tasks.
- Command-Line Interface: ImageMagick can be used via a command-line interface, making it easy to integrate into scripts and automated workflows.
- Programming Interfaces: It offers APIs and libraries for integrating ImageMagick into programming languages like Python, PHP, Perl, Ruby, and more.
- High-Quality Rendering: ImageMagick uses high-quality rendering algorithms to ensure accurate and visually pleasing results.
- Cross-Platform Compatibility: ImageMagick is available for multiple platforms, including Linux, Windows, macOS, and various Unix systems.
Overall, ImageMagick is a versatile and powerful tool for image processing, editing, and manipulation, suitable for a wide range of applications including web development, graphic design, scientific analysis, and more.
Read Also: How to install OpenLiteSpeed on Rocky Linux 9
What is Imagick?
Imagick is a PHP extension that provides a wrapper for the ImageMagick library, allowing PHP developers to access and manipulate images using ImageMagick’s functionality. It enables PHP scripts to perform a wide range of image processing tasks, such as resizing, cropping, rotating, applying filters and effects, and converting between different image formats.
With Imagick, PHP developers can harness the power of ImageMagick directly within their PHP applications, making it easier to work with images and perform complex image manipulations programmatically. This extension is commonly used in web development for tasks such as generating thumbnails, processing user-uploaded images, creating dynamic image content, and more.
Imagick provides an object-oriented interface in PHP, making it intuitive to use for developers familiar with object-oriented programming principles. Additionally, it offers extensive documentation and examples to help developers get started with integrating image processing capabilities into their PHP applications efficiently.
Environment Specification
We are using a minimal Rocky Linux 9 virtual machine with following specifications.
- CPU – 3.4 Ghz (2 cores)
- Memory – 2 GB
- Storage – 20 GB
- Operating System – Rocky Linux release 9.1 (Blue Onyx)
- Hostname – web-01.centlinux.com
- IP Address – 192.168.116.128/24
For this tutorial, I recommend setting up your Rocky Linux 9 environment on either a reliable Mini PC or a VPS, depending on your needs and budget. A Mini PC offers a compact, energy-efficient option perfect for hands-on experimentation and long-term projects right at your desk.
[Power Your Projects with the Best Mini PC – Shop Now!]
Alternatively, a VPS from Rose Hosting provides scalable, cloud-based Linux server access with minimal setup time and remote flexibility. Both options are excellent for practicing Linux server administration and software installations like ImageMagick.
[Launch Your Own VPS with Rose Hosting – Click to Get Started!]
If you’re interested, you can find affordable and performance-optimized Mini PCs and VPS plans through the affiliate links below to kickstart your Linux experiments.
Disclaimer: This blog post contains affiliate links. If you purchase through these links, I may earn a small commission at no extra cost to you, which helps support this site and keep the tutorials free.
Update Rocky Linux Server
Start by logging into your Linux server as the root user. To do this, you can use any SSH client of your choice, such as PuTTY or the built-in terminal in Linux or macOS. Once you have successfully logged in, you will have administrative access to your server.
Next, execute the following command in the Linux terminal to update your Rocky Linux server. This will ensure that all installed packages are up-to-date with the latest security patches and software improvements, optimizing the system’s performance and stability.
dnf update -yIf above command updates your Linux Kernel, then you should reboot your Linux server, before moving forward with this Linux tutorial.
rebootNote down the versions of Linux operating system and Linux Kernel.
cat /etc/rocky-release
uname -r
Output:
Rocky Linux release 9.1 (Blue Onyx)
5.14.0-162.23.1.el9_1.x86_64
Install ImageMagick Prerequisites
Here, we are installing ImageMagick with PHP-Imagick to use by a web application for conversion of images.
Now, there is a question arises in the mind of many readers that:
Is it mandatory to setup a LAMP server for ImageMagick?
The answer is certainly NOT.
You can easily install ImageMagick separately on a Linux server. But it is being observed that, the ImageMagick is most commonly used by web applications. Therefore, we are installing a PHP based web server here.
Execute following dnf command to install Apache and PHP on Rocky Linux 9.
dnf install -y httpd php-fpmEnable and start Apache and PHP services.
systemctl enable --now httpd php-fpmTo ensure that your websites are accessible over the network, it is crucial to allow the HTTP service through the Linux firewall. By doing this, you enable incoming traffic on port 80, which is required for serving web pages to users. If the firewall is blocking HTTP traffic, your websites will not be reachable from external networks. Follow the necessary steps to configure the firewall settings, ensuring that HTTP service is properly enabled and your websites can be accessed without any restrictions.
firewall-cmd --permanent --add-service=http
firewall-cmd --reload
Install Third Party Yum Repositories
ImageMagick is available through the EPEL (Extra Packages for Enterprise Linux) repository, which provides additional software packages not included in the default Linux repositories. To access and install ImageMagick, you first need to enable the EPEL repository on your system. This repository contains a wide range of useful tools and utilities, including ImageMagick, that are essential for various tasks on Linux servers. To enable the EPEL repository, simply execute the following dnf command. Once enabled, you’ll be able to install ImageMagick and other packages directly from EPEL with ease.
dnf install -y epel-releaseAdditionally, you may enable the CRB (CodeReady Builder) yum repository.
Be informed that, Power Tools repository has been replaced by CRB repository in Rocky Linux 9.
Enable the CRB repository executing following Linux command.
/usr/bin/crb enableOutput:
Enabling CRB repo
CRB repo is enabled and named: crb
Build yum cache for newly installed yum repositories.
dnf makecacheInstall ImageMagick on Rocky Linux 9
Now that all the necessary repositories have been successfully set up, you are ready to install ImageMagick on your Linux system. With the EPEL repository enabled, the process becomes straightforward. You can easily install ImageMagick and all its dependencies by invoking a simple dnf command in your terminal. This will ensure that the latest version of ImageMagick is downloaded and installed, allowing you to leverage its powerful image manipulation capabilities on your server. Follow the command below to complete the installation and get ImageMagick up and running.
dnf install -y ImageMagick ImageMagick-develCheck the version of Magick-config to verify ImageMagick installation.
Magick-config --versionInstall Imagick (PHP Extension)
PHP Imagick is a PHP extension to create and modify images using the ImageMagick API.
You need to install PHP development and PHP Pear to install and manage PHP extensions.
dnf install -y php-devel php-pear makeNow, you can install PHP Imagick by executing pecl command.
pecl install imagickAdd Imagick extension to php.ini file.
echo "extension=imagick.so" > /etc/php.d/20-imagick.iniRestart Apache and PHP services to load Imagick module.
systemctl restart httpd php-fpmExecute following command to verify that Imagick module is loaded successfully.
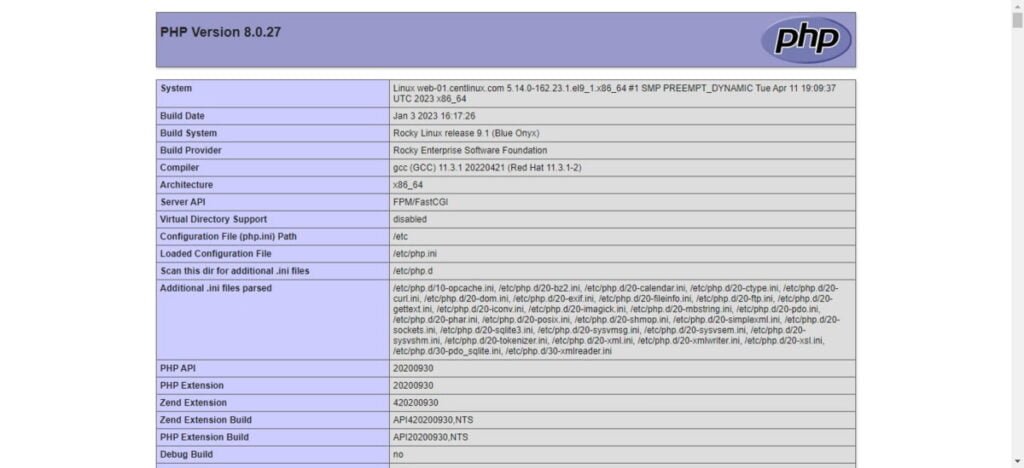
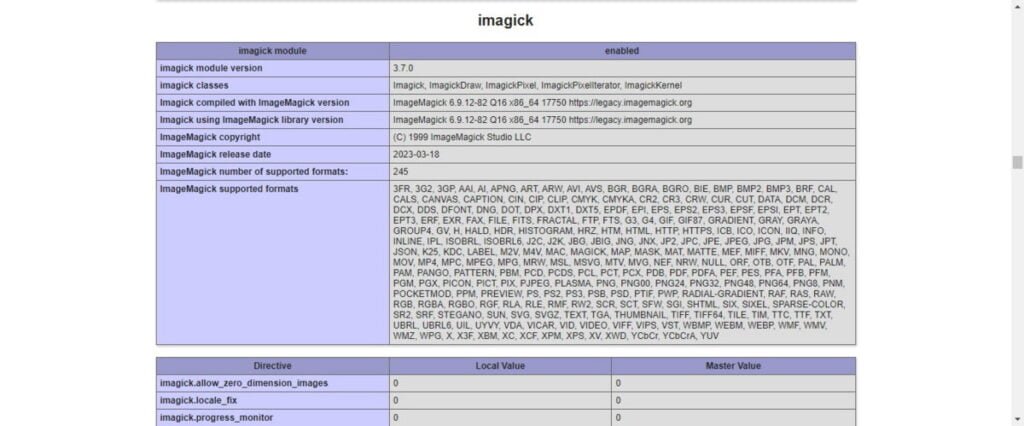
php -m | grep imagickYou can also verify this by creating a phpinfo webpage.
echo "<?php phpinfo ();?>" > /var/www/html/index.phpOpen URL http://web-01.centlinux.com in a web browser.

Scroll down and you will find the Imagick section there.

Video Tutorial
To make the installation process even easier, we’ve created a detailed video tutorial that walks you through each step to install ImageMagick on Linux. Watching the video will provide you with a visual guide, helping you follow along and complete the installation without any confusion. Whether you’re a beginner or an experienced Linux user, the video will simplify the process, ensuring that you set up ImageMagick correctly and efficiently. Don’t miss out—click the video below to watch and learn!
Final Thoughts
When it comes to install ImageMagick on Rocky Linux 9, the possibilities for enhancing your image processing capabilities are endless. Whether you’re a developer, designer, or enthusiast, ImageMagick opens up a world of creative potential and practical utility. By following our comprehensive guide, you’ll seamlessly integrate this powerful tool into your workflow, unlocking new avenues for image manipulation, conversion, and analysis. Embrace the power of ImageMagick on Rocky Linux 9, and elevate your projects to new heights with ease and efficiency.
Searching for a skilled Linux admin? From server management to security, I ensure seamless operations for your Linux systems. Find out more on my Freelancer profile!
FAQs
Q1: Can I customize ImageMagick during installation on Rocky Linux 9?
A1: Yes, you can install additional modules or compile from source for custom features, but the default package covers most common needs.
Q2: Is there a way to check if ImageMagick is installed correctly after installation?
A2: Yes, run
convert -version or
magick -version in the terminal to verify the installed version and confirm successful installation.
Q3: Will installing ImageMagick affect my system’s existing graphics programs?
A3: Generally no; ImageMagick is standalone, but it’s best to ensure it doesn’t conflict with other image processing tools if you install from source.
Q4: Can I install specific ImageMagick features or delegates on Rocky Linux 9?
A4: Yes, you can install additional libraries or delegates like Ghostscript for PDF handling by installing related packages.
Q5: Is it possible to run ImageMagick commands on Rocky Linux 9 remotely?
A5: Absolutely, you can execute ImageMagick commands through SSH or remote scripts to process images on a server from afar.
What’s Next
If you’re serious about building a career in IT, the Complete Linux Training Course to Get Your Dream IT Job 2025 by Imran Afzal is one of the best investments you can make in yourself. This highly rated course takes you from the basics of Linux to advanced system administration skills, preparing you for real-world IT roles and certifications.
Whether you’re a beginner or brushing up your skills, the structured lessons, hands-on labs, and career-oriented approach make it a perfect choice to boost your confidence and job readiness. Enroll now and start your Linux journey today!
Disclaimer: This post contains affiliate links. If you purchase through these links, I may earn a small commission at no additional cost to you. This helps support the site and allows me to continue creating valuable content.


Leave a Reply
You must be logged in to post a comment.