Learn how to install PostgreSQL on Ubuntu Server 18.04 LTS with this step-by-step guide. Configure, secure, and manage your PostgreSQL database efficiently. #centlinux #ubuntu #postgres
Table of Contents
What is PostgreSQL?
PostgreSQL is a powerful, open-source object-relational database management system (DBMS). It is known for its robustness, scalability, and standards-compliance. Here’s a more detailed overview:
Key Features
- Open Source: PostgreSQL is free to use and distribute, with an active community that contributes to its development and maintenance.
- ACID Compliance: It ensures that transactions are processed reliably, adhering to the principles of Atomicity, Consistency, Isolation, and Durability.
- Extensibility: Users can define their own data types, operators, and index methods. It also supports procedural languages like PL/pgSQL, PL/Tcl, PL/Perl, and PL/Python.
- SQL Compliance: PostgreSQL supports a large portion of the SQL standard, making it compatible with many SQL-based applications.
- Concurrency: Uses Multi-Version Concurrency Control (MVCC) to allow multiple users to read and write data simultaneously without conflicts.
- Data Integrity: Features such as foreign keys, joins, views, triggers, and stored procedures help maintain data accuracy and reliability.
- Scalability and Performance: Capable of handling large volumes of data and high concurrency with advanced indexing techniques, efficient query execution, and optimization strategies.
- Full-text Search: Integrated support for full-text search allows for efficient searching of text data.
- JSON Support: Includes robust support for storing and querying JSON data, making it suitable for NoSQL-style applications.

Use Cases
- Web and Mobile Applications: Due to its reliability and robustness, many developers use PostgreSQL as the database backend for web and mobile applications.
- Geospatial Applications: PostgreSQL, with its PostGIS extension, is widely used for geospatial databases.
- Data Warehousing: With features like table partitioning and parallel query execution, PostgreSQL can be used effectively in data warehousing.
- Business Intelligence: Supports complex queries and data analysis, making it suitable for business intelligence applications.
History and Development
PostgreSQL has its roots in the POSTGRES project at the University of California, Berkeley. It was developed to overcome the limitations of existing database systems, focusing on extensibility and support for complex data types. The first release, POSTGRES, was in 1989, and it evolved into PostgreSQL in the mid-1990s.
Community and Support
The PostgreSQL community is active and vibrant, with contributors from around the world. There are regular releases, with new features and improvements, extensive documentation, and numerous forums, mailing lists, and professional support options available.
Recommended Training: SQL and PostgreSQL for Beginners: Become a SQL Expert from Jon Avis

What is pgAdmin4?
pgAdmin4 is web-based interface for database administration of PostgreSQL servers. pgAdmin is the most popular and feature enrich web interface for PostgreSQL. pgAdmin is also free and open source.
pgAdmin 4 is a web-based management tool for PostgreSQL, one of the most popular open-source relational database systems. It provides a user-friendly graphical interface to manage and interact with PostgreSQL databases. Here are the key features and functionalities of pgAdmin 4:
Key Features
Web-based Interface:
- Accessible through a web browser, allowing remote database management without the need for client installations.
Database Management:
- Create, view, and modify database objects such as tables, views, indexes, and sequences.
- Support for advanced PostgreSQL features like partitioning, replication, and extensions.
Query Tool:
- An integrated SQL query editor with syntax highlighting, autocompletion, and error detection.
- Execute complex queries and view results in a tabular format.
User Management:
- Manage roles and permissions, create and manage user accounts, and assign privileges.
Backup and Restore:
- Tools to perform database backups and restores, ensuring data integrity and security.
- Supports both full and partial backups.
Graphical Query Plan Analysis:
- Visual representation of query execution plans to help optimize and troubleshoot query performance.
Server Monitoring:
- Monitor server activity, including connections, locks, and processes.
- View server and database statistics to manage performance.
Extensions Management:
- Install and manage PostgreSQL extensions to add additional functionality.
Cross-platform:
- Available for multiple operating systems, including Windows, macOS, and Linux.
Customization:
- Customize the interface and functionality through settings and plugins.
Use Cases
- Database Development: Ideal for developers working on PostgreSQL-based applications, providing tools to write and test SQL queries, design schemas, and manage data.
- Database Administration: Useful for database administrators for tasks like user management, performance monitoring, backup and recovery, and server configuration.
- Learning and Education: A helpful tool for students and educators to learn and teach database concepts and SQL with a practical interface.
Have a look at our previous article, if you intend to install PostgreSQL on CentOS 7.
Ubuntu Server Specification
We are using a minimal Ubuntu Server 18.04 virtual machine with following specification.
- CPU – 3.4 Ghz (2 cores)
- Memory – 2 GB
- Storage – 20 GB
- Operating System – Ubuntu Server 18.04 LTS
- Hostname – postgresql-01.centlinux.com
- IP Address – 192.168.116.218 /24
Read Also: How to Run Postgres Docker Container
Amazon Fire HD 10 Kids Pro tablet (newest model) ages 6-12 | Bright 10.1″ HD screen | Slim case for older kids, ad-free content, parental controls, 13-hr battery, 32 GB, Mint
$104.99 (as of July 5, 2025 20:48 GMT +00:00 – More infoProduct prices and availability are accurate as of the date/time indicated and are subject to change. Any price and availability information displayed on [relevant Amazon Site(s), as applicable] at the time of purchase will apply to the purchase of this product.)Update Ubuntu Software Packages
Connect with postgresql-01.centlinux.com as a privileged user by using a ssh tool.
Check the apt repository and obtain the list of packages that can be updated on this Ubuntu Server.
sudo apt updateUpgrade all available packages as follows.
sudo apt upgrade -yInstall PostgreSQL APT Repository
Download and import GPG Key of PostgreSQL apt repository.
wget --quiet -O - https://www.postgresql.org/media/keys/ACCC4CF8.asc | sudo apt-key add -Add PostgreSQL apt repository by creating a repository source file.
$ sudo sh -c 'echo "deb http://apt.postgresql.org/pub/repos/apt/ `lsb_release -cs`-pgdg main" >> /etc/apt/sources.list.d/pgdg.list'Install PostgreSQL on Ubuntu
We are now ready to install PostgreSQL and relevant packages using apt command.
sudo apt -y install postgresql postgresql-contribOutput:
[sudo] password for ahmer:
Reading package lists... Done
Building dependency tree
Reading state information... Done
The following package was automatically installed and is no longer required:
  libdumbnet1
Use 'sudo apt autoremove' to remove it.
The following additional packages will be installed:
  libpq5 libsensors4 postgresql-10 postgresql-client-10
  postgresql-client-common postgresql-common ssl-cert sysstat
Suggested packages:
  lm-sensors postgresql-doc locales-all postgresql-doc-10 libjson-perl
  openssl-blacklist isag
The following NEW packages will be installed:
  libpq5 libsensors4 postgresql postgresql-10 postgresql-client-10
  postgresql-client-common postgresql-common postgresql-contrib ssl-cert
  sysstat
0 upgraded, 10 newly installed, 0 to remove and 0 not upgraded.
Need to get 28.8 kB/5,344 kB of archives.
After this operation, 21.1 MB of additional disk space will be used.
...
Setting up ssl-cert (1.0.39) ...
Setting up libpq5:amd64 (10.12-0ubuntu0.18.04.1) ...
Setting up postgresql-client-common (190ubuntu0.1) ...
Setting up postgresql-common (190ubuntu0.1) ...
Adding user postgres to group ssl-cert

Creating config file /etc/postgresql-common/createcluster.conf with new version
Building PostgreSQL dictionaries from installed myspell/hunspell packages...
Removing obsolete dictionary files:
Created symlink /etc/systemd/system/multi-user.target.wants/postgresql.service â /lib/systemd/system/postgresql.service.
Setting up libsensors4:amd64 (1:3.4.0-4) ...
Setting up postgresql-client-10 (10.12-0ubuntu0.18.04.1) ...
update-alternatives: using /usr/share/postgresql/10/man/man1/psql.1.gz to provide /usr/share/man/man1/psql.1.gz (psql.1.gz) in auto mode
Setting up sysstat (11.6.1-1ubuntu0.1) ...

Creating config file /etc/default/sysstat with new version
update-alternatives: using /usr/bin/sar.sysstat to provide /usr/bin/sar (sar) in auto mode
Created symlink /etc/systemd/system/multi-user.target.wants/sysstat.service â /lib/systemd/system/sysstat.service.
Setting up postgresql-10 (10.12-0ubuntu0.18.04.1) ...
Creating new PostgreSQL cluster 10/main ...
/usr/lib/postgresql/10/bin/initdb -D /var/lib/postgresql/10/main --auth-local peer --auth-host md5
The files belonging to this database system will be owned by user "postgres".
This user must also own the server process.

The database cluster will be initialized with locale "en_US.UTF-8".
The default database encoding has accordingly been set to "UTF8".
The default text search configuration will be set to "english".

Data page checksums are disabled.

fixing permissions on existing directory /var/lib/postgresql/10/main ... ok
creating subdirectories ... ok
selecting default max_connections ... 100
selecting default shared_buffers ... 128MB
selecting default timezone ... Etc/UTC
selecting dynamic shared memory implementation ... posix
creating configuration files ... ok
running bootstrap script ... ok
performing post-bootstrap initialization ... ok
syncing data to disk ... ok

Success. You can now start the database server using:

    /usr/lib/postgresql/10/bin/pg_ctl -D /var/lib/postgresql/10/main -l logfile start

Ver Cluster Port Status Owner    Data directory              Log file
10  main    5432 down   postgres /var/lib/postgresql/10/main /var/log/postgresql/postgresql-10-main.log
update-alternatives: using /usr/share/postgresql/10/man/man1/postmaster.1.gz to provide /usr/share/man/man1/postmaster.1.gz (postmaster.1.gz) in auto mode
Setting up postgresql (10+190ubuntu0.1) ...
Setting up postgresql-contrib (10+190ubuntu0.1) ...
Processing triggers for systemd (237-3ubuntu10.39) ...
Processing triggers for man-db (2.8.3-2ubuntu0.1) ...
Processing triggers for ureadahead (0.100.0-21) ...
Processing triggers for libc-bin (2.27-3ubuntu1) ...
PostgreSQL installation process creates a default OS user postgres to own PostgreSQL files and processes.
Switch to postgres user.
sudo su - postgresConnect to PostgreSQL by using psql command.
psqlOutput:
psql (10.12 (Ubuntu 10.12-0ubuntu0.18.04.1))
Type "help" for help.
Set the password for postgres (database user).
ALTER USER postgres PASSWORD '123';
q
Exit from psql shell.
exitInstall pgAdmin4 on Ubuntu
PGDG repository also provides pgAdmin and relevant packages. Therefore, we can easily install pgAdmin4 by using an apt command.
But first, we have to update the packages on our Ubuntu Server.
sudo apt updateUpgrade available packages.
sudo apt upgrade -y
Install pgAdmin4 and relevant packages using apt command.
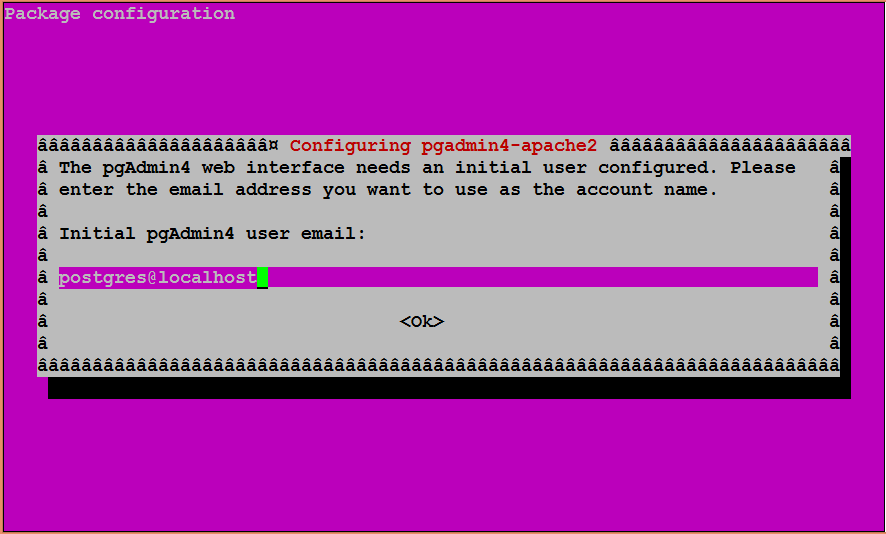
sudo apt install -y pgadmin4 pgadmin4-apache2The pgAdmin 4 installation process will launch a TUI (Terminal User Interface) based configuration screen.

Enter an email address to create a user account for pgAdmin web interface. Press Ok button.

Set a password for pgAdmin web interface user and press Ok button.
The pgAdmin installation will be continue as follows.
...
apache2_invoke: Enable configuration pgadmin4
NOTE: Configuring authentication for SERVER mode.

pgAdmin 4 - Application Initialisation
======================================

Setting up libpango-1.0-0:amd64 (1.40.14-1ubuntu0.1) ...
...
Processing triggers for libc-bin (2.27-3ubuntu1) ...
pgAdmin 4 has been installed on Ubuntu Server 18.04 LTS.
pgAdmin web application runs at default http service port. Therefore, to access pgAdmin 4 we need to allow http service port in Ubuntu firewall.
sudo ufw allow httpOutput:
Rules updated
Rules updated (v6)
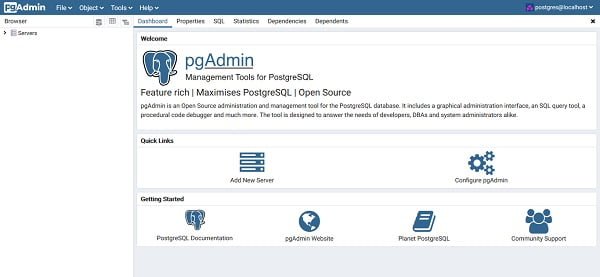
To access pgAdmin4 web interface, open URL http://postgresql-01.centlinux.com/pgadmin4 in a browser.

Login using email/password that we have created during pgAdmin 4 installation.

Add a PostgreSQL Server in pgAdmin4
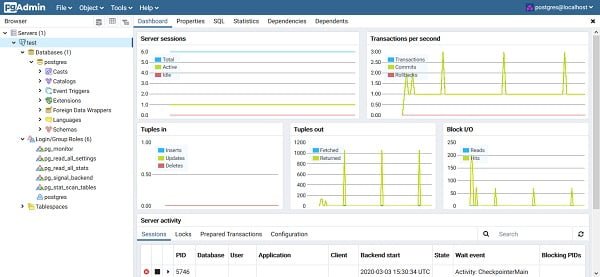
At the pgAdmin 4 dashboard, click on Add New Server to add a PostgreSQL database server in our pgAdmin 4 web interface.


Click on Save to add local postgreSQL server.

We have successfully install PostgreSQL and pgAdmin4 on Ubuntu Server 18.04 LTS.
Building a Debugger: Write a Native x64 Debugger From Scratch
$45.33 (as of July 5, 2025 20:48 GMT +00:00 – More infoProduct prices and availability are accurate as of the date/time indicated and are subject to change. Any price and availability information displayed on [relevant Amazon Site(s), as applicable] at the time of purchase will apply to the purchase of this product.)Final Thoughts
If you’re looking for a robust and reliable relational database system, PostgreSQL is an excellent choice. Paired with the powerful management capabilities of pgAdmin 4, you can efficiently handle a wide range of database tasks, from development to administration.
From setting up scalable AWS solutions to managing complex Linux environments, I’ve got you covered. Visit my Fiverr profile to get started.
Let me help you get started with PostgreSQL today!


Leave a Reply
You must be logged in to post a comment.