Follow our comprehensive guide to install Tomcat on CentOS 7. This tutorial covers all the necessary steps, from prerequisites to installation and configuration tips. #centlinux #linux #tomcat
Table of Contents
What is Apache Tomcat?
Apache Tomcat is an open-source web server and servlet container developed by the Apache Software Foundation. It implements the Java Servlet, Java Server Pages (JSP), and Java Expression Language (EL) specifications from the Java EE (Enterprise Edition) platform, providing a robust environment for running Java-based web applications. Here’s a detailed look at Apache Tomcat and its features:
Key Features of Apache Tomcat
- Servlet and JSP Engine:
- Servlets: Tomcat serves as a Java Servlet container, which processes requests and generates responses for web applications.
- JSP: It supports JavaServer Pages (JSP), a technology for creating dynamic web content.
- Open Source:
- Free to Use: Tomcat is open-source software distributed under the Apache License 2.0, making it free to use, modify, and distribute.
- High Performance:
- Efficient: Tomcat is designed for high performance and scalability, suitable for handling a range of applications from small-scale projects to large enterprise deployments.
- Lightweight:
- Minimal Overhead: It is a lightweight server, focusing on providing a core set of features for web applications without unnecessary overhead.
- Modular Architecture:
- Components: Tomcat’s modular architecture includes components like Catalina (Servlet Engine), Jasper (JSP Engine), and Coyote (HTTP Connector).
- Clustering and Load Balancing:
- Scalability: Tomcat supports clustering, session replication, and load balancing for high availability and scalability in production environments.
- Management and Monitoring:
- Admin Console: Includes a web-based administration console for managing deployments, configurations, and monitoring server status.
- JMX Integration: Supports Java Management Extensions (JMX) for advanced monitoring and management.
- IDE Integration:
- Development Tools: Integrates with popular IDEs like Eclipse, IntelliJ IDEA, and NetBeans for streamlined development and deployment.
- Security Features:
- Configuration Options: Offers various security features and configuration options, including SSL/TLS support, role-based access controls, and security constraints.

Common Use Cases for Apache Tomcat
- Web Applications:
- Deploy and manage Java-based web applications, including e-commerce sites, content management systems, and intranet applications.
- Enterprise Solutions:
- Serve as the foundation for enterprise-level Java EE applications, including customer relationship management (CRM) and enterprise resource planning (ERP) systems.
- Development and Testing:
- Used by developers for creating and testing Java web applications before deploying them to production environments.
Architecture of Apache Tomcat
| Component | Description |
|---|---|
| Catalina | The servlet container that handles the request/response lifecycle for servlets and JSPs. |
| Jasper | The JSP engine that compiles JSP pages into servlets. |
| Coyote | The HTTP connector that listens for incoming requests and forwards them to Catalina. |
| Cluster | Features for session replication, load balancing, and failover for high-availability setups. |
| Manager | Web-based application for managing Tomcat’s server and deployed applications. |
How Apache Tomcat Compares to Other Servers
| Feature | Apache Tomcat | Apache TomEE | WildFly | GlassFish |
|---|---|---|---|---|
| Servlet Container | Yes | Yes | Yes | Yes |
| Java EE Support | No | Yes | Yes | Yes |
| Lightweight | Yes | No | No | No |
| Enterprise Ready | No | Yes | Yes | Yes |
| Open Source | Yes | Yes | Yes | Yes |
Recommended Training: Apache Tomcat Server from Beginners to Advanced from Amit Kumar

Read Also: How to install Apache Tomcat on Rocky Linux 9
Application Server Specification
We have provisioned a CentOS 7 virtual machine with following specifications.
- Hostname – tomcat-01.example.com
- IP Address – 192.168.116.144/24
- Operating System – CentOS 7.6
- Apache Tomcat – 9
Read Also: How to install TomEE on Linux 7
Install OpenJDK on CentOS 7
Connect with tomcat-01.example.com using ssh as root user.
Apache Tomcat 9 requires Java 8 or later JRE (Java Runtime Environment). Therefore, we will install OpenJDK 8 (an open source implementation of Java platform) on CentOS 7 machine.
yum install -y java-1.8.0-openjdk-develJava executables have been automatically added to PATH environment variable. Therefore, we are only required to set the JAVA_HOME environment variable.
echo "export JAVA_HOME=/usr/lib/jvm/java-1.8.0-openjdk-1.8.0.191.b12-1.el7_6.x86_64" >> /etc/profile
. /etc/profile
env | grep JAVA_HOME
Output:
JAVA_HOME=/usr/lib/jvm/java-1.8.0-openjdk-1.8.0.191.b12-1.el7_6.x86_64
Verify Java version.
java -versionOutput:
openjdk version "1.8.0_191"
OpenJDK Runtime Environment (build 1.8.0_191-b12)
OpenJDK 64-Bit Server VM (build 25.191-b12, mixed mode)
OpenJDK 8 has been installed on our CentOS 7 server.
Note: if you are using more than one Java versions on the same machine then you should read our previous article Install Java on CentOS 7 to perform additional settings using alternatives command.
Apple 2025 MacBook Air 13-inch Laptop with M4 chip: Built for Apple Intelligence, 13.6-inch Liquid Retina Display, 16GB Unified Memory, 512GB SSD Storage, 12MP Center Stage Camera, Touch ID; Midnight
$1,049.00 (as of July 5, 2025 20:48 GMT +00:00 – More infoProduct prices and availability are accurate as of the date/time indicated and are subject to change. Any price and availability information displayed on [relevant Amazon Site(s), as applicable] at the time of purchase will apply to the purchase of this product.)Install Tomcat on CentOS 7
If we install Apache Tomcat from yum repository, then we do not have to perform following steps manually. But Apache Tomcat 9 is the latest version and it is not yet available in yum repositories. Therefore, we have to install it manually.
Create a user to own Apache Tomcat 9 software.
useradd -s /sbin/nologin tomcatDownload Apache Tomcat 9 binaries from Tomcat’s website.
cd
wget https://www-us.apache.org/dist/tomcat/tomcat-9/v9.0.16/bin/apache-tomcat-9.0.16.tar.gz
Extract downloaded tarball of Apache Tomcat 9.
tar xf apache-tomcat-9.0.16.tar.gzMove extracted directory to /opt/tomcat/.
mkdir /opt/tomcat
mv apache-tomcat-9.0.16 /opt/tomcat
Change ownership of /opt/tomcat directory.
chown -R tomcat:tomcat /opt/tomcatWe will create a soft link latest for /opt/tomcat/apache-tomcat-9.0.16 directory. So, we can upgrade/downgrade Apache Tomcat conveniently.
ln -s /opt/tomcat/apache-tomcat-9.0.16/ /opt/tomcat/latestCreate a systemd unit file to define a service for Apache Tomcat 9 server.
vi /usr/lib/systemd/system/tomcat.serviceand add following lines therein.
[Unit]
Description=Tomcat 9 servlet container
After=network.target

[Service]
Type=forking

User=tomcat
Group=tomcat

Environment="JAVA_HOME=/usr/lib/jvm/jre"
Environment="JAVA_OPTS=-Djava.security.egd=file:///dev/urandom"

Environment="CATALINA_BASE=/opt/tomcat/latest"
Environment="CATALINA_HOME=/opt/tomcat/latest"
Environment="CATALINA_PID=/opt/tomcat/latest/temp/tomcat.pid"
Environment="CATALINA_OPTS=-Xms512M -Xmx1024M -server -XX:+UseParallelGC"

ExecStart=/opt/tomcat/latest/bin/startup.sh
ExecStop=/opt/tomcat/latest/bin/shutdown.sh

[Install]
WantedBy=multi-user.target
Execute following command to notify systemd that we have created a new unit file.
systemctl daemon-reloadStart and enable Apache Tomcat service.
systemctl enable tomcat.service
systemctl start tomcat.service
Allow Apache Tomcat service port in Linux firewall.
firewall-cmd --permanent --add-port=8080/tcp
firewall-cmd --reload
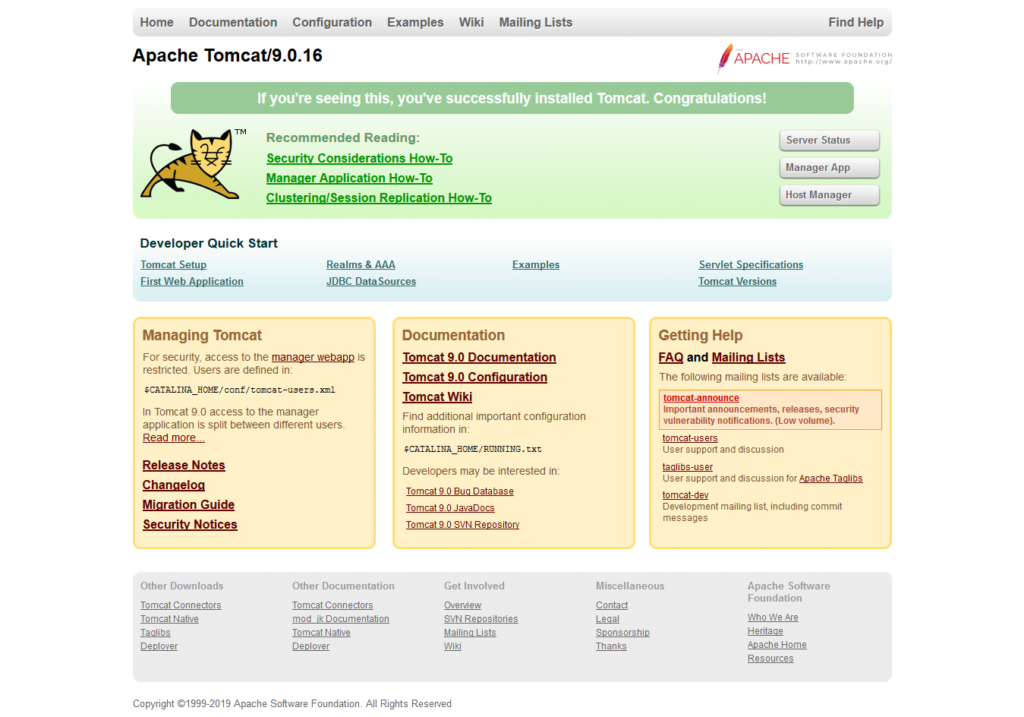
Browse URL http://tomcat-01.example.com:8080/ in a client’s browser.

It will show the default homepage of Apache Tomcat 9.
Apache Tomcat 9 has been installed on our CentOS 7 server.
Configure Tomcat Application Manager
Application Manager is installed by default with Apache Tomcat 9. Application Manager provides Web UI to easily manage, deploy, start and stop Java applications running on Apache Tomcat 9 server.
But, we need to configure Managers Apps according to our requirement.
Define users and roles to access Apache Tomcat 9 Manager Web UI.
vi /opt/tomcat/latest/conf/tomcat-users.xmlAdd following lines just before </tomcat-users> tag.
   <role rolename="admin-gui"/>
   <role rolename="manager-gui"/>
   <user username="admin" password="admin" roles="admin-gui,manager-gui"/>
   <user username="ahmer" password="123" roles="admin-gui,manager-gui"/>
By default Application Manager is allowed to be accessed from localhost only.
We must edit the following files to let us access it from other machines.
vi /opt/tomcat/latest/webapps/manager/META-INF/context.xmlFind and comment following lines of code.
  <Valve className="org.apache.catalina.valves.RemoteAddrValve"
         allow="127.d+.d+.d+|::1|0:0:0:0:0:0:0:1" />
After comment, it should be looks like this.
<!--
  <Valve className="org.apache.catalina.valves.RemoteAddrValve"
         allow="127.d+.d+.d+|::1|0:0:0:0:0:0:0:1" />
-->
Similarly, repeat the above step for following file.
vi /opt/tomcat/latest/webapps/host-manager/META-INF/context.xmlRestart Apache Tomcat 9 service.
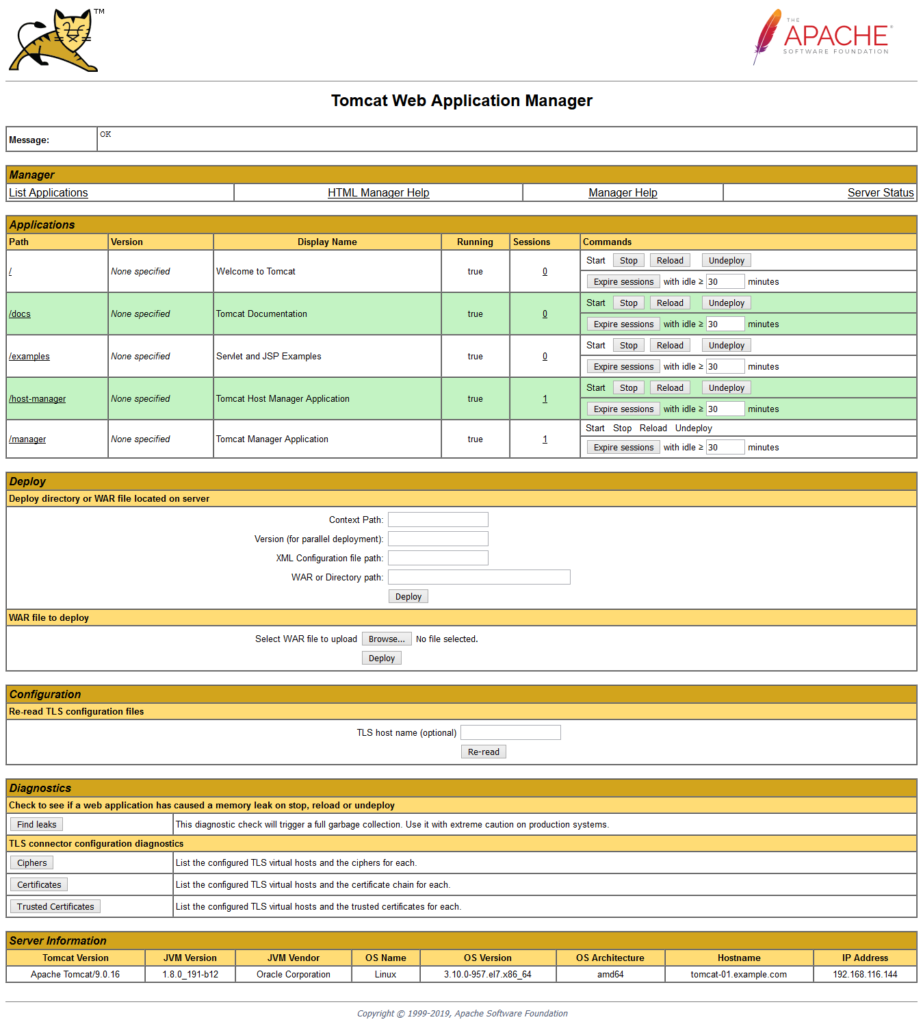
systemctl restart tomcat.serviceBrowse URL http://192.168.116.144:8080 using a client’s browser.

Click on Server Status.

Go back and click on Manager App.

Go back and click on Host Manager.

The Application Manager has been successfully configured on an Apache Tomcat 9 server running on CentOS 7. This powerful web-based interface allows you to easily deploy, monitor, and manage Java web applications directly from your browser.
With this setup, you can streamline application management tasks such as deploying WAR files, stopping or restarting applications, and viewing server status—all without needing to access the server terminal.
Frequently Asked Questions (FAQs)
What is Tomcat, and why would I need it?
Tomcat is an open-source web server and servlet container used to run Java-based web applications. You may need it if you’re deploying Java web apps (like those built with Spring or JSP).
Do I need Java installed before setting up Tomcat?
Yes, Tomcat requires Java to run. You must install a compatible Java Development Kit (JDK) before installing Tomcat.
Can I install Tomcat using CentOS’s default package manager (YUM)?
Yes, you can install Tomcat via YUM, but it may not provide the latest version. Many users prefer manually downloading Tomcat from the Apache website for better control.
How do I start and stop Tomcat after installation?
Tomcat runs as a service, so you can start, stop, or check its status using system commands (like systemctl). It also includes scripts for manual management.
How do I access Tomcat after installation to verify it’s working?
Once installed and running, open a web browser and go to http://[your-server-IP]:8080. If Tomcat is running, you’ll see the default Apache Tomcat welcome page.
O guia completo de sobrevivência do Windows 11: Dicas, truques e resolução de problemas para todos os utilizadores (Portuguese Edition)
$25.99 (as of July 5, 2025 20:48 GMT +00:00 – More infoProduct prices and availability are accurate as of the date/time indicated and are subject to change. Any price and availability information displayed on [relevant Amazon Site(s), as applicable] at the time of purchase will apply to the purchase of this product.)Final Thoughts
By following this guide, you have successfully installed Apache Tomcat on your CentOS 7 server. Tomcat provides a reliable and efficient platform for deploying Java-based web applications and is widely used in both development and production environments.
To ensure optimal performance and security, consider setting up a reverse proxy, enabling SSL, and restricting access to the management interface. With Tomcat up and running, you’re now ready to deploy and manage your Java applications with confidence.
Whether you need cloud optimization, server management, or automation, I provide comprehensive AWS and Linux services. Hire me on Fiverr to elevate your systems.
Feel free to reach out for personalized solutions to ensure your Tomcat setup is done right and efficiently!


Leave a Reply
You must be logged in to post a comment.