Set up Ubuntu on multiple machines without USBs or DVDs! Learn how to install Ubuntu from PXE server in minutes — the efficient, modern way. Don’t get left behind in outdated installation methods! #centlinux #linux #ubuntu #pxe
Table of Contents
Problem Statement
In our previous posts, we have configured a PXE boot server that supports both BIOS and UEFI based clients. We have also configured our CentOS 7 PXE server to install RHEL 6 and RHEL 7 operating systems using Kickstart. Now, we will install Ubuntu from PXE Server.
We will also create a Kickstart file for automated installation of Ubuntu 18.10 operating system, and ensure that it will support both BIOS and UEFI based clients.

PXE Server Specification
We use the same CentOS 7 machine that we have configured as PXE Boot Server in our previous article. These specifications have been re-mentioned below for convenience of the readers.
- CPU – 2 Core (2.4 Mhz)
- Memory – 2 GB
- Storage – 50 GB
- Operating System – CentOS 7.5
- Hostname – pxe-server.itlab.com
- IP Address – 192.168.116.41/24
If you are new to Linux and want a solid starting point, I highly recommend Ubuntu Linux Server Basics by Cody Ray Miller. This beginner-friendly guide walks you step by step through setting up and managing Ubuntu servers, making it perfect for students, sysadmins, and developers who want practical hands-on knowledge. With clear explanations and real-world examples, this resource can fast-track your Linux learning journey and save you countless hours of trial and error.
Disclaimer: This post contains affiliate links. If you purchase through these links, I may earn a small commission at no extra cost to you.
Read Also: How to install Windows 10 over PXE Linux Server
Configure NFS Server in CentOS 7
Connect to pxe-server.itlab.com using ssh as root user.
Install NFS packages using yum command.
yum install -y nfs-utilsStart and Enable NFS service.
systemctl start nfs-server
systemctl enable nfs-server
Create a directory for sharing Ubuntu 18.10 ISO.
mkdir /nfsshare
chown nfsnobody:nfsnobody /nfsshare
Allow NFS and relevant ports in CentOS 7.5 Firewall.
firewall-cmd --permanent --add-service={nfs,mountd,rpc-bind}
firewall-cmd --reload
Adjust SELinux Permissions.
semanage fcontext --add -t nfs_t '/nfsshare(/.*)?'
restorecon -Rv /nfsshare/
Output:
restorecon reset /nfsshare context unconfined_u:object_r:var_t:s0->unconfined_u:object_r:nfs_t:s0
Export /nfsshare directory for all clients.
echo "/nfsshare *(ro)" >> /etc/exports
exportfs -r
Copy Ubuntu ISO in NFS Share
Attach Ubuntu 18.10 Server ISO/DVD and mount it at /mnt/iso (you can use any mountpoint, according to your choice).
mount -t iso9660 /dev/cdrom /mnt/isoOutput:
mount: /dev/sr0 is write-protected, mounting read-only
Copy contents of /mnt/iso directory to NFS server.
cp -rf /mnt/iso /nfsshare/ubuntu18Create Kickstart File for Automated Installation
We have to write a Kickstart file for Ubuntu 18.10 within the /nfsshare/ubuntu18/preseed/ directory, so it can be accessed by PXE clients via NFS service.
vi /nfsshare/ubuntu18/preseed/ubuntu.seedA sample kickstart file is given below, you can modify it according to your requirements.
# Enable extras.ubuntu.com.
d-i     apt-setup/extras        boolean true
# Install the Ubuntu desktop.
tasksel tasksel/first   multiselect ubuntu-desktop
# On live DVDs, don't spend huge amounts of time removing substantial
# application packages pulled in by language packs. Given that we clearly
# have the space to include them on the DVD, they're useful and we might as
# well keep them installed.
ubiquity        ubiquity/keep-installed string icedtea6-plugin openoffice.org
#System language
lang en_US
#Language modules to install
langsupport en_US
#System keyboard
keyboard us
#System mouse
mouse
#System timezone
timezone Asia/Karachi
#Root password
rootpw --disabled
#Initial user (user with sudo capabilities)
user ubuntu --fullname "ahmer" --password ahmer1234
#Reboot after installation
reboot
#Use text mode install
text
#Install OS instead of upgrade
install
#Installation media
nfs --server=192.168.116.41 --dir=/nfsshare/ubuntu18/
#System bootloader configuration
bootloader --location=mbr
#Clear the Master Boot Record
zerombr yes
#Partition clearing information
clearpart --all --initlabel
#Basic disk partition
part / --fstype ext4 --size 1 --grow --asprimary
part swap --size 1024
part /boot --fstype ext4 --size 256 --asprimary
#System authorization infomation
auth  --useshadow  --enablemd5
#Network information
network --bootproto=dhcp --device=eth0
#Firewall configuration
firewall --disabled --trust=eth0 --ssh
Copy boot images in tftpboot directory
The Boot images in the Ubuntu ISO won’t work for network boot Therefore, we downloaded netboot images from Ubuntu website.
wget http://archive.ubuntu.com/ubuntu/dists/cosmic/main/installer-amd64/current/images/netboot/netboot.tar.gzExtract download TARBall.
mkdir netboot
tar xf netboot.tar.gz -C netboot
We need to copy initrd.gz and linux files from netboot directory ~/netboot/ubuntu-installer/amd64/ to /var/lib/tftpboot/networkboot/ubuntu18 directory. These files will be referenced in the menu entry of PXE boot menu.
mkdir /var/lib/tftpboot/networkboot/ubuntu18
cp ~/netboot/ubuntu-installer/amd64/{linux,initrd.gz} /var/lib/tftpboot/networkboot/ubuntu18/
Add Ubuntu Entry in PXE Menu
Edit PXE boot menu for BIOS based clients.
vi /var/lib/tftpboot/pxelinux.cfg/defaultAdd a menu entry for Ubuntu 18.10 installation therein.
default vesamenu.c32
prompt 0
timeout 30
menu title Ahmer's PXE Menu
label Install RHEL 7.5
kernel /networkboot/rhel7/vmlinuz
append initrd=/networkboot/rhel7/initrd.img inst.repo=ftp://192.168.116.41/pub/rhel7 ks=ftp://192.168.116.41/pub/rhel7/rhel7.cfg
label Install RHEL 6.0 (64-bit)
kernel /networkboot/rhel6/vmlinuz
append initrd=/networkboot/rhel6/initrd.img inst.repo=ftp://192.168.116.41/pub/rhel6 ks=ftp://192.168.116.41/pub/rhel6/rhel6.cfg
label Install Ubuntu 18.10 Server
menu label Install Ubuntu 18.10 Server
kernel networkboot/ubuntu18/linux
append vga=788 initrd=networkboot/ubuntu18/initrd.gz ks=nfs:192.168.116.41:/nfsshare/ubuntu18/preseed/ubuntu.seed --- quiet
Edit PXE boot menu for UEFI based clients. For more information on UEFI, please refer to Add UEFI Support to PXE Server in CentOS 7.
vi /var/lib/tftpboot/grub.cfgAdd a menu entry for Ubuntu 18.10 installation in this file.
set timeout=60

menuentry 'Install RHEL 7.5' {
        linuxefi /networkboot/rhel7/vmlinuz inst.repo=ftp://192.168.116.41/pub/rhel7/ inst.ks=ftp://192.168.116.41/pub/rhel7/rhel7.cfg
        initrdefi /networkboot/rhel7/initrd.img
}

menuentry 'Install RHEL 6.0' {
        linuxefi /networkboot/rhel6/vmlinuz inst.repo=ftp://192.168.116.41/pub/rhel6/ inst.ks=ftp://192.168.116.41/pub/rhel6/rhel6.cfg
        initrdefi /networkboot/rhel6/initrd.img
}

menuentry "Install Ubuntu 18.10 Server" {
        set gfxpayload=keep
        linuxefi        /networkboot/ubuntu18/linux inst.repo=nfs:192.168.116.41:/nfsshare/ubuntu18 inst.ks=nfs:192.168.116.41:/nfsshare/ubuntu18/preseed/ubuntu.seed
        initrdefi       /networkboot/ubuntu18/initrd.gz
}
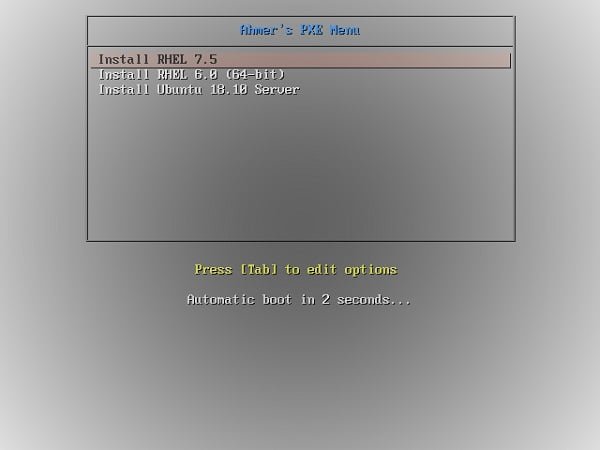
Now, connect a BIOS based PXE client to network and boot it. It will display the following PXE boot menu.

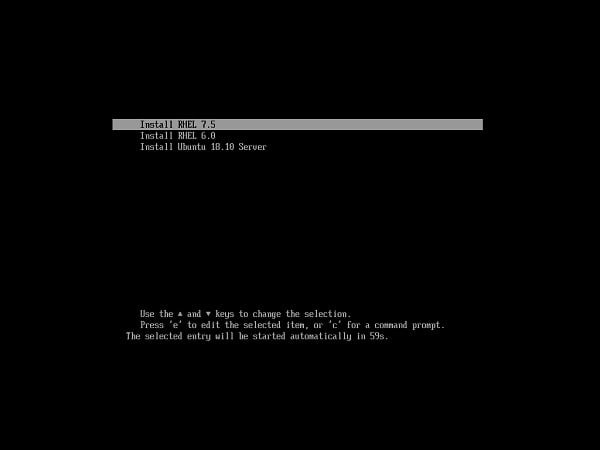
Similarly, connect a UEFI based PXE client to network and boot it. It will display the following PXE boot menu.

We have successfully configured our CentOS 7 PXE boot server to install Ubuntu 18.10. You can also add other versions of Ubuntu in similar manner.
Frequently Asked Questions (FAQs)
1. What is a PXE server, and why use it for Ubuntu installation?
A PXE (Preboot Execution Environment) server allows computers to boot and install an operating system over a network instead of using physical media like USB or DVD. It’s useful for installing Ubuntu on multiple machines simultaneously without individual bootable drives.
2. What do I need before setting up a PXE server for Ubuntu?
You’ll need:
- A server (or a dedicated machine) to host the PXE setup.
- A DHCP server to assign IP addresses to client machines.
- A TFTP server to transfer boot files.
- The Ubuntu ISO or network installation files.
- A working local network with clients supporting PXE boot.
3. How do I configure a client machine to boot from PXE?
Enter the BIOS/UEFI settings of the client computer, enable Network Boot (PXE), and set it as the first boot option. Save changes, and the machine will attempt to boot from the PXE server.
4. Can I install any Ubuntu version via PXE?
Yes, as long as the PXE server is configured with the correct boot files and installation sources (like the Ubuntu netboot or ISO files). Both LTS and non-LTS versions are supported.
5. What are common issues when installing Ubuntu via PXE?
- DHCP misconfiguration – Clients may fail to get an IP.
- Missing/invalid boot files – TFTP may not serve the correct files.
- Network issues – Slow or unstable connections can disrupt installation.
- PXE boot not enabled – Clients must support and have PXE boot enabled in BIOS.
Final Thoughts
Installing Ubuntu from a PXE server isn’t just efficient—it’s a game changer for anyone managing multiple systems. You’ve now seen how easy it is to boot and install over the network, saving time and effort while eliminating the hassle of physical media.
Why stick to slow, manual setups when the future is automated and scalable? Thousands of sysadmins have already made the switch—don’t be the one still juggling bootable USBs. Take control, boost productivity, and deploy smarter.
👉 Start setting up your PXE server today and experience seamless Ubuntu installations like a pro!
Struggling with Linux server management? I offer professional support to ensure your servers are secure, optimized, and always available. Visit my Freelancer profile to learn more!

Leave a Reply
You must be logged in to post a comment.