Discover the step-by-step guide to install Wazuh SIEM on Rocky Linux 9. Learn the essentials of setting up a robust security monitoring system on this powerful Linux distribution. Get expert insights and practical tips for seamless implementation. #centlinux #linux #elasticsearch
Table of Contents
What is Wazuh?:
Wazuh platform provides XDR and SIEM features to protect your cloud, container, and server workloads. These include log data analysis, intrusion and malware detection, file integrity monitoring, configuration assessment, vulnerability detection, and support for regulatory compliance.
The Wazuh solution is based on the Wazuh agent, which is deployed on the monitored endpoints, and on three central components: the Wazuh manager, the Wazuh indexer, and the Wazuh dashboard.
- The Wazuh indexer is a highly scalable, full-text search and analytics engine. This central component indexes and stores alerts generated by the Wazuh server.
- The Wazuh manager analyzes data received from the agents. It processes it through decoders and rules, using threat intelligence to look for well-known indicators of compromise (IOCs). A single server can analyze data from hundreds or thousands of agents, and scale horizontally when set up as a cluster. This central component is also used to manage the agents, configuring and upgrading them remotely when necessary.
- The Wazuh dashboard is the web user interface for data visualization and analysis. It includes out-of-the-box dashboards for security events, regulatory compliance (e.g., PCI DSS, GDPR, CIS, HIPAA, NIST 800-53), detected vulnerable applications, file integrity monitoring data, configuration assessment results, cloud infrastructure monitoring events, and others. It is also used to manage Wazuh configuration and to monitor its status.
- Wazuh agents are installed on endpoints such as laptops, desktops, servers, cloud instances, or virtual machines. They provide threat prevention, detection, and response capabilities. They run on operating systems such as Linux, Windows, macOS, Solaris, AIX, and HP-UX.
In addition to agent-based monitoring capabilities, the Wazuh platform can monitor agent-less devices such as firewalls, switches, routers, or network IDS, among others. For example, a system log data can be collected via Syslog, and its configuration can be monitored through periodic probing of its data, via SSH or through an API.
OSSEC vs Wazuh
OSSEC and Wazuh are closely related security tools, with Wazuh being an extended and more feature-rich version of OSSEC. While OSSEC primarily focuses on host-based intrusion detection, log analysis, file integrity monitoring, and rootkit detection, Wazuh SIEM expands upon these capabilities by incorporating additional features such as advanced log analysis, threat intelligence integration, cloud monitoring, and compliance management.
Wazuh also provides a centralized management interface, making it easier to deploy and manage across large-scale environments. Additionally, Wazuh SIEM offers integrations with other security tools and platforms, enhancing its versatility and effectiveness in modern cybersecurity operations.
Ultimately, the choice between OSSEC and Wazuh depends on the specific needs and requirements of the organization. For those seeking a more comprehensive and feature-rich security solution with centralized management capabilities, Wazuh SIEM may be the preferred option. However, OSSEC remains a solid choice for organizations looking for a reliable and straightforward host-based intrusion detection system.
Recommended Online Training: A Guide to Security Information and Event Management – SIEM

Environment Specification:
We are using a minimal Rocky Linux 9 virtual machine with following specifications.
- CPU – 3.4 Ghz (2 cores)
- Memory – 4 GB
- Storage – 40 GB
- Operating System – Rocky Linux release 9.2 (Blue Onyx)
- Hostname – wazuh-01.centlinux-com.com
- IP Address – 192.168.18.83/24
Prepare your Rocky Linux Server:
Login to your Rocky Linux server as root user with the help of a ssh client.
Set a static password for your Wazuh server by using nmcli command.
# nmcli c m enp0s3 ipv4.method manual ipv4.addresses 192.168.18.83/24 ipv4.gateway 192.168.18.1 ipv4.dns 192.168.18.1
# nmcli c down enp0s3 ; nmcli c up enp0s3
Set a FQDN (Fully Qualified Domain Name) hostname for your Linux machine.
# hostnamectl set-hostname wazuh-01.centlinux.com
# echo "192.168.18.83 wazuh-01 wazuh-01.centlinux-com.com" >> /etc/hosts
As a best practice, always update installed packages in your Linux OS, before installing a new software.
# dnf update -y
Sometimes, the above command also updates packages related to Linux Kernel. If this happens, then reboot your Linux OS with the new Kernel.
# reboot
Note down the Linux OS and Kernel versions that are being used in this tutorial.
# cat /etc/rocky-release
Rocky Linux release 9.2 (Blue Onyx)

# uname -r
5.14.0-284.25.1.el9_2.x86_64
Install Wazuh software prerequisites by executing dnf command.
# dnf install -y coreutils chkconfig tar libcap
Create Security Certificates:
To encrypt communication between Wazuh components, you need to create the necessary security certificates.
Wazuh official website provides a bash script for this pupose. You can download the script and the relevant configuration file with the help of curl command.
# curl -sO https://packages.wazuh.com/4.4/wazuh-certs-tool.sh
# curl -sO https://packages.wazuh.com/4.4/config.yml
Edit config.yml file by using vim text editor.
# vi config.yml
Locate and set following directives in this file.
nodes:
  # Wazuh indexer nodes
  indexer:
    - name: wazuh-01
      ip: 192.168.18.83

  # Wazuh server nodes
  # If there is more than one Wazuh server
  # node, each one must have a node_type
  server:
    - name: wazuh-01
      ip: 192.168.18.83

  # Wazuh dashboard nodes
  dashboard:
    - name: dashboard
      ip: 192.168.18.83
Here, we are going to install Wazuh server on a single node, therefore, we are only adding one hostname and IP address. However, in case of Multi-node setup, you need to add all the nodes of your Wazuh cluster in this file.
Execute the bash script to generate Wazuh security certificates.
# bash ./wazuh-certs-tool.sh -A
04/08/2023 21:15:41 INFO: Admin certificates created.
04/08/2023 21:15:41 INFO: Wazuh indexer certificates created.
04/08/2023 21:15:43 INFO: Wazuh server certificates created.
04/08/2023 21:15:44 INFO: Wazuh dashboard certificates created.
Use tar command to create an archive of security certificates’ folder.
# tar -cvf ./wazuh-certificates.tar -C ./wazuh-certificates/ .
./
./root-ca.key
./root-ca.pem
./admin-key.pem
./admin.pem
./wazuh-01-key.pem
./wazuh-01.pem
./dashboard-key.pem
./dashboard.pem
Remove security certificates folder with the help of rm command.
# rm -rf ./wazuh-certificates
Install Wazuh Yum Repository:
Wazuh software components for Red Hat based Linux OS are available via their Official yum repository.
To install Wazuh yum repository on your Rocky Linux server, first of all you need to import the GPG Key of that repo.
# rpm --import https://packages.wazuh.com/key/GPG-KEY-WAZUH
Execute following Linux command to install Wazuh yum repository.
Build yum cache for newly installed yum repositories.
# echo -e '[wazuh]\ngpgcheck=1\ngpgkey=https://packages.wazuh.com/key/GPG-KEY-WAZUH\nenabled=1\nname=EL-$releasever - Wazuh\nbaseurl=https://packages.wazuh.com/4.x/yum/\nprotect=1' | tee /etc/yum.repos.d/wazuh.repo
[wazuh]
gpgcheck=1
gpgkey=https://packages.wazuh.com/key/GPG-KEY-WAZUH
enabled=1 name=EL-$releasever - Wazuh
baseurl=https://packages.wazuh.com/4.x/yum/
protect=1
# dnf makecache
Rocky Linux 9 - BaseOS                          1.4 kB/s | 4.1 kB     00:03
Rocky Linux 9 - AppStream                       3.3 kB/s | 4.5 kB     00:01
Rocky Linux 9 - Extras                          1.6 kB/s | 2.9 kB     00:01
EL-9 - Wazuh                                    941 kB/s |  16 MB     00:17
Metadata cache created.
You have successfully setup Wazuh yum repository, now you can easily install your SIEM software.
Install Wazuh Indexer:
Install Wazuh Indexer on your Rocky Linux server with the help of dnf command.
# dnf -y install wazuh-indexer
Open configuration file in vim text editor.
# vi /etc/wazuh-indexer/opensearch.yml
Locate and set following directives in this file.
network.host: "192.168.18.83"
node.name: "wazuh-01"
cluster.initial_master_nodes:
- "wazuh-01"
plugins.security.nodes_dn:
- "CN=wazuh-01,OU=Wazuh,O=Wazuh,L=California,C=US"
Deploy Security Certificates on Wazuh Indexer, that you have created in previous step.
# export NODE_NAME=wazuh-01
# mkdir /etc/wazuh-indexer/certs
# tar -xf ./wazuh-certificates.tar -C /etc/wazuh-indexer/certs/ ./$NODE_NAME.pem ./$NODE_NAME-key.pem ./admin.pem ./admin-key.pem ./root-ca.pem
# mv -n /etc/wazuh-indexer/certs/$NODE_NAME.pem /etc/wazuh-indexer/certs/indexer.pem
# mv -n /etc/wazuh-indexer/certs/$NODE_NAME-key.pem /etc/wazuh-indexer/certs/indexer-key.pem
# chmod 500 /etc/wazuh-indexer/certs
# chmod 400 /etc/wazuh-indexer/certs/*
# chown -R wazuh-indexer:wazuh-indexer /etc/wazuh-indexer/certs
Enable and start Wazuh Indexer service.
# systemctl enable --now wazuh-indexer
Synchronizing state of wazuh-indexer.service with SysV service script with /usr/lib/systemd/systemd-sysv-install.
Executing: /usr/lib/systemd/systemd-sysv-install enable wazuh-indexer
Created symlink /etc/systemd/system/multi-user.target.wants/wazuh-indexer.service → /usr/lib/systemd/system/wazuh-indexer.service.
Wazuh Indexer uses service port 9200/tcp for communication, therefore, you need to allow this port in your Linux firewall.
# firewall-cmd --permanent --add-port=9200/tcp
success

# firewall-cmd --reload
success
Execute the indexer-security-init.sh script on any Wazuh indexer node to load the new certificates information and initiate the single-node or multi-node cluster.
# /usr/share/wazuh-indexer/bin/indexer-security-init.sh
**************************************************************************
** This tool will be deprecated in the next major release of OpenSearch **
** https://github.com/opensearch-project/security/issues/1755           **
**************************************************************************
Security Admin v7
Will connect to 192.168.18.83:9200 ... done
Connected as "CN=admin,OU=Wazuh,O=Wazuh,L=California,C=US"
OpenSearch Version: 2.6.0
Contacting opensearch cluster 'opensearch' and wait for YELLOW clusterstate ...
Clustername: wazuh-cluster
Clusterstate: GREEN
Number of nodes: 1
Number of data nodes: 1
.opendistro_security index does not exists, attempt to create it ... done (0-all replicas)
Populate config from /etc/wazuh-indexer/opensearch-security/
Will update '/config' with /etc/wazuh-indexer/opensearch-security/config.yml
   SUCC: Configuration for 'config' created or updated
Will update '/roles' with /etc/wazuh-indexer/opensearch-security/roles.yml
   SUCC: Configuration for 'roles' created or updated
Will update '/rolesmapping' with /etc/wazuh-indexer/opensearch-security/roles_mapping.yml
   SUCC: Configuration for 'rolesmapping' created or updated
Will update '/internalusers' with /etc/wazuh-indexer/opensearch-security/internal_users.yml
   SUCC: Configuration for 'internalusers' created or updated
Will update '/actiongroups' with /etc/wazuh-indexer/opensearch-security/action_groups.yml
   SUCC: Configuration for 'actiongroups' created or updated
Will update '/tenants' with /etc/wazuh-indexer/opensearch-security/tenants.yml
   SUCC: Configuration for 'tenants' created or updated
Will update '/nodesdn' with /etc/wazuh-indexer/opensearch-security/nodes_dn.yml
   SUCC: Configuration for 'nodesdn' created or updated
Will update '/whitelist' with /etc/wazuh-indexer/opensearch-security/whitelist.yml
   SUCC: Configuration for 'whitelist' created or updated
Will update '/audit' with /etc/wazuh-indexer/opensearch-security/audit.yml
   SUCC: Configuration for 'audit' created or updated
Will update '/allowlist' with /etc/wazuh-indexer/opensearch-security/allowlist.yml
   SUCC: Configuration for 'allowlist' created or updated
SUCC: Expected 10 config types for node {"updated_config_types":["allowlist","tenants","rolesmapping","nodesdn","audit","roles","whitelist","internalusers","actiongroups","config"],"updated_config_size":10,"message":null} is 10 (["allowlist","tenants","rolesmapping","nodesdn","audit","roles","whitelist","internalusers","actiongroups","config"]) due to: null
Done with success
Run the following command to confirm that the Wazuh installation is successful.
# curl -k -u admin:admin https://wazuh-01.centlinux-com.com:9200
{
  "name" : "wazuh-01",
  "cluster_name" : "wazuh-cluster",
  "cluster_uuid" : "OYd3dDQ5QUmoGfN0QQ1uxQ",
  "version" : {
    "number" : "7.10.2",
    "build_type" : "rpm",
    "build_hash" : "7203a5af21a8a009aece1474446b437a3c674db6",
    "build_date" : "2023-02-24T18:57:04.388618985Z",
    "build_snapshot" : false,
    "lucene_version" : "9.5.0",
    "minimum_wire_compatibility_version" : "7.10.0",
    "minimum_index_compatibility_version" : "7.0.0"
  },
  "tagline" : "The OpenSearch Project: https://opensearch.org/"
}
Install Wazuh Manager:
Install Wazuh Manager on your Rocky Linux server with the help of dnf command.
# dnf install -y wazuh-manager
Enable and start Wazuh Manager service.
# systemctl enable --now wazuh-manager
Synchronizing state of wazuh-manager.service with SysV service script with /usr/lib/systemd/systemd-sysv-install.
Executing: /usr/lib/systemd/systemd-sysv-install enable wazuh-manager
Created symlink /etc/systemd/system/multi-user.target.wants/wazuh-manager.service → /usr/lib/systemd/system/wazuh-manager.service.
Wazuh Manager uses Port 1514/tcp and 1515/tcp for communication with Wazuh Agents. Therefore, you are required to allow both ports in your Linux firewall.
# firewall-cmd --permanent --add-port={1514,1515}/tcp
success

# firewall-cmd --reload
success
Install Filebeat software with the help of following command.
# dnf install -y filebeat
Download sample configuration file for Filebeat software.
# curl -so /etc/filebeat/filebeat.yml https://packages.wazuh.com/4.4/tpl/wazuh/filebeat/filebeat.yml
Open Filebeat configuration file in vim text editor.
# vi /etc/filebeat/filebeat.yml
Find and set following directive therein.
hosts: ["192.168.18.83:9200"]
Create a Filebeat keystore to securely store authentication credentials.
# filebeat keystore create
Created filebeat keystore
Add the default username and password admin/admin to the secrets keystore.
# echo admin | filebeat keystore add username --stdin --force
Successfully updated the keystore

# echo admin | filebeat keystore add password --stdin --force
Successfully updated the keystore
Download the alerts template for the Wazuh indexer.
# curl -so /etc/filebeat/wazuh-template.json https://raw.githubusercontent.com/wazuh/wazuh/4.4/extensions/elasticsearch/7.x/wazuh-template.json
# chmod go+r /etc/filebeat/wazuh-template.json
Install the Wazuh module for Filebeat.
# curl -s https://packages.wazuh.com/4.x/filebeat/wazuh-filebeat-0.2.tar.gz | tar -xvz -C /usr/share/filebeat/modulesd
Deploy Security Certificates on Wazuh Server, that you have created in previous step.
# export NODE_NAME=wazuh-01
# mkdir /etc/filebeat/certs
# tar -xf ./wazuh-certificates.tar -C /etc/filebeat/certs/ ./$NODE_NAME.pem ./$NODE_NAME-key.pem ./root-ca.pem
# mv -n /etc/filebeat/certs/$NODE_NAME.pem /etc/filebeat/certs/filebeat.pem
# mv -n /etc/filebeat/certs/$NODE_NAME-key.pem /etc/filebeat/certs/filebeat-key.pem
# chmod 500 /etc/filebeat/certs
# chmod 400 /etc/filebeat/certs/*
# chown -R root:root /etc/filebeat/certs
Enable and start Filebeat service.
# systemctl enable --now filebeat
Synchronizing state of filebeat.service with SysV service script with /usr/lib/systemd/systemd-sysv-install.
Executing: /usr/lib/systemd/systemd-sysv-install enable filebeat
Created symlink /etc/systemd/system/multi-user.target.wants/filebeat.service → /usr/lib/systemd/system/filebeat.service.
Run the following command to verify that Filebeat is successfully installed.
# filebeat test output
elasticsearch: https://192.168.18.83:9200...
  parse url... OK
  connection...
    parse host... OK
    dns lookup... OK
    addresses: 192.168.18.83
    dial up... OK
  TLS...
    security: server's certificate chain verification is enabled
    handshake... OK
    TLS version: TLSv1.3
    dial up... OK
  talk to server... OK
  version: 7.10.2
Install Wazuh SIEM Dashboard:
Install Wazuh Dashboard on your Rocky Linux server with the help of dnf command.
# dnf install -y wazuh-dashboard
Open Wazuh Dashboard configurations in vim text editor.
# vi /etc/wazuh-dashboard/opensearch_dashboards.yml
Find and set following directives in this file.
server.host: 192.168.18.83
opensearch.hosts: https://192.168.18.83:9200
Deploy Security Certificates on Wazuh Dashboard, that you have created in previous step.
# export NODE_NAME=wazuh-01
# mkdir /etc/wazuh-dashboard/certs
# tar -xf ./wazuh-certificates.tar -C /etc/wazuh-dashboard/certs/ ./$NODE_NAME.pem ./$NODE_NAME-key.pem ./root-ca.pem
# mv -n /etc/wazuh-dashboard/certs/$NODE_NAME.pem /etc/wazuh-dashboard/certs/dashboard.pem
# mv -n /etc/wazuh-dashboard/certs/$NODE_NAME-key.pem /etc/wazuh-dashboard/certs/dashboard-key.pem
# chmod 500 /etc/wazuh-dashboard/certs
# chmod 400 /etc/wazuh-dashboard/certs/*
# chown -R wazuh-dashboard:wazuh-dashboard /etc/wazuh-dashboard/certs
Enable and start Wazuh Dashboard service.
# systemctl enable --now wazuh-dashboard.service
Created symlink /etc/systemd/system/multi-user.target.wants/wazuh-dashboard.service → /etc/systemd/system/wazuh-dashboard.service.
Wazuh Dashboard runs at 443/tcp port. Therefore, allow this service port in your Linux firewall.
# firewall-cmd --permanent --add-service=https
success

# firewall-cmd --reload
success
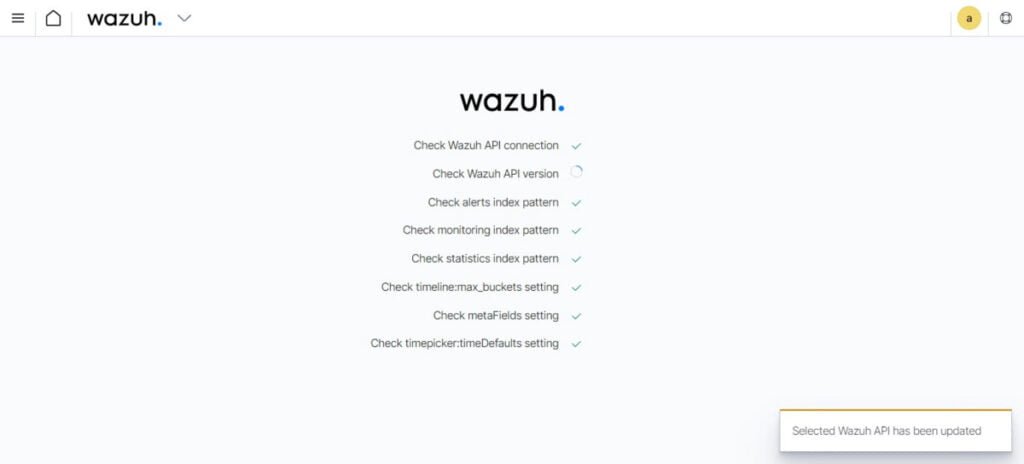
Open URL https://wazuh-01.centlinux.com in a web browser.

Login with the users that you have created above i.e. admin/admin.


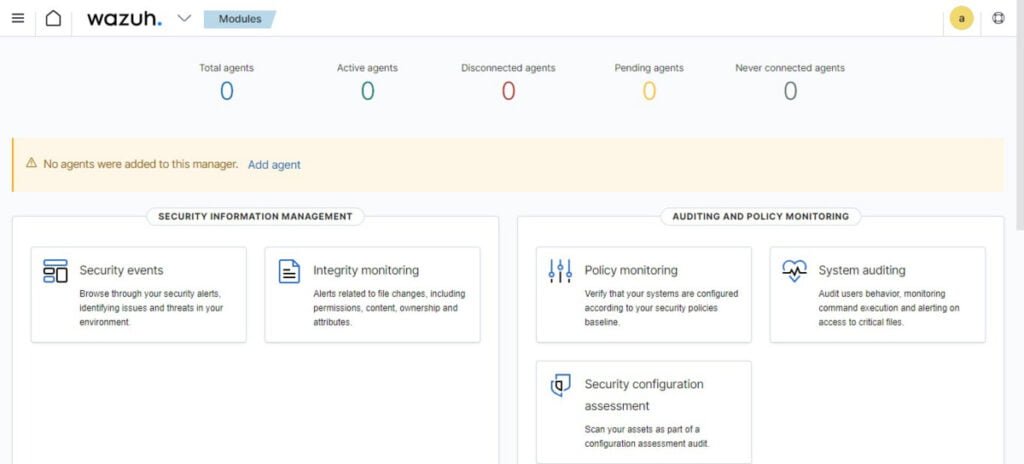
You have reached at the Wazuh dashboard.
Install Wazuh Agent:
Currently, you won’t see any agent in your Wazuh Dashboard. You need to add one by performing below steps.
Login to your target Linux machine to install Wazuh agent.
Wazuh agent uses SysV type scripts to start/stop it’s services. Therefore, you need to install chkconfig package on your Linux machine.
# dnf install -y chkconfig
Execute the following command to download and install Wazuh Agent software.
# sudo WAZUH_MANAGER='192.168.18.83' yum install -y https://packages.wazuh.com/4.x/yum/wazuh-agent-4.4.5-1.x86_64.rpm
In above command, you can change WAZUH_MANAGER ip address according to your environment.
Enable and start Wazuh Agent.
# systemctl enable --now wazuh-agent
Synchronizing state of wazuh-agent.service with SysV service script with /usr/lib/systemd/systemd-sysv-install.
Executing: /usr/lib/systemd/systemd-sysv-install enable wazuh-agent
Created symlink /etc/systemd/system/multi-user.target.wants/wazuh-agent.service → /usr/lib/systemd/system/wazuh-agent.service.
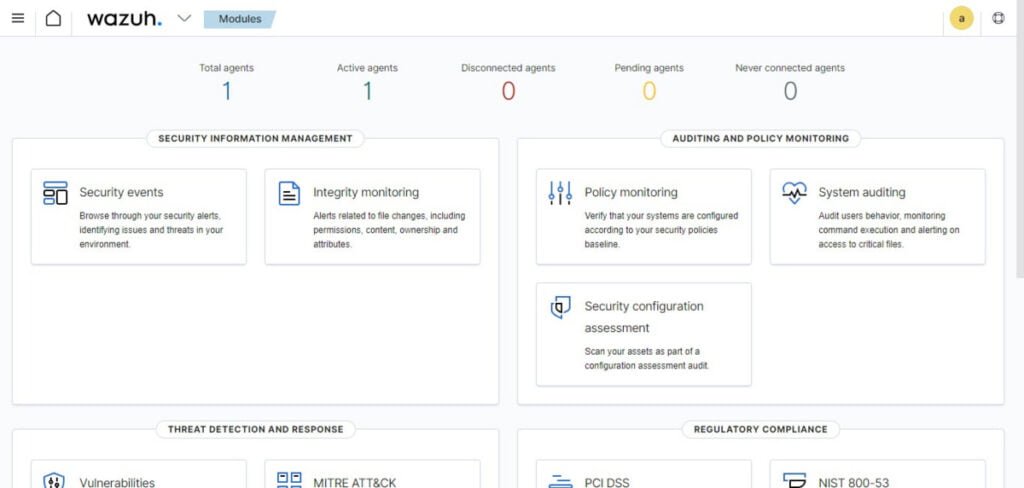
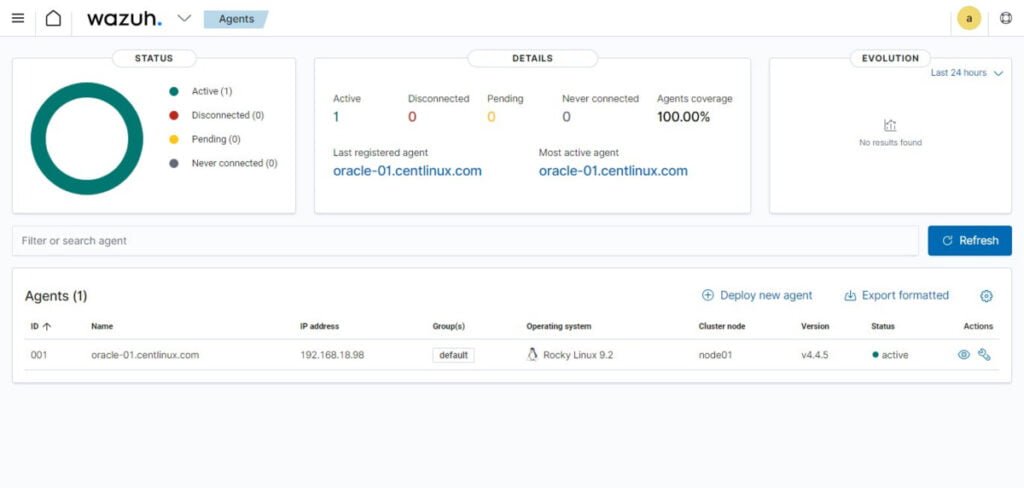
Refresh your Wazuh Dashboard.


Wazuh Agent has been deployed on your Linux node and it is now submitting relevant metrices to your Wazuh server.
Video to install Wazuh Server on Rocky Linux 9:
Final Thoughts
Install Wazuh SIEM on Rocky Linux 9 because it offers a robust security solution, empowering organizations to proactively monitor and protect their systems. By following the detailed installation guide, users can enhance their security posture and mitigate potential threats effectively. Stay ahead of emerging risks and ensure the integrity of your systems with Wazuh installation on Rocky Linux 9.

