Discover how to perform a Rocky Linux 8 Minimal Install with our comprehensive guide, complete with helpful screenshots. Simplify your system setup and streamline operations with this lightweight yet powerful installation option. #centlinux #linux #rockylinux
Table of Contents
What is Rocky Linux?
Rocky Linux is a community-driven, enterprise-grade Linux distribution designed to be a seamless replacement for CentOS Linux. It aims to provide a stable, reliable, and free alternative to CentOS, particularly for organizations and users who were relying on CentOS for their production environments and enterprise workloads.
Key features of Rocky Linux include:
- Stability and Reliability: Built on a solid foundation, Rocky Linux inherits the stability and reliability of its predecessor, CentOS Linux.
- Community-Driven Development: Rocky Linux is developed by the community, with contributions from volunteers, organizations, and developers around the world. This ensures transparency, accountability, and responsiveness to the needs of users.
- Binary Compatibility: Rocky Linux aims to maintain binary compatibility with Red Hat Enterprise Linux (RHEL), providing a compatible environment for applications and workloads developed for RHEL.
- Long-Term Support (LTS): Like CentOS Linux, Rocky Linux offers long-term support (LTS) with regular security updates and maintenance releases, providing stability and peace of mind for enterprise users.
- Free and Open Source: Rocky Linux is distributed under open-source licenses, allowing users to freely use, modify, and distribute the software, in alignment with the principles of the open-source community.
Rocky Linux was initiated by Gregory Kurtzer, one of the original co-founders of CentOS Linux, in response to the shift in CentOS’s focus from being a downstream rebuild of RHEL to CentOS Stream. It aims to fill the gap left by CentOS’s transition and provide a viable alternative for users seeking a stable, community-driven Linux distribution for their production environments and enterprise workloads. Thus Rocky Linux may be be considered as the best alternative for CentOS 8 by Linux enthusiasts.
What is Minimal Installation?
Minimal installation refers to installing an operating system with only the essential components required for basic functionality. It typically includes only the core components and essential system services necessary for the system to boot and perform basic operations.
In the context of Linux distributions like CentOS, Fedora, or Ubuntu, a minimal installation option is often provided during the installation process. Choosing this option installs the operating system with a minimal set of packages, resulting in a lightweight and streamlined system with minimal disk space and resource requirements.
Here are some characteristics of a minimal installation:
- Basic System Utilities: Minimal installations typically include essential system utilities such as a shell, package manager, and basic command-line tools necessary for system administration and management.
- No Graphical Interface: A minimal installation usually does not include a graphical desktop environment or any graphical applications. This helps reduce the disk space and memory footprint of the system.
- Limited Pre-installed Software: Minimal installations come with only a small set of pre-installed software packages, focusing on core system components rather than additional applications or utilities.
- Customizable: Users can add additional packages and software as needed after the minimal installation is complete, using the package manager to install only the software they require.
- Resource Efficient: Minimal installations consume fewer system resources (such as CPU, memory, and disk space) compared to full installations, making them suitable for resource-constrained environments or specialized use cases where performance is critical.
Overall, a minimal installation provides a lightweight and efficient base system that users can customize and expand according to their specific requirements, making it a popular choice for servers, virtual machines, containers, and other deployments where resource efficiency and flexibility are important.
Recommended Online Training: Learn Bash Shell in Linux for Beginners

Environment Specification
We are using a KVM based virtual machine with following specifications.
- CPU – 3.4 Ghz (2 cores)
- Memory – 2 GB
- Storage – 20 GB
Download Rocky Linux 8 ISO
Just like CentOS, Rocky Linux is also freely available over the Internet. You can download it from their official website.
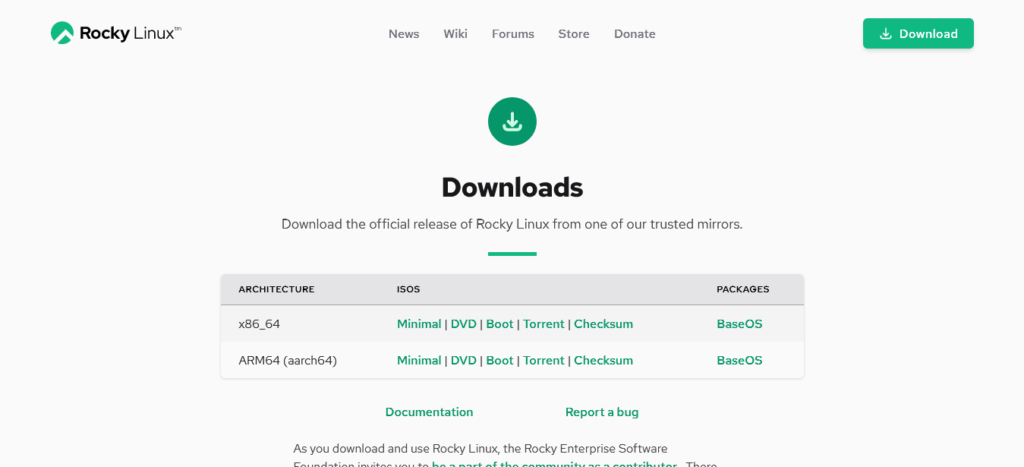
Download the Minimal ISO Rocky-8.4-x86_64-minimal.iso for your preferred architecture.
Rocky Linux 8 Minimal Installation
Attach the downloaded ISO file in the CDROM of your virtual machine and start it.
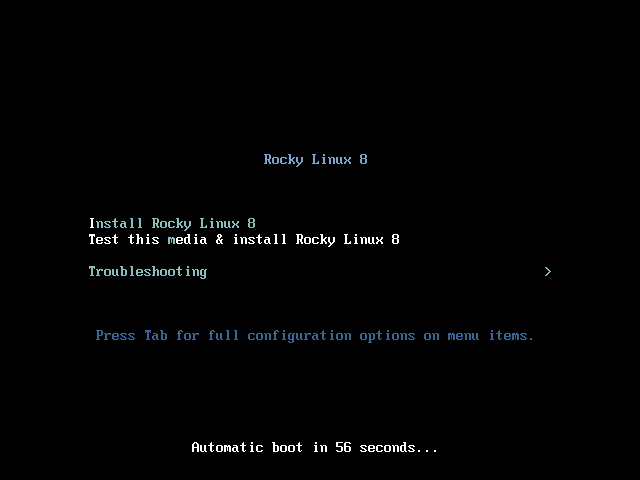
Select the ‘Install Rocky Linux’ option and press <ENTER>.
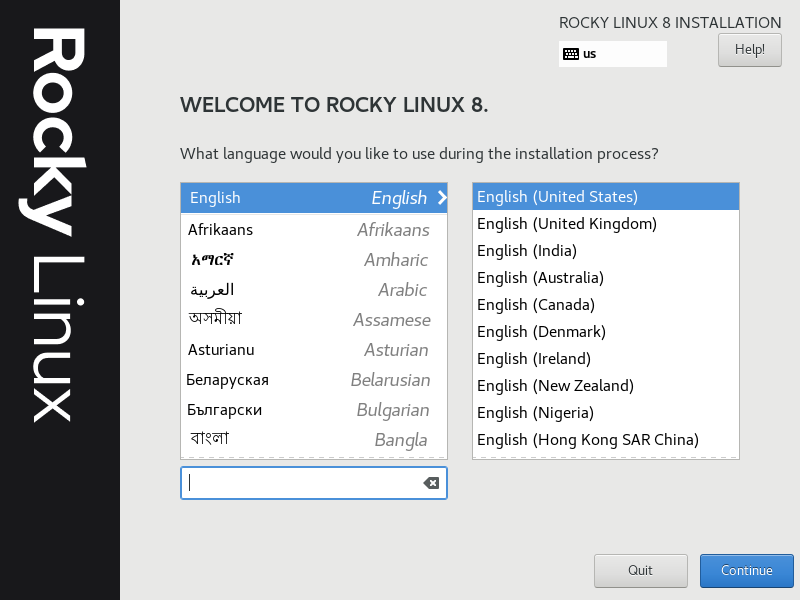
Select the language to be used during installation process and press <Continue>.
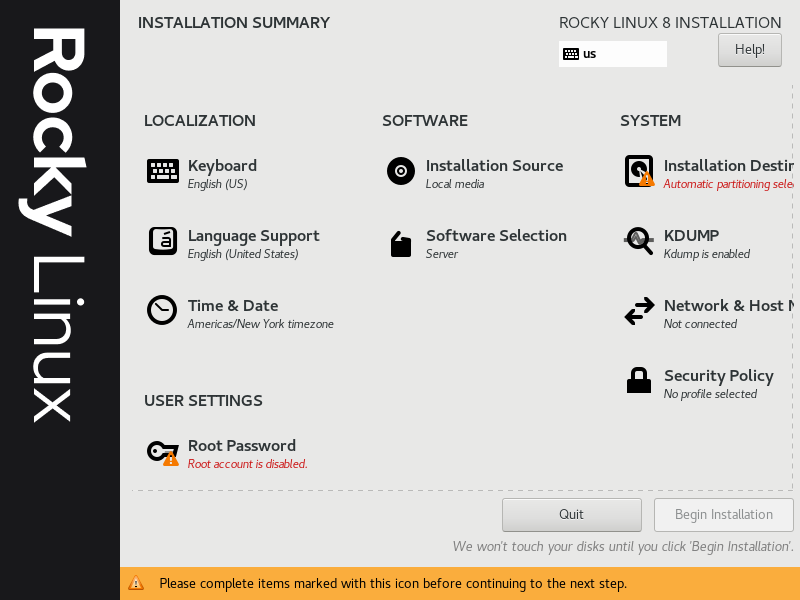
You are now at the ‘Installation Summary’ screen. You can configure installation of the operating system from here.
Click on ‘Installation Destination’ under ‘System’ section.
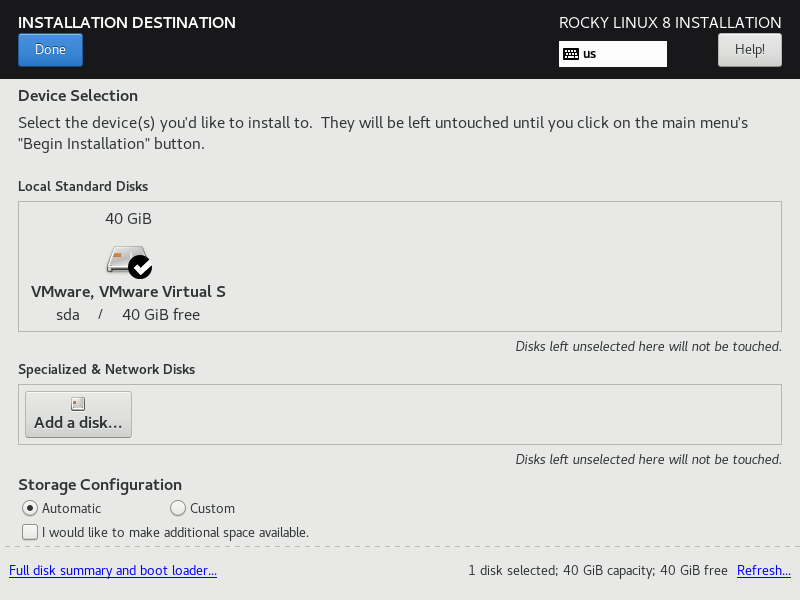
You can configure from simple to advance storage options here. You can create partitions, LVMs and software RAIDS.
But for a minimal installation, you need to click on <Done>, and the setup will configure the default storage option i.e. LVMs for your enterprise operating system.
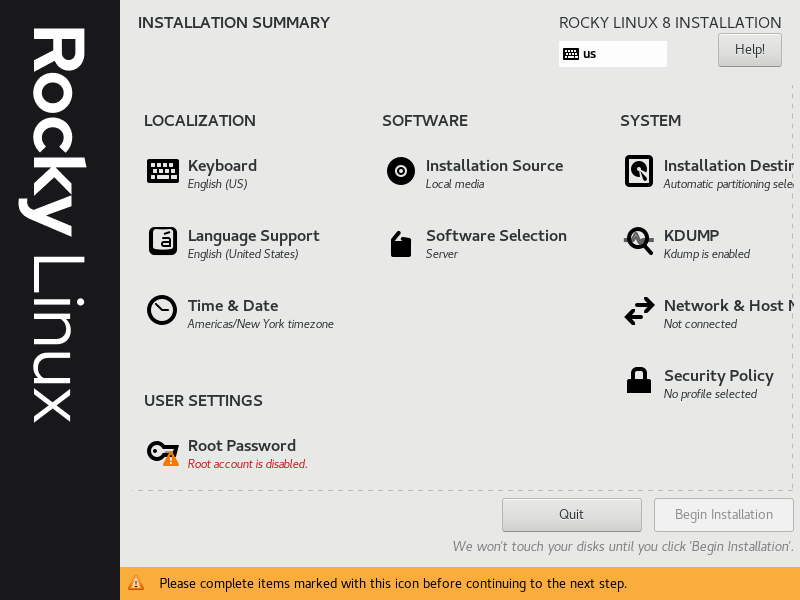
Click on ‘Software Selection’ under ‘Software’ section.
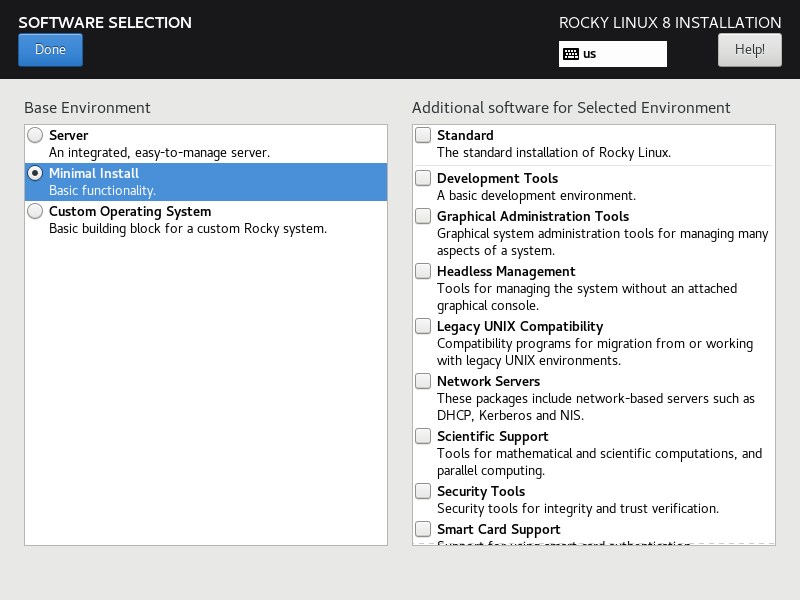
Choose the ‘Minimal Install’ under ‘Base Environment’ and click on <Done>.
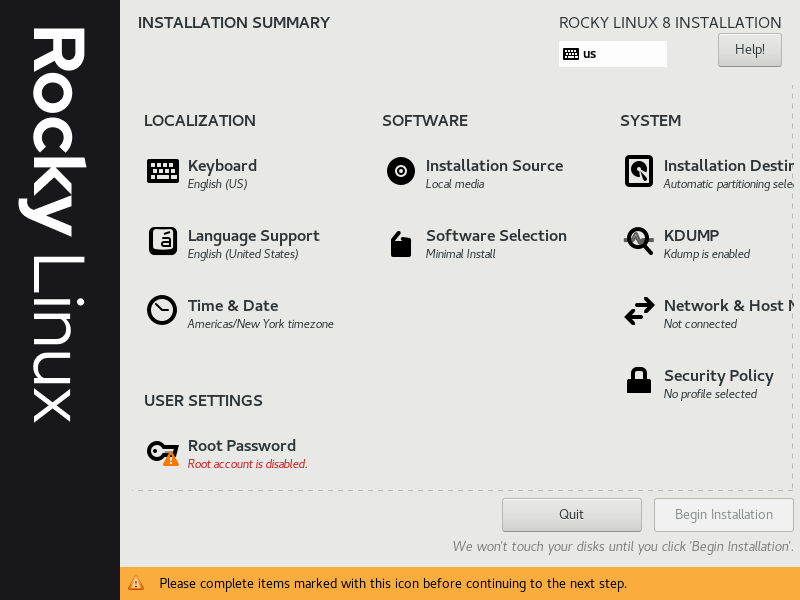
Click on ‘Time & Date’ to set the relevant settings for your server machine.
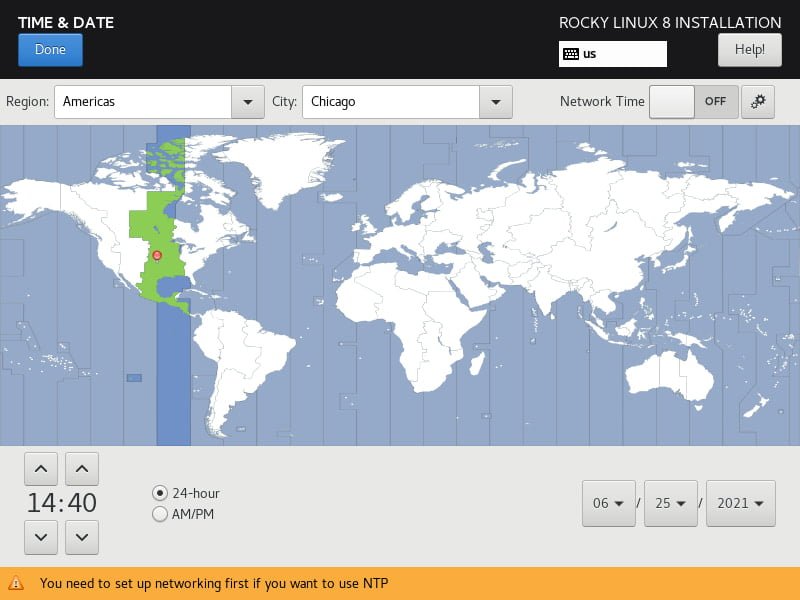
Choose your timezone and adjust time and date settings as per your requirement.
Press <Done> to save settings and go back to installation summary.
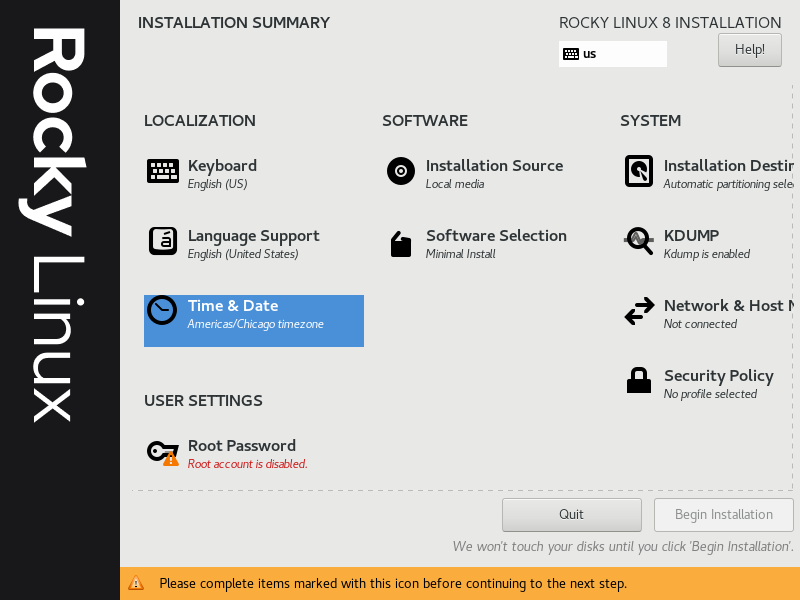
Click on ‘Network & Host Name’ to go to network configuration screen.
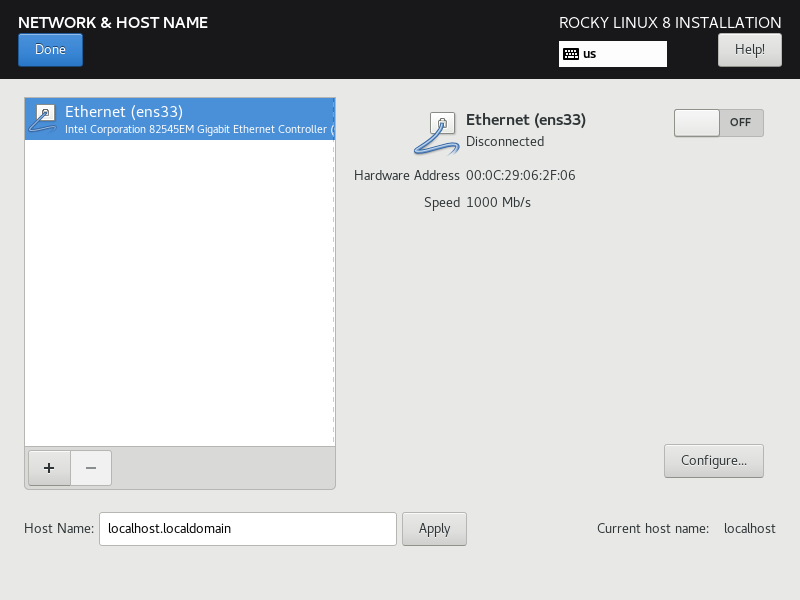
Turn on the Ethernet (ens33) connection. Connection name may vary on operating system.
Also set the preferred ‘Host Name’ for your Rocky Linux server.
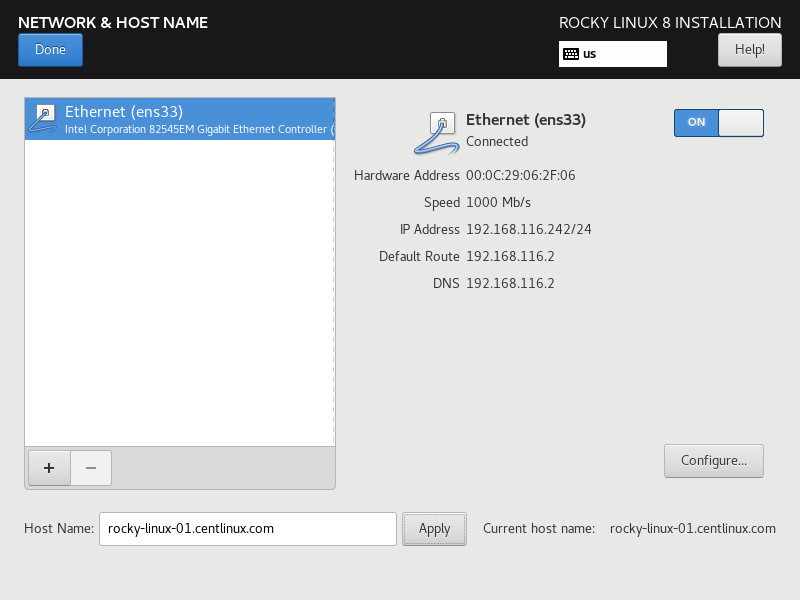
Press <Done> to go back to main screen.
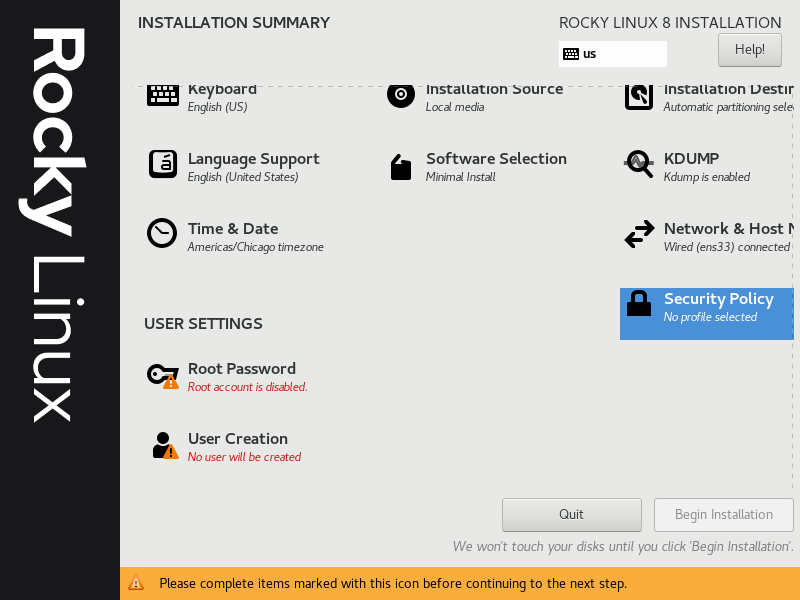
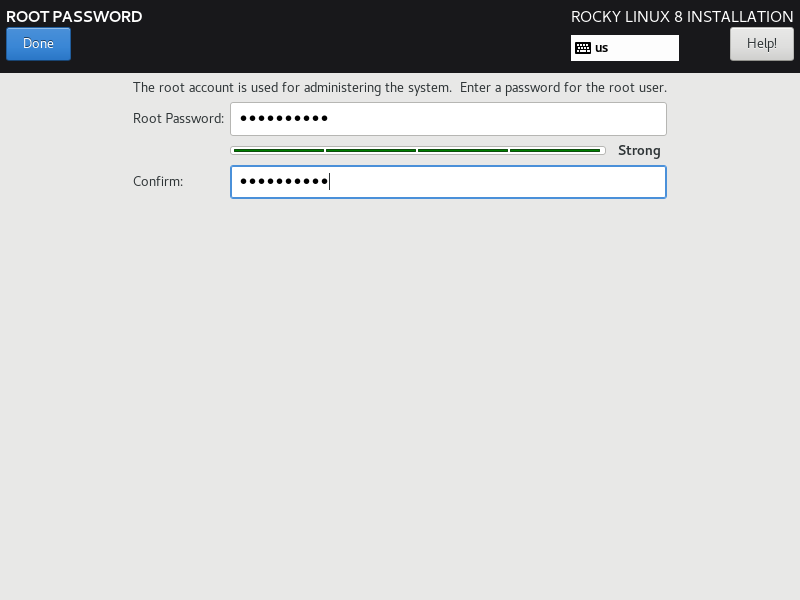
Click on ‘Root Password’ and set a strong password for the Linux superuser.
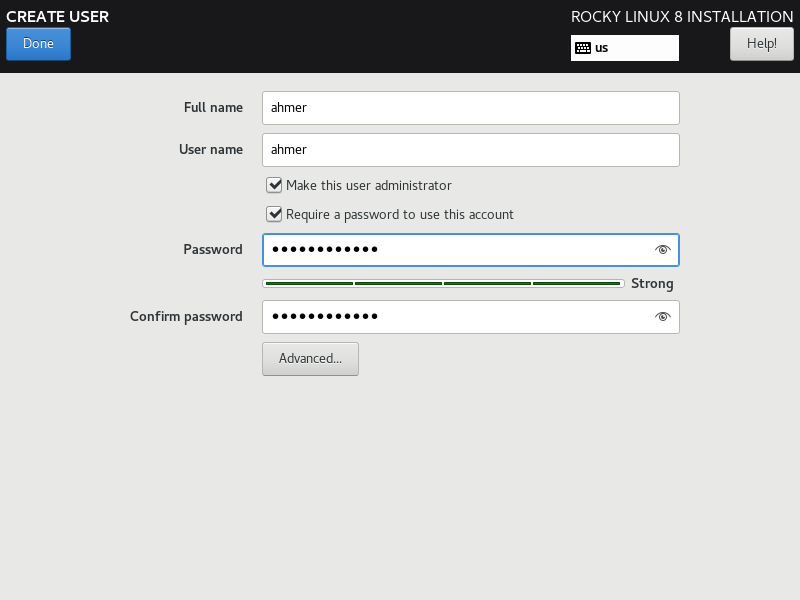
Click on ‘Create User’ to create your required operating system users.
Press <Done> button to save changes and go back to main screen.
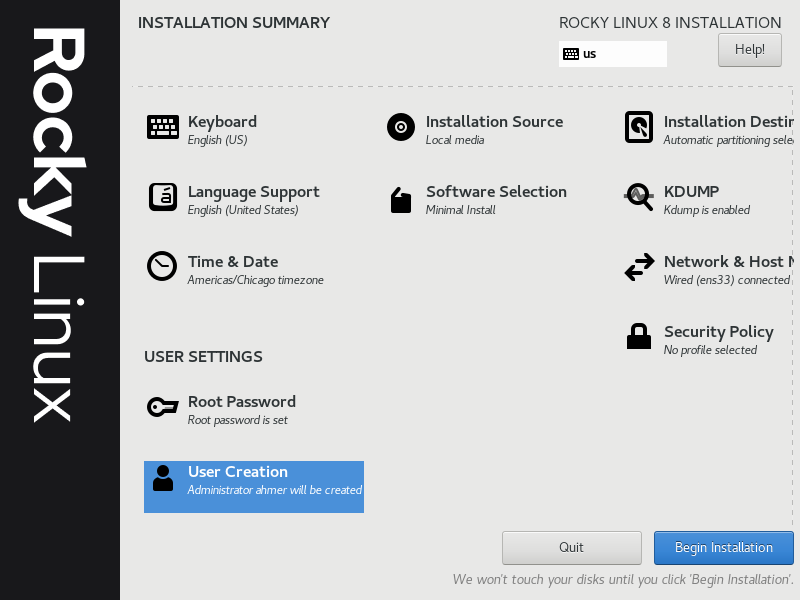
After configuring all installation settings, click on <Begin Installation> to start minimal installation.
The installation process started, take sometime and completed eventually.
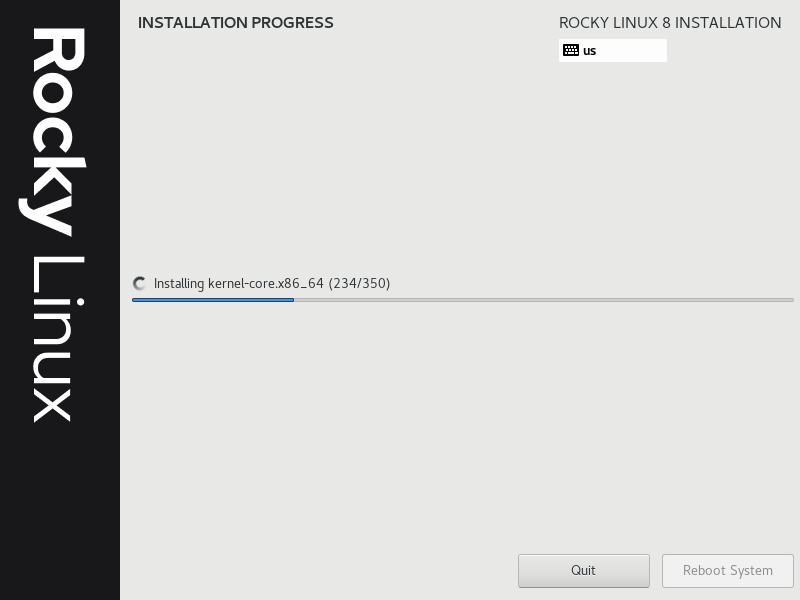
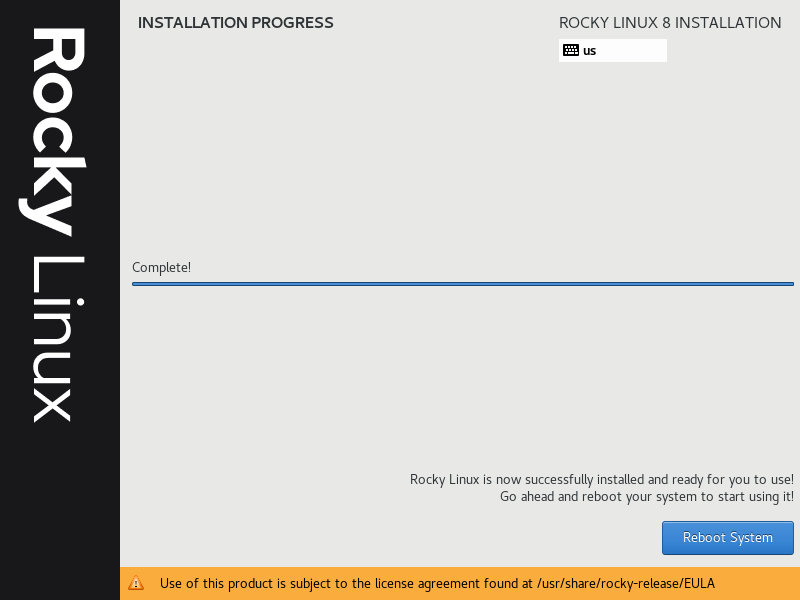
Click on <Reboot System> to restart the machine.
After reboot, the system will show the GRUB boot menu.
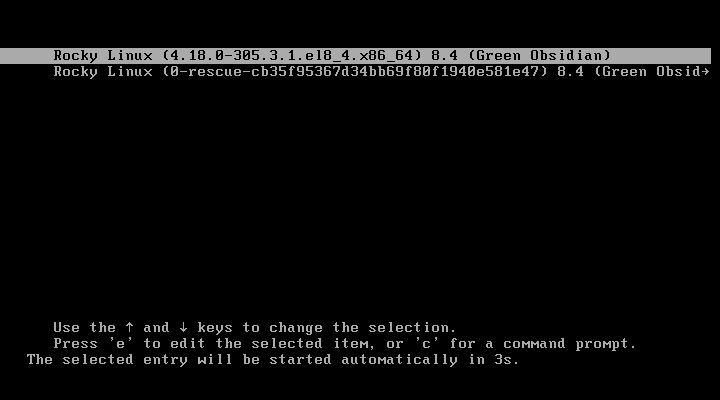
Choose the highlighted option or wait for 5 seconds to start Rocky Linux with the same.

After operating system startup, you will reach at the CommandLine (CLI) based Linux login prompt.
Login as root user.

Execute the uname command to verify the Linux Kernel version.
If you are new to Linux and facing difficulty in working at Linux Bash prompt. We recommend that, you should read The Linux Command Line, 2nd Edition: A Complete Introduction by William Shotts.
Final Thoughts
Experience the efficiency and flexibility of Rocky Linux 8 Minimal Install with our detailed guide accompanied by insightful screenshots. Simplify your system setup and streamline your operations with a lightweight yet powerful foundation.
For personalized assistance or additional support with your Rocky Linux installation, consider exploring my services on Fiverr:
Linux Server Configuration – Fiverr
Let me help you navigate through the process, ensuring a smooth and seamless transition to Rocky Linux 8 Minimal Install, tailored to your specific needs and preferences.
