Learn how to install Cockpit, a powerful web GUI, for streamlined and efficient Linux server management. Simplify your server administration with this step-by-step guide. #centlinux #linux #cockpit
Table of Contents
What is Cockpit?
Cockpit is a web-based graphical user interface (GUI) that allows users to manage Linux servers easily and effectively. It provides an intuitive dashboard where administrators can perform various tasks without needing deep command-line knowledge. Key features of Cockpit include:
- Real-Time Monitoring: View real-time statistics and performance data for CPU, memory, disk usage, and network activity.
- System Logs: Access and manage system logs to diagnose issues and track system events.
- User Management: Create, modify, and delete user accounts, and manage user permissions.
- Service Management: Start, stop, and monitor system services and manage systemd units.
- Software Updates: Install and update software packages, ensuring your server is up to date.
- Storage Management: Manage disks and file systems, including creating and mounting new storage volumes.
- Networking: Configure network settings, manage interfaces, and troubleshoot network issues.
- Container Management: Administer containerized applications using Docker or Podman.
Cockpit is designed to be lightweight and efficient, making it suitable for both experienced administrators and those new to server management. It can be installed on various Linux distributions, including Fedora, Red Hat Enterprise Linux (RHEL), CentOS, Ubuntu, and Debian.
Read Also: How to install Linux Dash on Rocky Linux 8
Cockpit Alternatives
There are several alternatives to Cockpit for managing Linux servers through a web-based GUI. Here are some of the most popular ones:
Webmin:
- A comprehensive web-based interface for system administration.
- Allows management of user accounts, Apache, DNS, file sharing, and more.
- Supports a wide range of modules for additional functionalities.
phpMyAdmin:
- Primarily focused on MySQL and MariaDB administration through a web interface.
- Useful for database management tasks such as creating databases, running SQL queries, and managing tables and users.
Ajenti:
- A modern, lightweight, and user-friendly web-based server management tool.
- Offers a range of plugins for managing various server functions, including web hosting, mail servers, and monitoring.
ISPConfig:
- An open-source hosting control panel for Linux.
- Supports the management of multiple servers from a single interface.
- Provides features for web hosting, email, DNS, and FTP management.
cPanel/WHM:
- A popular commercial web hosting control panel.
- Offers extensive features for managing web servers, domains, email accounts, and databases.
- Provides a user-friendly interface and extensive support.
Plesk:
- Another commercial web hosting control panel.
- Designed to simplify the management of websites, domains, emails, and applications.
- Includes robust security features and supports a variety of extensions.
Zentyal:
- An all-in-one Linux server management tool with a focus on small and medium-sized businesses.
- Integrates services such as directory and domain management, file sharing, email, and firewall.
OpenMediaVault:
- Specifically designed for NAS (Network Attached Storage) management.
- Offers features for managing storage, user accounts, and file sharing protocols.
These alternatives offer different features and capabilities, catering to various server management needs and preferences. Depending on your specific requirements, one of these tools might be a better fit for your environment than Cockpit.
Recommended Online Training: Learn Bash Shell in Linux for Beginners

Environment Specification
We are using a minimal Rocky Linux 8 virtual machine with following specifications.
- CPU – 3.4 Ghz (2 cores)
- Memory – 2 GB
- Storage – 20 GB
- Operating System – Rocky Linux 8.5 (Green Obsidian)
- Hostname – rockylinux-01.centlinux.com
- IP Address – 192.168.116.128 /24
Update your Linux Server
Connect with rockylinux-01.centlinux.com as root user by using a ssh client.
Execute following command to build cache for installed yum repositories.
# dnf makecache
As a best practice, update software packages in your Linux operating system before installing Cockpit web interface.
# dnf update -y
Last metadata expiration check: 0:00:49 ago on Mon 21 Feb 2022 07:39:22 PM PKT.
Dependencies resolved.
Nothing to do.
Complete!
Our Linux server is already up-to-date. The result may vary on your operating system.
Check the Linux Kernel and operating system version, being used in this installation guide.
# uname -r
4.18.0-348.12.2.el8_5.x86_64

# cat /etc/os-release
NAME="Rocky Linux"
VERSION="8.5 (Green Obsidian)"
ID="rocky"
ID_LIKE="rhel centos fedora"
VERSION_ID="8.5"
PLATFORM_ID="platform:el8"
PRETTY_NAME="Rocky Linux 8.5 (Green Obsidian)"
ANSI_COLOR="0;32"
CPE_NAME="cpe:/o:rocky:rocky:8:GA"
HOME_URL="https://rockylinux.org/"
BUG_REPORT_URL="https://bugs.rockylinux.org/"
ROCKY_SUPPORT_PRODUCT="Rocky Linux"
ROCKY_SUPPORT_PRODUCT_VERSION="8"
Install Cockpit on Rocky Linux 8
In Rocky Linux 8, Cockpit software is available in standard yum repositories. Therefore, you can easily install it by executing a dnf command.
# dnf install -y cockpit
After successful installation of web GUI management software, enable and start Cockpit service.
# systemctl enable --now cockpit.socket
Created symlink /etc/systemd/system/sockets.target.wants/cockpit.socket → /usr/lib/systemd/system/cockpit.socket.
Check the status of Cockpit service.
# systemctl status cockpit.socket
● cockpit.socket - Cockpit Web Service Socket
   Loaded: loaded (/usr/lib/systemd/system/cockpit.socket; enabled; vendor pres>
   Active: active (listening) since Mon 2022-02-21 19:48:06 PKT; 34s ago
     Docs: man:cockpit-ws(8)
   Listen: [::]:9090 (Stream)
  Process: 2150 ExecStartPost=/bin/ln -snf active.motd /run/cockpit/motd (code=>
  Process: 2143 ExecStartPost=/usr/share/cockpit/motd/update-motd  localhost (c>
    Tasks: 0 (limit: 5808)
   Memory: 4.0K
   CGroup: /system.slice/cockpit.socket

Feb 21 19:48:06 rockylinux-01.centlinux.com systemd[1]: Starting Cockpit Web Se>
Feb 21 19:48:06 rockylinux-01.centlinux.com systemd[1]: Listening on Cockpit We>
Configure Linux Firewall
Cockpit uses default service port 9090/tcp. Therefore, you may have to enable this port or enable predefined cockpit service in Linux firewall.
# firewall-cmd --permanent --add-service=cockpit
Warning: ALREADY_ENABLED: cockpit
success
You can see that, the cockpit service is already enabled by the installer.
Accessing Cockpit Web GUI
Open URL https://rockylinux-01.centlinux.com:9090 in a web browser.
You may encounter some privacy warning.
This is because Cockpit software is using self-signed SSL/TLS certificates.
Ignore this warning and add a Security Exception.

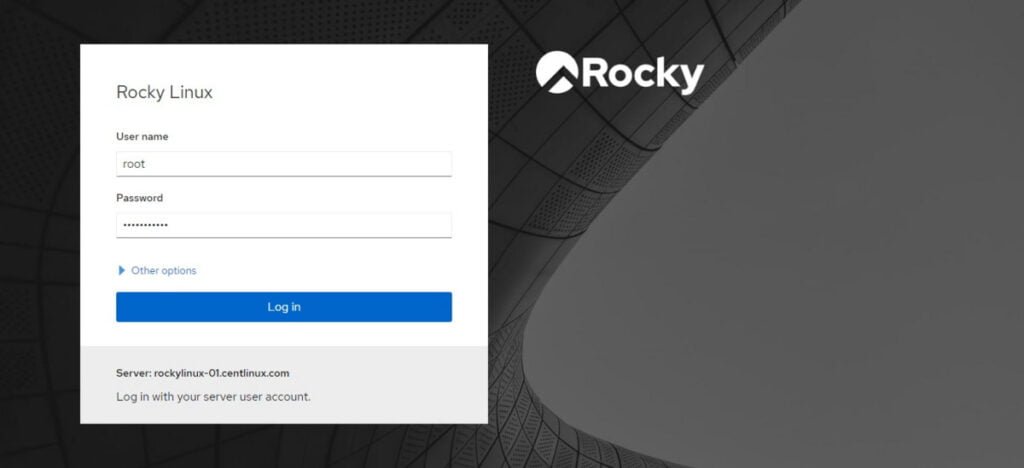
Login as root user.

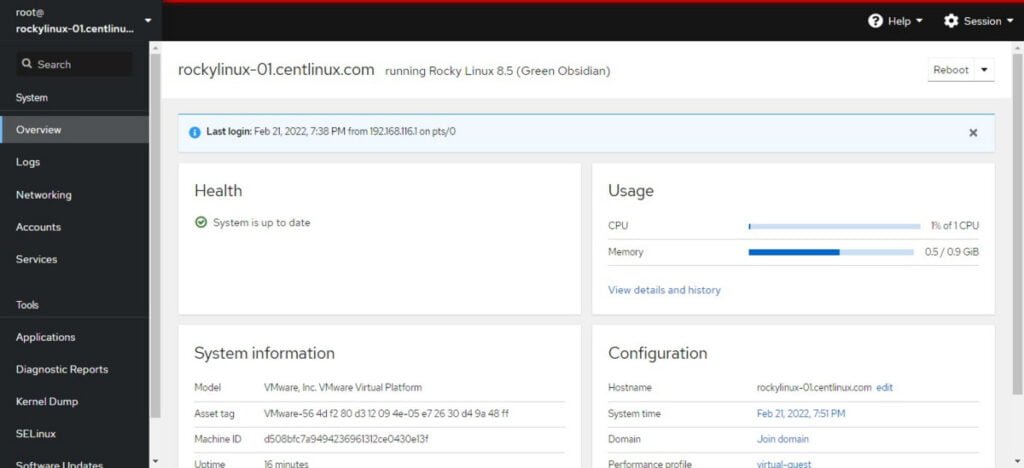
You have successfully login to Cockpit Web GUI Management Software.
If you are new to Linux and facing difficulty in working at Linux Bash prompt. We recommend that, you should read The Linux Command Line, 2nd Edition: A Complete Introduction by William Shotts.
Video: Install Cockpit Web GUI for Efficient Linux Server Management
Read also: Complete Spacewalk installation on CentOS 7
Final Thoughts
In conclusion, installing Cockpit Web GUI significantly enhances your Linux server management experience, making it more intuitive and efficient. By following this guide, you can easily set up Cockpit and take advantage of its powerful features to simplify server administration tasks.
For personalized assistance or further support with your Linux server management needs, feel free to check out my services on Fiverr. I’m here to help you make the most of your server setup.
