Learn how to install MariaDB Server on Rocky Linux 9 with our comprehensive step-by-step guide. Set up this powerful, open-source database management system to efficiently manage your data on Rocky Linux. #centlinux #linux #mysql
Table of Contents
What is MariaDB?
MariaDB is a community-developed, commercially supported fork of the MySQL relational database management system (RDBMS), intended to remain free and open-source software under the GNU General Public License. Development is led by some of the original developers of MySQL, who forked it due to concerns over its acquisition by Oracle Corporation in 2009.
MariaDB is intended to maintain high compatibility with MySQL, with library binary parity and exact matching with MySQL APIs and commands, allowing it in many cases to function as drop-in replacement for MySQL. However, new features are diverging. It includes new storage engines like Aria, ColumnStore, and MyRocks.
Its lead developer/CTO is Michael “Monty” Widenius, one of the founders of MySQL AB and the founder of Monty Program AB. On 16 January 2008, MySQL AB announced that it had agreed to be acquired by Sun Microsystems for approximately $1 billion. The acquisition completed on 26 February 2008. Sun was then bought the following year by Oracle Corporation. MariaDB is named after Widenius’ younger daughter, Maria. (MySQL is named after his other daughter, My. (Source: Wikipedia)

MariaDB vs MySQL
MariaDB and MySQL are both popular open-source relational database management systems (RDBMS) with similar roots, but they have diverged over time. Here’s a comparison to help you understand their differences and decide which one might be better suited for your needs:
Origins and Development
- MySQL: Originally developed by MySQL AB, it was acquired by Sun Microsystems and later by Oracle Corporation. Oracle now maintains MySQL.
- MariaDB: Created by the original developers of MySQL after concerns about Oracle’s acquisition. It aims to maintain open-source freedom and compatibility with MySQL.
Licensing
- MySQL: Dual-licensed under the GPL and a commercial license. Some advanced features are available only under the commercial license.
- MariaDB: Entirely open-source under the GPL. All features are available without the need for a commercial license.
Features
- MySQL:
- Strong community and widespread adoption.
- Some enterprise features (e.g., MySQL Enterprise Firewall) are only available in the commercial version.
- Offers different storage engines, with InnoDB as the default.
- MariaDB:
- Includes features not found in MySQL, such as the Aria storage engine and advanced Galera Cluster for synchronous multi-master replication.
- Generally, incorporates community-contributed patches faster.
- Strives for backward compatibility with MySQL, including matching command-line options and API endpoints.
Performance
- MySQL: Known for stability and reliability. Performance can be enhanced with proprietary add-ons available through Oracle.
- MariaDB: Often includes performance improvements and optimizations. Some benchmarks show MariaDB performing better in certain scenarios due to additional storage engines and query optimizations.
Compatibility
- MySQL: Standard in many applications and services; widely supported by third-party tools and hosting providers.
- MariaDB: Designed to be a drop-in replacement for MySQL. Most MySQL connectors, clients, and libraries work seamlessly with MariaDB. Some newer MySQL features may not be immediately available in MariaDB.
Community and Support
- MySQL: Backed by Oracle, offering extensive professional support and resources. A large community of users and developers provides a wealth of information and third-party tools.
- MariaDB: Maintained by the MariaDB Foundation, which ensures its open-source nature. It has a growing community and increasing enterprise adoption, with various support options available through MariaDB Corporation.
Use Cases
- MySQL: Suitable for applications that rely on Oracle’s proprietary features or those embedded in Oracle’s ecosystem. It remains a popular choice for web applications, enterprise environments, and software that explicitly supports MySQL.
- MariaDB: Ideal for users who prioritize open-source software, need features like Galera Cluster for high availability, or want to avoid potential licensing costs associated with MySQL’s commercial version. It’s increasingly being adopted for enterprise applications and large-scale deployments.
Conclusion
- Choose MySQL if you need guaranteed compatibility with Oracle’s ecosystem, rely on enterprise features provided by Oracle, or require a widely supported and stable RDBMS.
- Choose MariaDB if you prefer a fully open-source solution with advanced features, improved performance, and a commitment to open-source principles. It’s also a strong choice if you want to avoid potential licensing costs and embrace a rapidly evolving platform.
Environment Specification
We are using a minimal Rocky Linux 9 virtual machine with following specifications.
- CPU – 3.4 Ghz (2 cores)
- Memory – 2 GB
- Storage – 20 GB
- Operating System – Rocky Linux release 9.0 (Blue Onyx)
- Hostname – mariadb-01.centlinux.com
- IP Address – 192.168.116.131/24
For setting up your MariaDB server environment, opting for a reliable and flexible platform is key. Whether you choose a compact Mini PC, which offers the advantage of dedicated local hardware ideal for hands-on experimentation.
[Grab a Mini PC for your Home Lab – Shop with Us!]
Or a Rose Hosting VPS that provides scalable cloud resources with excellent uptime, both options are perfect for building a Linux Home Lab.
[Discover the Power of Rose Hosting VPS – Limited Time Offer!]
These setups allow you to experiment with MariaDB and other Linux server technologies in a controlled environment without affecting production systems. If you’re interested, you can find links to recommended Mini PCs and Rose Hosting VPS plans below to get started quickly and efficiently.
Disclaimer: The links provided for Mini PCs and Rose Hosting VPS are affiliate links. If you make a purchase through these links, I may earn a commission at no additional cost to you, which helps support this blog and future tutorials.
Update your Linux Operating System
By using a ssh client, login to your Rocky Linux server as root user.
Set the hostname of your machine as follows.
hostnamectl set-hostname mariadb-01.centlinux.comRefresh your yum cache with the help of dnf command.
dnf makecacheUpdate all software packages in your Linux operating system.
dnf update -yThe above command may update your Linux Kernel. If it does, then restart your Linux machine before moving forward with your server configurations.
rebootAfter reboot, confirm the Linux operating system and Kernel versions, that are being used in this tutorial.
cat /etc/rocky-release
uname -r
Output:
Rocky Linux release 9.0 (Blue Onyx)
5.14.0-70.22.1.el9_0.x86_64
Alternatively, you can also upgrade Rocky Linux 9 to 10 by following our step-by-step guide.
Install MariaDB Yum Repository
In Rocky Linux 9.0, MariaDB Server 10.5 is available in standard yum repositories, and you can easily install it by using dnf command.
dnf info mariadb-serverOutput:
Last metadata expiration check: 0:07:36 ago on Thu 29 Sep 2022 11:39:20 AM CDT.
Available Packages
Name         : mariadb-server
Epoch        : 3
Version      : 10.5.16
Release      : 2.el9_0
Architecture : x86_64
Size         : 9.4 M
Source       : mariadb-10.5.16-2.el9_0.src.rpm
Repository   : appstream
Summary      : The MariaDB server and related files
URL          : http://mariadb.org
License      : GPLv2 and LGPLv2
Description  : MariaDB is a multi-user, multi-threaded SQL database server. It
             : is a client/server implementation consisting of a server daemon
             : (mariadbd) and many different client programs and libraries. This
             : package contains the MariaDB server and some accompanying files
             : and directories. MariaDB is a community developed fork from
             : MySQL.
However, we are emphasizing on installing a latest version of MariaDB database, that usually isn’t available in standard yum repositories.
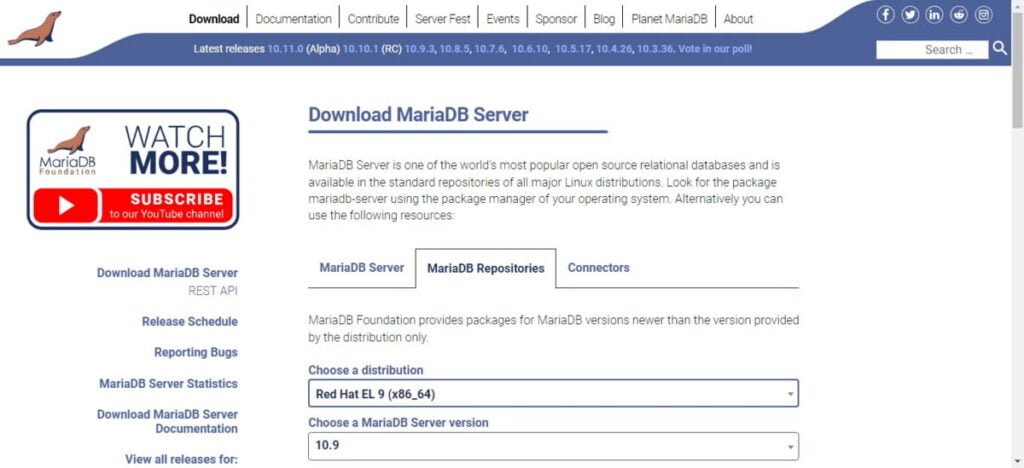
Browse official MariaDB website to download latest versions of famous MySQL fork and setup MariaDB server on your preferred operating systems.
Additionally, the MariaDB download page also provides the yum repository configurations for the various Linux distributions.
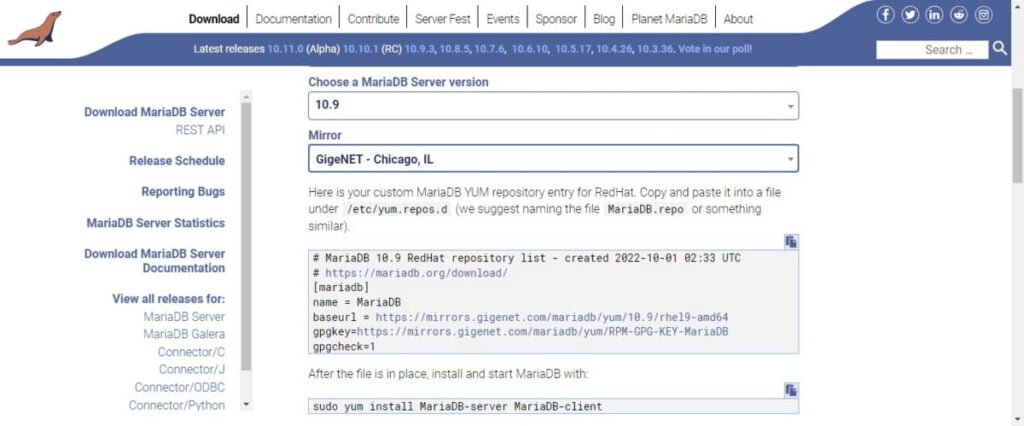
Select your Linux distribution and required MariaDB server version to generate the yum repository configurations.
It is worth noting that, currently, version 10.11 (Alpha) and 10.10 (RC) are available to install, but we are focusing on a stable release i.e. MariaDB 10.9.


Copy the yum repo configurations and use it to create a repo file within /etc/yum.repos.d directory. You can use vim text editor for this purpose.
vi /etc/yum.repos.d/mariadb.repoPaste the MariaDB repo configurations in this file.
MariaDB 10.9 RedHat repository list - created 2022-09-29 16:48 UTC
# https://mariadb.org/download/
[mariadb]
name = MariaDB
baseurl = https://mirrors.gigenet.com/mariadb/yum/10.9/rhel9-amd64 gpgkey=https://mirrors.gigenet.com/mariadb/yum/RPM-GPG-KEY-MariaDB
gpgcheck=1
Save and Exit.
Build the yum cache for newly added yum repository.
dnf makecacheInstall MariaDB Server on Rocky Linux 9
Now, you can install the latest version of MariaDB server by executing following command.
dnf install -y MariaDB-server MariaDB-clientEnable and start MariaDB service.
systemctl enable --now mariadb.serviceCheck the status of MariaDB service.
systemctl status mariadb.serviceOutput:
● mariadb.service - MariaDB 10.9.3 database server
     Loaded: loaded (/usr/lib/systemd/system/mariadb.service; enabled; vendor p>
    Drop-In: /etc/systemd/system/mariadb.service.d
             └─migrated-from-my.cnf-settings.conf
     Active: active (running) since Thu 2022-09-29 15:16:11 CDT; 16s ago
       Docs: man:mariadbd(8)
             https://mariadb.com/kb/en/library/systemd/
    Process: 901 ExecStartPre=/bin/sh -c systemctl unset-environment _WSREP_STA>
    Process: 902 ExecStartPre=/bin/sh -c [ ! -e /usr/bin/galera_recovery ] && V>
    Process: 923 ExecStartPost=/bin/sh -c systemctl unset-environment _WSREP_ST>
   Main PID: 910 (mariadbd)
     Status: "Taking your SQL requests now..."
      Tasks: 13 (limit: 5740)
     Memory: 187.2M
        CPU: 4.197s
     CGroup: /system.slice/mariadb.service
             └─910 /usr/sbin/mariadbd

Sep 29 15:16:11 mariadb-01.centlinux.com mariadbd[910]: 2022-09-29 15:16:11 0 [>
Sep 29 15:16:11 mariadb-01.centlinux.com mariadbd[910]: 2022-09-29 15:16:11 0 [>
Configure initial settings of your MariaDB database server as follows.
mariadb-secure-installationOutput:
NOTE: RUNNING ALL PARTS OF THIS SCRIPT IS RECOMMENDED FOR ALL MariaDB
      SERVERS IN PRODUCTION USE!  PLEASE READ EACH STEP CAREFULLY!

In order to log into MariaDB to secure it, we'll need the current
password for the root user. If you've just installed MariaDB, and
haven't set the root password yet, you should just press enter here.

Enter current password for root (enter for none):
OK, successfully used password, moving on...

Setting the root password or using the unix_socket ensures that nobody
can log into the MariaDB root user without the proper authorisation.

You already have your root account protected, so you can safely answer 'n'.

Switch to unix_socket authentication [Y/n] n
 ... skipping.

You already have your root account protected, so you can safely answer 'n'.

Change the root password? [Y/n] Y
New password:
Re-enter new password:
Password updated successfully!
Reloading privilege tables..
 ... Success!


By default, a MariaDB installation has an anonymous user, allowing anyone
to log into MariaDB without having to have a user account created for
them.  This is intended only for testing, and to make the installation
go a bit smoother.  You should remove them before moving into a
production environment.

Remove anonymous users? [Y/n] Y
 ... Success!

Normally, root should only be allowed to connect from 'localhost'.  This
ensures that someone cannot guess at the root password from the network.

Disallow root login remotely? [Y/n] Y
 ... Success!

By default, MariaDB comes with a database named 'test' that anyone can
access.  This is also intended only for testing, and should be removed
before moving into a production environment.

Remove test database and access to it? [Y/n] Y
 - Dropping test database...
 ... Success!
 - Removing privileges on test database...
 ... Success!

Reloading the privilege tables will ensure that all changes made so far
will take effect immediately.

Reload privilege tables now? [Y/n] Y
 ... Success!

Cleaning up...

All done!  If you've completed all of the above steps, your MariaDB
installation should now be secure.

Thanks for using MariaDB!
Login to your database server by using mysql command and execute some SQL commands thereon.
mysql -u root -pList available databases.
show databases;
+--------------------+
| Database           |
+--------------------+
| information_schema |
| mysql              |
| performance_schema |
| sys                |
+--------------------+
4 rows in set (0.093 sec)
Exit from MySQL Prompt.
exitIf you planning to access your database server over the network then you need to allow the service/port in Linux firewall, otherwise you can skip this step.
firewall-cmd --permanent --add-service=mysql
firewall-cmd --reload
You have successfully setup MariaDB server on Linux.
Install phpMyAdmin on Rocky Linux 9
phpMyAdmin is the most popular and de facto preferred tool for MySQL database administration. Just like MariaDB, it is also free and open source. As a portable web application written primarily in PHP, it has become one of the most popular MySQL administration tools, especially for web hosting services.
phpMyAdmin is a PHP web application, therefore, you need a LAMP or LEMP server to deploy it.
Here, we are using Apache based PHP server (i.e. LAMP), however you can also install a Nginx based PHP server (i.e. LEMP) according to your requirements.
Execute following dnf command to install Apache, PHP, PHP modules and other required software packages in one go.
dnf install -y httpd php php-common php-opcache php-cli php-gd php-curl php-mysqlnd php-xml wget policycoreutils-python-utilsEnable and start Apache and PHP services.
systemctl enable --now httpd.service php-fpm.serviceAllow the http service in Linux Firewall.
firewall-cmd --permanent --add-service=http
firewall-cmd --reload
phpMyAdmin is a free software, therefore you can download it from phpMyAdmin official website.
Or you can copy the link and use it with wget command to download phpMyAdmin straight from Linux commandline. Just as we did below.
cd /tmp
wget https://files.phpmyadmin.net/phpMyAdmin/5.2.0/phpMyAdmin-5.2.0-english.tar.gz
Extract the downloaded file in Apache document root by using tar command.
tar xf phpMyAdmin-5.2.0-english.tar.gz --directory /var/www/htmlRename the phpMyAdmin software directory for easy accessibility.
mv /var/www/html/phpMyAdmin-5.2.0-english/ /var/www/html/pmaphpMyAdmin software provides a SQL script to create its meta data repository. You can easily execute it by using mysql command as follows.
mysql -u root -p < /var/www/html/pma/sql/create_tables.sqlCreate a copy of phpMyAdmin configuration file in the application root.
cp /var/www/html/pma/config.sample.inc.php /var/www/html/pma/config.inc.phpOpen config.inc.php file in vim text editor.
vi /var/www/html/pma/config.inc.phpLocate and set following directives in this file.
$cfg['blowfish_secret'] = 'I;Am;Fan;0f;0p3n;S0urc3;S0ftwar3'; /* YOU MUST FILL IN THIS FOR COOKIE AUTH! */
$cfg['Servers'][$i]['host'] = '127.0.0.1';
Create a temporary directory to cache templates by the web application.
mkdir /var/www/html/pma/tmpSet apache user as the owner of pma directory.
chown -R apache:apache /var/www/html/pma/Enable following SELinux Boolean to allow Apache to connect with your MariaDB Database.
setsebool -P httpd_can_network_connect 1Set SELinux permissions for tmp directory, to make it writable by the apache user.
semanage fcontext -a -t httpd_sys_rw_content_t "/var/www/html/pma/tmp(/.*)?"
restorecon -Rv /var/www/html/pma/tmp
Output:
Relabeled /var/www/html/pma/tmp from unconfined_u:object_r:httpd_sys_content_t:s0 to unconfined_u:object_r:httpd_sys_rw_content_t:s0
Create a Admin user in MariaDB database. You can use this user to login via phpMyAdmin administration panel.
mysql -u root -pCreate Admin user by executing following commands.
CREATE USER ahmer@localhost IDENTIFIED BY 'pma';
GRANT ALL ON *.* TO ahmer@localhost;
FLUSH PRIVILEGES;
exit
Open URL http://mariadb-01.centlinux.com/pma/ in a web browser.

Login as user ‘ahmer’.

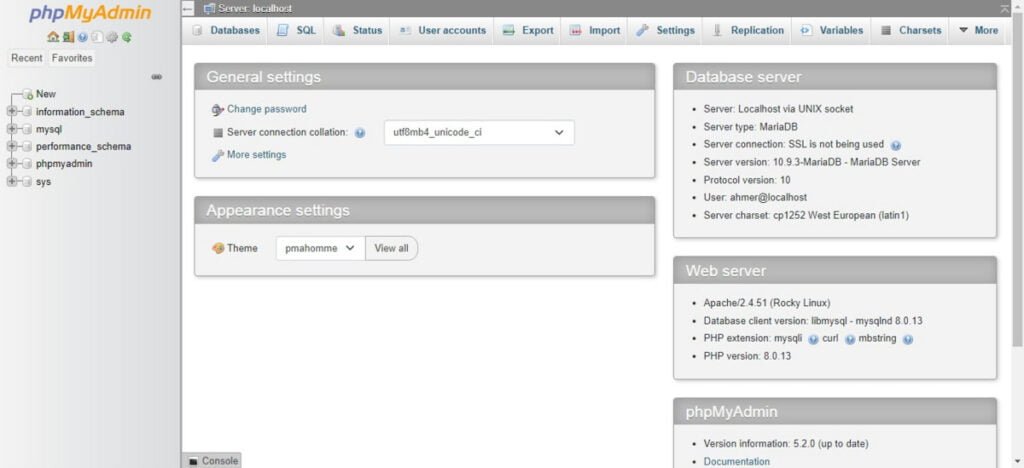
You are now at the dashboard of phpMyAdmin administration panel.
Video Tutorial: How to install MariaDB Server on Linux
Final Thoughts
Congratulations on successfully learning how to install MariaDB Server on Rocky Linux 9! With MariaDB up and running, you now have a powerful, open-source database management system to handle your data efficiently. Take advantage of its robust features and performance to support your applications and projects. Remember to regularly update and secure your MariaDB installation to ensure optimal performance and security.
Whether you need cloud optimization, server management, or automation, I provide comprehensive AWS and Linux services. Hire me to elevate your systems.
FAQs
1. Can I install MariaDB alongside MySQL on Rocky Linux 9?
Yes, but it’s not recommended due to port conflicts and service interference unless you isolate them using containers or different ports.
2. How do I secure MariaDB after installation on Rocky Linux 9?
Run mysql_secure_installation to set root password, remove anonymous users, disable remote root login, and remove test databases.
3. Does MariaDB support encrypted connections on Rocky Linux 9 by default?
MariaDB supports SSL/TLS, but you need to configure certificates and update the server settings manually to enable encrypted connections.
4. Can I use MariaDB with lightweight desktop environments on Rocky Linux 9?
Yes, MariaDB is a server service and runs independently of the desktop environment, so it works on minimal setups too.
5. What is the default storage engine in MariaDB on Rocky Linux 9?
The default storage engine is InnoDB, providing transactions, ACID compliance, and foreign key support by default.
What’s Next
If you’re serious about mastering databases and boosting your tech career, The Ultimate MySQL Bootcamp: Go from SQL Beginner to Expert by Colt Steele is one of the most practical and highly-rated online courses available. Designed for both beginners and professionals, this course walks you step-by-step from the fundamentals of SQL to advanced database management skills using real-world examples.
Whether you’re a developer, data analyst, or aspiring system administrator, this bootcamp will give you the confidence to work with MySQL like a pro. [Enroll today] and start building skills that employers value.
Disclaimer: This post contains affiliate links. If you purchase through these links, I may earn a small commission at no additional cost to you.


Leave a Reply
Please log in to post a comment.