Learn how to install MinIO Object Storage on Rocky Linux 8 with this step-by-step guide. Follow our detailed instructions to set up and configure MinIO for efficient and secure object storage on your Rocky Linux server. #centlinux #linux #cloudstorage
Table of Contents
What is MinIO?
MinIO is a High Performance Object Storage released under GNU Affero General Public License v3.0. It is API compatible with Amazon S3 cloud storage service. It can handle unstructured data such as photos, videos, log files, backups, and container images with (currently) the maximum supported object size of 5TB.
MinIO storage stack has three major components: MinIO Server, MinIO Client (a.k.a. mc, which is a command-line client for the object and file management with any Amazon S3 compatible servers), and MinIO Client SDK that can be used by application developers to interact with any Amazon S3 compatible server.
While MinIO ensures scalable object storage, you can add an extra layer of security with NordLocker — encrypting your files with zero-knowledge protection before they even touch the cloud. With NordLocker, your sensitive data stays private and fully under your control, no matter where it’s stored.
MinIO cloud storage server is designed to be minimal and scalable. It is light enough to be bundled along with the application stack, similar to NodeJS, and Redis.
Designed for high performance, MinIO offers a suite of features that are specific to large enterprise deployments, these include erasure coding, bitrot protection, encryption/WORM, identity management, continuous replication, global federation, and multi-cloud deployments via gateway mode.
MinIO server is hardware agnostic, it can be installed on physical or virtual machines or launched as Docker containers and deployed on container orchestration platforms like Kubernetes. (Source: Wikipedia)

MinIO Alternatives
There are several alternatives to MinIO for object storage, each offering unique features and benefits. Here are some popular options:
Amazon S3:
- Description: Amazon S3 (Simple Storage Service) is a widely used, scalable object storage service provided by AWS.
- Strengths: Highly reliable, scalable, integrated with other AWS services, global availability.
- Use Cases: Ideal for large-scale applications, backups, data archiving, and content distribution.
Also Watch:
Google Cloud Storage:
- Description: A fully managed object storage service provided by Google Cloud.
- Strengths: High availability, strong security, seamless integration with Google Cloud services.
- Use Cases: Suitable for application data, media storage, and data analytics.
Microsoft Azure Blob Storage:
- Description: A scalable object storage solution from Microsoft Azure for storing large amounts of unstructured data.
- Strengths: Integration with Azure services, advanced security features, flexible pricing.
- Use Cases: Good for backup, disaster recovery, and big data analytics.
Backblaze B2:
- Description: An affordable cloud storage service similar to Amazon S3, offered by Backblaze.
- Strengths: Cost-effective, straightforward pricing, easy to use.
- Use Cases: Ideal for personal backups, media storage, and archiving data.
Wasabi:
- Description: A cloud storage service known for its high-speed performance and low-cost pricing model.
- Strengths: No egress fees, high speed, affordable.
- Use Cases: Suitable for businesses needing a low-cost, high-performance storage solution.
DigitalOcean Spaces:
- Description: An object storage service from DigitalOcean, designed for simplicity and scalability.
- Strengths: Simple pricing, integrates well with DigitalOcean infrastructure, user-friendly.
- Use Cases: Ideal for developers and small to medium-sized businesses.
IBM Cloud Object Storage:
- Description: A highly scalable and secure object storage service provided by IBM.
- Strengths: Advanced security features, AI integration, flexible deployment options.
- Use Cases: Suitable for enterprise applications, data archiving, and AI workloads.
Ceph:
- Description: An open-source storage platform that provides object, block, and file storage in a unified system.
- Strengths: Highly scalable, open-source, flexible.
- Use Cases: Good for enterprises looking for a flexible, scalable open-source solution.
OpenStack Swift:
- Description: An open-source object storage system that is part of the OpenStack cloud computing platform.
- Strengths: Open-source, highly scalable, customizable.
- Use Cases: Suitable for private cloud deployments and enterprises seeking an open-source solution.
Each of these alternatives offers different advantages, making them suitable for a variety of use cases depending on your specific requirements and preferences.
Environment Specification
We are using a minimal Rocky Linux 8 virtual machine with following specifications.
- CPU – 3.4 Ghz (2 cores)
- Memory – 2 GB
- Storage – 20 GB
- Operating System – Rocky Linux 8.5 (Green Obsidian)
- Hostname – minio-01.centlinux.com
- IP Address – 192.168.116.128 /24
For setting up MinIO object storage on Rocky Linux 8, having a reliable and flexible environment is essential. Many tech enthusiasts and Linux professionals prefer using a Mini PC or a VPS (Virtual Private Server) to create a dedicated home lab. A Mini PC offers the convenience of a compact, always-on physical server at home.
[Limited Time Mini PC Offers – Click and Save!]
While a VPS from providers like Hostinger ensures reliable uptime and scalable resources in the cloud.
[Get Reliable VPS Hosting at Affordable Prices – Sign Up Now!]
Both options are great for experimenting with Linux server environments and testing storage solutions like MinIO. If you’re interested, consider checking out the Mini PC and Hostinger VPS links below to find the best fit for your home lab setup.
Disclaimer: Some of the links in this post are affiliate links. If you purchase through them, I may earn a small commission at no extra cost to you, which helps support this blog and the creation of quality Linux tutorials.
Update your Linux Operating System
Connect with minio-01.centlinux.com as root user with the help of a ssh client.
Build cache for your yum repositories.
dnf makecacheUpdate software packages of your Linux operating system by executing following command.
dnf update -yYou may have to reboot your Linux operating system, if the above command updates your Linux Kernel.
rebootAfter reboot, check the Linux operating system and Kernel versions.
uname -r
cat /etc/os-release
Output:
4.18.0-348.20.1.el8_5.x86_64
NAME="Rocky Linux"
VERSION="8.5 (Green Obsidian)"
ID="rocky"
ID_LIKE="rhel centos fedora"
VERSION_ID="8.5"
PLATFORM_ID="platform:el8"
PRETTY_NAME="Rocky Linux 8.5 (Green Obsidian)"
ANSI_COLOR="0;32"
CPE_NAME="cpe:/o:rocky:rocky:8:GA"
HOME_URL="https://rockylinux.org/"
BUG_REPORT_URL="https://bugs.rockylinux.org/"
ROCKY_SUPPORT_PRODUCT="Rocky Linux"
ROCKY_SUPPORT_PRODUCT_VERSION="8"
Install MinIO Object Storage on Linux Server
MinIO Object Storage software is not available in yum repositories, therefore, you have to download it from MinIO official website.
Create a directory for use by MinIO server as storage volume.
mkdir /u01Create a Linux user to own MinIO software and services.
useradd -s /sbin/nologin -d /u01/minio minioYou will need wget command to download MinIO. Therefore, install it by using dnf command.
dnf install -y wgetDownload the MinIO Storage software by using wget command.
cd /tmp
wget https://dl.min.io/server/minio/release/linux-amd64/minio
You can also find the MinIO software for other Hardware platforms and operating systems at MinIO Download Page.
Move the MinIO to /usr/local/bin directory and adjust file permissions and ownership.
mv minio /usr/local/bin/
chmod 775 /usr/local/bin/minio
chown minio:minio /usr/local/bin/minio
Create a Systemd Service for MinIO Server
Create a configuration file for MinIO storage server by using vim text editor.
vi /etc/minio.confAdd following lines to define the basic MinIO parameters.
# Volume to be used for Minio server.
MINIO_VOLUMES="/u01/minio/"

# Use if you want to run Minio on a custom port.
MINIO_OPTS="--address :9000 --console-address :9001"

# Root user for the server.
MINIO_ROOT_USER=minioadmin

# Root secret for the server.
MINIO_ROOT_PASSWORD=centlinux
Adjust the file ownership of MinIO configuration file.
chown minio:minio /etc/minio.confBy using vim command, create a systemd service unit for MinIO.
vi /usr/lib/systemd/system/minio.serviceAdd following directives in this file.
[Unit]
Description=Minio
Wants=network-online.target
After=network-online.target

[Install]
WantedBy=multi-user.target

[Service]
Type=simple
User=minio
Group=minio
WorkingDirectory=/u01/minio
EnvironmentFile=/etc/minio.conf
ExecStart=/usr/local/bin/minio server $MINIO_OPTS $MINIO_VOLUMES
Enable and start MinIO service.
systemctl enable --now minio.serviceCheck the status of MinIO service.
systemctl status minio.serviceOutput:
● minio.service - Minio
   Loaded: loaded (/usr/lib/systemd/system/minio.service; enabled; vendor prese>
   Active: active (running) since Sun 2022-03-13 20:19:44 PKT; 1s ago
 Main PID: 1302 (minio)
    Tasks: 6 (limit: 5808)
   Memory: 51.4M
   CGroup: /system.slice/minio.service
           └─1302 /usr/local/bin/minio server --address :9000 --console-address>

Mar 13 20:19:44 minio-01.centlinux.com systemd[1]: Started Minio.
Mar 13 20:19:45 minio-01.centlinux.com minio[1302]: API: http://192.168.116.128>
Mar 13 20:19:45 minio-01.centlinux.com minio[1302]: Console: http://192.168.116>
Mar 13 20:19:45 minio-01.centlinux.com minio[1302]: Documentation: https://docs>
Configure Linux Firewall
To make your Storage service accessible across the network, you have to allow the MinIO service ports in Linux firewall.
firewall-cmd --permanent --add-port={9000,9001}/tcp
firewall-cmd --reload
Access MinIO Web Console
Open URL http://minio-01.centlinux.com:9001 in a web browser.

Login a minioadmin user.

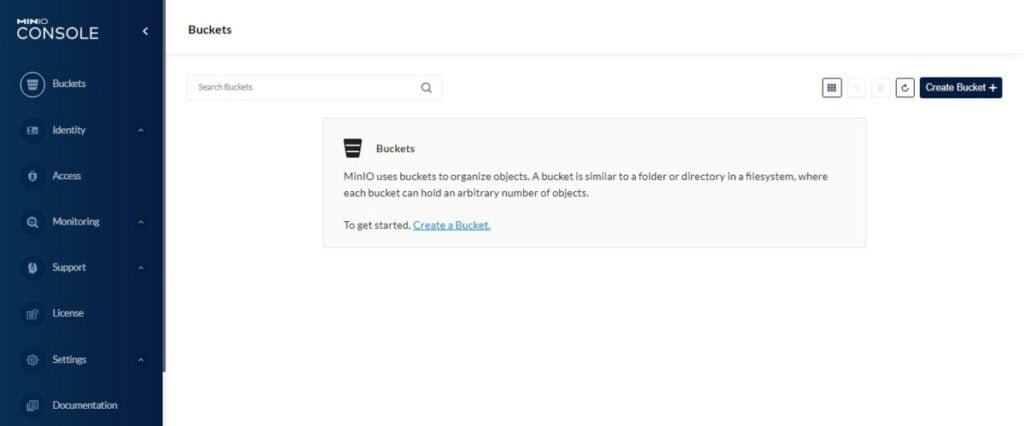
You have reached at the Bucket page. There isn’t any Bucket right now.
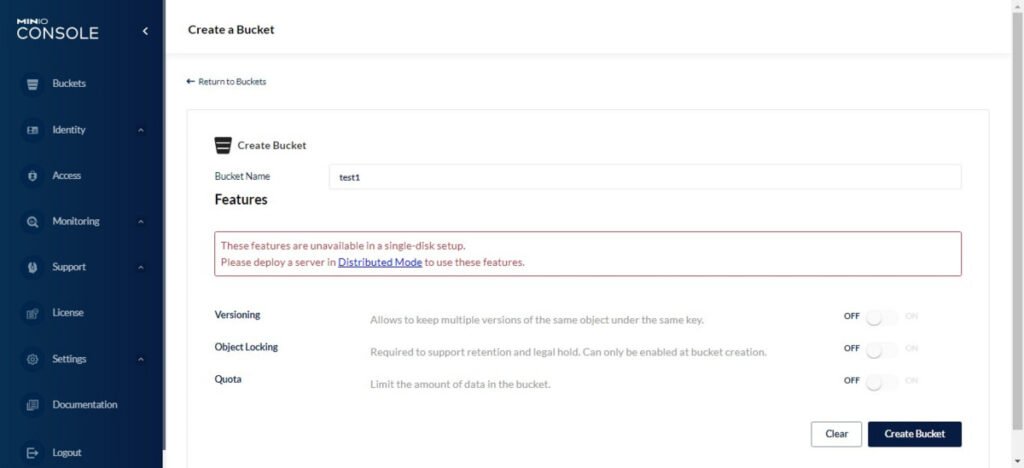
Click on “Create Bucket” to create your first MinIO Storage bucket.

Provide a name for Bucket and click on “Create Bucket”.

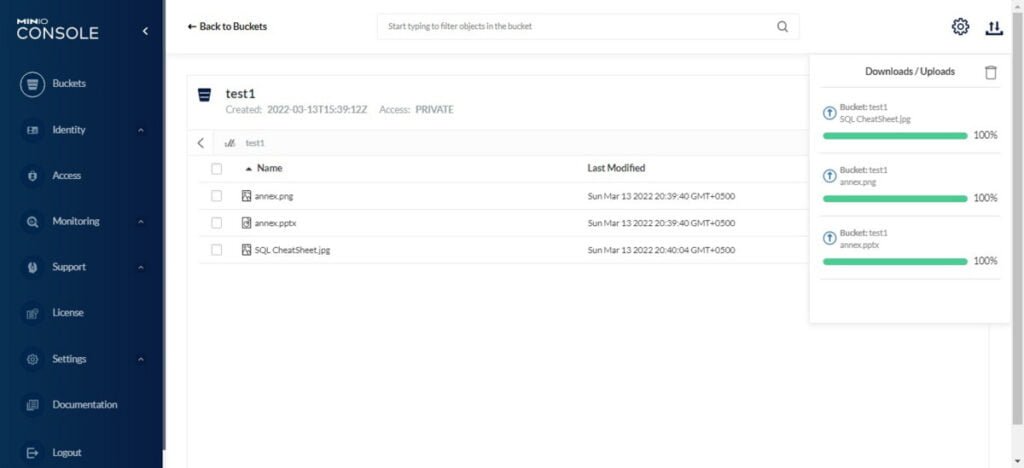
Upload a few files to your bucket.
The MinIO storage server is working fine.
Install MinIO Client on Rocky Linux 8
You can install MinIO Client (mc) to access your Storage server right from the Linux shell.
mc utility provides many Unix like commands to manage your MinIO server.
You can download mc utility form MinIO website as follows.
cd /tmp
wget https://dl.min.io/client/mc/release/linux-amd64/mc
Move mc command to /usr/local/bin directory and grant it execution privilege.
mv mc /usr/local/bin/
chmod +x /usr/local/bin/mc
Check the version of mc command.
mc --versionOutput:
mc version RELEASE.2022-03-09T02-08-36Z
Connect to you MinIO storage server by using following command.
mc alias set minio http://192.168.116.128 minioadmin centlinux --api s3v4Output:
mc: Configuration written to `/root/.mc/config.json`. Please update your access credentials.
mc: Successfully created `/root/.mc/share`.
mc: Initialized share uploads `/root/.mc/share/uploads.json` file.
mc: Initialized share downloads `/root/.mc/share/downloads.json` file.
Added `minio` successfully.
Execute following command to list all the buckets in MinIO storage server.
mc ls playOutput:
[2022-03-13 11:54:54 PKT]     0B acer/
[2022-03-13 13:37:05 PKT]     0B app-data/
[2022-03-13 13:50:19 PKT]     0B asiatrip/
[2022-03-13 18:46:22 PKT]     0B bucket/
[2022-03-13 16:50:15 PKT]     0B cgsecgchwczygil/
[2022-03-13 13:37:05 PKT]     0B data-files/
[2022-03-13 12:03:22 PKT]     0B dev-bucket/
[2022-03-13 17:20:47 PKT]     0B dev-stage-prv/
[2022-03-13 17:20:30 PKT]     0B dev-stage-pub/
[2022-03-13 14:52:40 PKT]     0B exercises/
[2022-03-13 12:59:08 PKT]     0B howzeh/
[2022-03-13 16:55:44 PKT]     0B njzfohoiooxfrfw/
[2022-03-13 12:06:29 PKT]     0B notea/
[2022-03-13 20:33:55 PKT]     0B test1/
[2022-03-13 13:37:05 PKT]     0B user-images/
Frequently Asked Questions (FAQs)
1. What is MinIO?
MinIO is a high-performance, open-source object storage system compatible with Amazon S3. It’s designed for cloud-native applications, AI/ML workloads, and large-scale data storage.
2. How do I install MinIO using Docker?
You can install MinIO quickly using Docker:
docker run -p 9000:9000 -p 9001:9001 minio/minio server /data --console-address ":9001"Or download the binary from MinIO’s official site.
3. Is MinIO free to use?
Yes! MinIO is open-source under the GNU AGPL v3 license. There’s also an enterprise version with additional features.
4. How does MinIO differ from AWS S3?
MinIO is S3-compatible, meaning it works with S3 APIs, but it’s self-hosted, lightweight, and optimized for private cloud or on-prem deployments.
5. Can MinIO be used for production?
Absolutely! MinIO is highly scalable, supports erasure coding for fault tolerance, and is used by enterprises for mission-critical storage.
You May Also Like:
Final Thoughts
Setting up MinIO Object Storage on Rocky Linux 8 provides a powerful and scalable solution for your data storage needs. By following this guide, you should now have MinIO up and running efficiently on your server. If you need any further assistance or customized configurations, I offer professional services to help you achieve the best results.
Need expert AWS and Linux system administration? From cloud architecture to server optimization, I provide reliable and efficient solutions tailored to your needs. Hire me today!
Recommended Courses
If you are preparing for the [NEW] Ultimate AWS Certified Cloud Practitioner CLF-C02 2025 exam, then Stephane Maarek’s top-rated online course is one of the best investments you can make. Known for his clear teaching style and real-world cloud expertise, Stephane has helped thousands of students pass AWS certifications with confidence.
This updated course covers everything you need to know for the 2025 exam version, including hands-on examples, exam tips, and detailed explanations that simplify even the toughest concepts. Don’t just study—prepare smartly with a course that gives you the edge.
Disclaimer: Some of the links in this post are affiliate links, meaning I may earn a commission if you click through and make a purchase—at no additional cost to you.


Leave a Reply
You must be logged in to post a comment.