Discover how to install Windows 10 over PXE Linux server in just a few steps! Don’t miss out—learn the efficient, sysadmin-friendly method to deploy Windows OS remotely like a pro. #centlinux #linux #pxe
Table of Contents
Problem Statement
In our previous posts, we have configured a PXE boot server for automated installation of RHEL 7.5 operating system that supports both BIOS and UEFI based clients. Later on, we added RHEL 6 and Ubuntu 18.10 installation options in our PXE boot server. We have also written Kickstart files for automated installations of both operating systems.
Before concluding our PXE configuration series, we decided to write an article to add the installation option of a Microsoft’s operating system. Therefore, we have selected the Microsoft Windows 10 (the latest OS at the time of this writeup) as the candidate for our PXE boot server.

Linux Server Specification
In this article, we will install Windows 10 over PXE Server.
We use the same Linux server that we have configured as PXE Boot Server in our previous article. These specifications have been re-mentioned below for convenience of the readers.
- CPU – 2 Core (2.4 Mhz)
- Memory – 2 GB
- Storage – 50 GB
- Operating System – RHEL 7.5
- Hostname – pxe-server.itlab.com
- IP Address – 192.168.116.41/24
Furthermore, we need a client system to create Windows PE iso file. Here, we are using a MS Windows 8.1 machine for this purpose, however, you can use other versions of MS Windows as well (be noted that configurations are slightly different in MS Windows versions prior to 8.1).
Recommended Training: The Linux Command Line Bootcamp: Beginner To Power User from Colt Steele

Read Also: How to install Linux over PXE Server
Install Samba Server on Linux
We used Samba server to share installation media of MS Windows 10 Operating System with PXE clients.
Connect to pxe-server.itlab.com using ssh and install Samba server.
yum install -y sambaCreate a directory to share Windows 10 installation media.
mkdir /smbshareAdjust SELinux permissions.
semanage fcontext -a '/smbshare(/.*)?' -t samba_share_t
restorecon -Rv /smbshare
Create an user to control access to Samba share.
useradd -s /sbin/nologin ahmer
smbpasswd -a ahmer
Change owner of the shared directory with user ahmer.
chown ahmer:ahmer /smbshare/Allow Samba service in Linux Firewall.
firewall-cmd --permanent --add-service=samba
firewall-cmd --reload
Add directives in /etc/samba/smb.conf to share the directory /smbshare with clients.
cat >> /etc/samba/smb.conf << EOF
[install]
        comment = Installation Media
        path = /smbshare
        public = yes
        writable = no
        printable = no
        browseable = yes
EOF
Start and enable Samba services.
systemctl start smb nmb
systemctl enable smb nmb
Attach MS Windows 10 ISO/DVD and mount it at /mnt/iso (you can use any mountpoint, according to your choice).
mount -t iso9660 /dev/cdrom /mnt/isoOutput:
mount: /dev/sr0 is write-protected, mounting read-only
Copy contents of /mnt/iso to /smbshare/windows10 directory.
cp -rf /mnt/iso /smbshare/windows1065W USB C Laptop Charger Replacement for Lenovo Thinkpad/Yoga/Chromebook, ADLX65YDC2A Lenovo Laptop Charger
$16.49 (as of July 1, 2025 19:59 GMT +00:00 – More infoProduct prices and availability are accurate as of the date/time indicated and are subject to change. Any price and availability information displayed on [relevant Amazon Site(s), as applicable] at the time of purchase will apply to the purchase of this product.)Create a Customized Windows PE ISO
Connect to MS Windows 8.1 client.
We required Windows ADK (Assessment and Deployment Kit) to create our Windows PE iso. Therefore, we have downloaded it from Microsoft’s website and installed it on our Windows 8.1 client.
After installation, run Deployment and Imaging Tools Environment as Administrator.
Run the following command to create working directories for Win PE. (Command output has been trimmed to show only success status)
cd C:\Program Files (x86)\Windows Kits\8.0\Assessment and Deployment Kit\Windows Preinstallation Environment
copype x86 c:\WinPE_x86\
Output:
---
186 File(s) copied
        1 file(s) copied.
        1 file(s) copied.
        1 file(s) copied.

Success
We will customize the startup script startcmd.net, so MS Windows 10 setup will start automatically. Therefore, mount the image file and customize it accordingly.
Dism /Mount-Image /ImageFile:"c:\WinPE_x86\media\sources\boot.wim" /index:1 /MountDir:"c:\WinPE_x86\mount"Output:
Deployment Image Servicing and Management tool
Version: 6.2.9200.16384

Mounting image
[==========================100.0%==========================]
The operation completed successfully.
Now, edit startnet.cmd.
notepad c:\WinPE_x86\mount\Windows\System32\Start\net.cmdAnd add following lines therein.
wpeinit
net use z: \\192.168.116.41\install\windows10 /user:ahmer@123
z:\setup.exe
Save and unmount the image file.
Dism /Unmount-Image /MountDir:"c:\WinPE_x86\mount" /commitOutput:
Deployment Image Servicing and Management tool
Version: 6.2.9200.16384

Saving image
[==========================100.0%==========================]
Unmounting image
[==========================100.0%==========================]
The operation completed successfully.
Generate winpe.iso file.
MakeWinPEMedia /ISO c:\WinPE_x86 c:\winpe.isoOutput:
Creating c:\winpe.iso...

100% complete

Success
Transfer winpe.iso file to pxe-server-itlab.com and copy it to /var/lib/tftpboot/networkboot/windows10/ directory.
Gtheos 2.4GHz Wireless Gaming Headset for PS5, PS4 Fortnite & Call of Duty/FPS Gamers, PC, Nintendo Switch, 7.1 Surround Sound, Bluetooth 5.3 Gaming Headphones with ENC Mic, 40+Hr Battery – Space Gray
$33.99 (as of July 1, 2025 19:51 GMT +00:00 – More infoProduct prices and availability are accurate as of the date/time indicated and are subject to change. Any price and availability information displayed on [relevant Amazon Site(s), as applicable] at the time of purchase will apply to the purchase of this product.)Add MS Windows 10 installation option to PXE boot menu
Now, connect to pxe-server.itlab.com again using ssh.
Copy Kernel boot image for MS Windows in tftpboot directory.
cp /usr/lib/syslinux/memdisk /var/lib/tftpboot/Edit PXE boot menu for BIOS based clients.
vi /var/lib/tftpboot/pxelinux.cfg/defaultAnd add following menu option at the end of file.
label Install MS Windows 10
menu label Install MS Windows 10
kernel memdisk
initrd /networkboot/windows10/winpe.iso
append iso raw
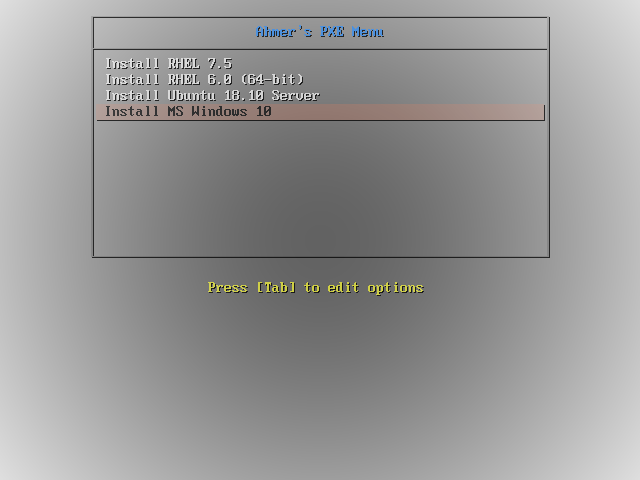
Connect a new client to your network and turn it on. It should get the IP address from DHCP server and display our PXE boot Menu as follows:

Select Install MS Windows 10 option and press <ENTER>.


We have successfully added the MS Windows 10 installation option in our Linux based PXE server.
Frequently Asked Questions (FAQs)
What is PXE booting, and how does it help install Windows 10?
PXE (Preboot Execution Environment) allows a computer to boot and install an operating system over a network instead of using physical media. A Linux server can host the Windows 10 installation files for remote deployment.
Do I need a Windows server to set up PXE for Windows 10?
No, you can use a Linux server (like Ubuntu or CentOS) to configure a PXE boot environment for Windows 10 installation with the right tools and configurations.
What files are required on the Linux server for Windows 10 PXE installation?
You’ll need the Windows 10 ISO (or extracted files), a TFTP server to host boot files, a DHCP server to assign IPs, and a network share (SMB/NFS) for the Windows installation files.
Can I use PXE to install Windows 10 on multiple computers at once?
Yes! Once the PXE server is set up, any device connected to the same network can boot and install Windows 10 simultaneously (depending on network bandwidth and server capacity).
Are there any risks when installing Windows 10 over PXE?
If configured incorrectly, you might face boot failures or network issues. Ensure proper DHCP settings, correct file paths, and compatible hardware (PXE-supported network cards). Always back up data before installation.
Mastering Embedded Linux: From Novice to Expert
$9.99 (as of June 30, 2025 20:24 GMT +00:00 – More infoProduct prices and availability are accurate as of the date/time indicated and are subject to change. Any price and availability information displayed on [relevant Amazon Site(s), as applicable] at the time of purchase will apply to the purchase of this product.)Final Thoughts
By now, you’ve seen how straightforward it can be to install Windows 10 over a PXE Linux server. From setting up the TFTP and DHCP services to booting the Windows installer remotely, you’re just steps away from streamlining your deployment process.
If you’re still manually installing operating systems or juggling bootable USBs, you’re already falling behind. Modern sysadmins automate and scale—and PXE booting is at the heart of that transformation.
Don’t let outdated methods slow you down. Get ahead, save time, and take control of your infrastructure.
✅ Ready to level up your deployment game? Start implementing PXE boot with Linux today—your future self will thank you.
Struggling with Linux server management? I offer professional support to ensure your servers are secure, optimized, and always available. Visit my Fiverr profile to learn more!


Leave a Reply
You must be logged in to post a comment.