Learn how to setup KVM hypervisor on CentOS 8 with our step-by-step guide. Get detailed instructions on installation, configuration, and management of virtual machines using KVM. #centlinux #linux #virtualization
Table of Contents
What is KVM Hypervisor?
A KVM hypervisor is a type of hypervisor that uses the Kernel-based Virtual Machine (KVM) technology to enable virtualization on Linux. Here are some key points about the KVM hypervisor:
How KVM Works
- Kernel Module: KVM turns the Linux kernel into a type-1 (bare-metal) hypervisor by loading a kernel module (kvm.ko) that provides core virtualization infrastructure.
- Hardware Support: KVM leverages hardware virtualization extensions like Intel VT-x and AMD-V to provide high performance and isolation for VMs.
- User-Space Tools: Tools like QEMU are used in conjunction with KVM to manage and emulate hardware for the VMs.
Features
- Full Virtualization: KVM supports full virtualization, meaning it can run unmodified guest operating systems.
- Resource Management: KVM can dynamically allocate resources such as CPU, memory, and storage to VMs.
- Security and Isolation: Each VM runs in isolated user-space processes, ensuring strong separation between them.
Advantages
- Performance: Near-native performance due to direct execution of guest code on host hardware.
- Scalability: Capable of scaling to support many VMs on a single host.
- Integration: Seamlessly integrates with other Linux features and tools, such as cgroups for resource management and SELinux for security.
Use Cases
- Server Consolidation: Running multiple server applications on a single physical server.
- Development and Testing: Isolated environments for software development and testing.
- Cloud Computing: Backbone of many cloud infrastructure solutions, such as OpenStack.
Management Tools
- Libvirt: A toolkit and API for managing KVM and other virtualization technologies.
- Virt-Manager: A graphical interface for managing virtual machines.
- Virsh: A command-line tool for managing VMs via libvirt.
In summary, the KVM hypervisor is a powerful and efficient virtualization solution integrated into the Linux kernel, providing a robust platform for running multiple isolated virtual machines with excellent performance and flexibility.
In this article, we are installing KVM virtualization host on CentOS 8. We are also installing Cockpit to manage our KVM Virtualization environment through a graphical interface.

KVM Hypervisor vs VMWare
When comparing KVM (Kernel-based Virtual Machine) and VMware, it’s essential to consider various factors such as performance, cost, features, and use cases. Here’s a breakdown of the key differences and similarities between KVM and VMware:
KVM (Kernel-based Virtual Machine)
Overview:
- Open Source: KVM is an open-source hypervisor built into the Linux kernel.
- Type: Type-1 (bare-metal) hypervisor when integrated with the Linux kernel.
- Integration: Deeply integrated with the Linux ecosystem.
Pros:
- Cost: Free and open-source, reducing licensing costs.
- Flexibility: High degree of customization and flexibility due to open-source nature.
- Performance: Near-native performance due to direct hardware access and integration with Linux.
- Scalability: Scales efficiently for different workloads and can manage many VMs.
- Management Tools: Uses tools like libvirt, QEMU, and Virt-Manager for VM management.
Cons:
- Learning Curve: May require more in-depth knowledge of Linux and command-line tools.
- Support: Community-based support; enterprise support available through third-party vendors.
Use Cases:
- Ideal for Linux-based environments and enterprises looking to minimize costs.
- Suitable for cloud environments (e.g., OpenStack).
- Good for developers and those needing highly customizable solutions.
VMware
Overview:
- Commercial Product: VMware provides a suite of proprietary virtualization products.
- Type: Type-1 hypervisor (e.g., ESXi) and Type-2 hypervisor (e.g., VMware Workstation).
- Comprehensive Ecosystem: Extensive range of features and tools for enterprise virtualization.
Pros:
- Ease of Use: User-friendly interface and comprehensive management tools (e.g., vSphere).
- Features: Advanced features like vMotion, High Availability (HA), Distributed Resource Scheduler (DRS).
- Support: Extensive documentation and professional support services.
- Reliability: High reliability and robust performance, widely used in enterprise environments.
Cons:
- Cost: Licensing and support can be expensive.
- Proprietary: Closed-source nature limits customization compared to open-source solutions.
- Resource Intensive: Can be resource-intensive, requiring more powerful hardware.
Use Cases:
- Preferred in large enterprises with significant budgets needing robust, reliable virtualization.
- Commonly used in data centers for server consolidation, disaster recovery, and workload management.
- Suitable for organizations requiring advanced features and professional support.
Summary
KVM:
- Best for Linux environments, cost-sensitive projects, and those needing open-source flexibility.
- Offers near-native performance and deep integration with Linux.
VMware:
- Best for enterprises needing advanced features, ease of use, and comprehensive support.
- Provides a robust, reliable, and feature-rich virtualization platform, albeit at a higher cost.
Read Also: How to install KVM Virtualization on Rocky Linux 9
Kickstart your tech career with the Complete Linux Training Course 2025 – master in-demand skills and land your dream IT job faster!

KVM Hypervisor Requirements
The recommended system requirements for KVM Hypervisor are:
- CPU – 1 CPU core or thread per virtual machine
- Memory – 2 GB RAM for the virtualization host + 2 GB RAM for each intended guest
- Storage – 6 GB space for the virtualization host + 6 GB space for each intended guest
Linux Server Specification
We have configured a CentOS 8 minimal installed virtual machine with following specification.
- CPU – 3.4 Ghz (2 cores)
- Memory – 2 GB
- Storage – 20 GB
- Operating System – CentOS 8.0
- Hostname – kvm-virtualization-01.recipes.com
- IP Address – 192.168.116.206 /24
Novatel MiFi 2200 Mobile Wi-Fi Modem (Verizon Wireless)
$14.50 (as of September 17, 2025 18:34 GMT +00:00 – More infoProduct prices and availability are accurate as of the date/time indicated and are subject to change. Any price and availability information displayed on [relevant Amazon Site(s), as applicable] at the time of purchase will apply to the purchase of this product.)Setup KVM Hypervisor on CentOS 8
Connect with kvm-virtualization-01.recipes.com using ssh as root user.
Verify support for Virtual Technology by the CPU.
lscpu | grep VirtualizationOutput:
Virtualization:      VT-x
Virtualization type: full
The output of the above command shows that, our server kvm-virtualization-01.recipes.com supports Virtualization.
However, if the above command returns no result on your server then,
- In case of bare-metal machine, you have to enable the VT support from system BIOS.
- In case of virtual machine, you have to enable the VT support from VM’s CPU Settings.
In CentOS 8 / RHEL 8, virtualization components including KVM and QEMU hypervisors are bundled in virt module. Therefore, it is really simple now to configure a KVM virtualization host in CentOS 8.
We are installing virt module using dnf command.
dnf install -y @virtWe are also installing virt-install package, because it provides some very useful command line tools.
dnf install -y virt-installValidate all the components on your Linux server can support virtualization.
virt-host-validateOutput:
...
  QEMU: Checking if IOMMU is enabled by kernel                               : WARN (IOMMU appears to be disabled in kernel. Add intel_iommu=on to kernel cmdline arguments)
It looks like IOMMU (input-output memory management unit) support is not yet enabled in the Linux Kernel.
The solution is already suggested by the above command. Therefore, we are adding the same in the Kernel command line options.
grub2-editenv - set "$(grub2-editenv - list | grep kernelopts) intel_iommu=on"Restart your machine to make the above change effective.
systemctl rebootAfter reboot, again run the virt-host-validate command.
virt-host-validateOutput:
...
  QEMU: Checking if IOMMU is enabled by kernel                               : PASS
Everything is fine now.
KVM and QEMU hypervisors has been installed on CentOS 8.
Norelco Philips Multi Groomer – 13 Piece Mens Grooming Kit for Beard, face, Nose, and Ear Hair Trimmer and Hair Clipper – NO Blade Oil Needed, MG3740/40
$19.96 (as of September 18, 2025 09:42 GMT +00:00 – More infoProduct prices and availability are accurate as of the date/time indicated and are subject to change. Any price and availability information displayed on [relevant Amazon Site(s), as applicable] at the time of purchase will apply to the purchase of this product.)Install Cockpit on CentOS 8
Although, KVM commandline-tools are quite sufficient for managing a Virtualization environment. But, we can also use Cockpit (CentOS 8 native Web UI) to manage virtual machines via a graphical interface.
We can install Cockpit using dnf command.
dnf install -y cockpitTo add support of managing virtual machines via Cockpit, we have to install cockpit-machines package.
dnf install -y cockpit-machinesEnable and start Cockpit Unit.
systemctl enable --now cockpit.socketCockpit service is by-default allowed in CentOS 8 firewall.
Open URL https://kvm-virtualization-01.recipes.com:9090/ in a web browser.
The Cockpit uses a self-signed SSL certificate, therefore, you may see a Security warning.
Ignore the Security warning and continue to the website.

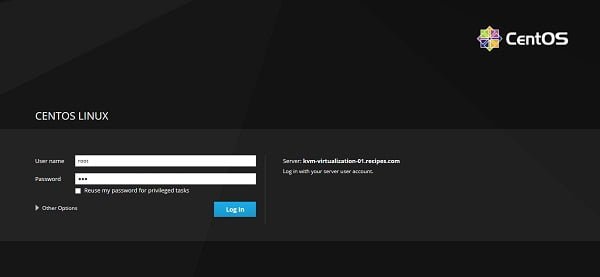
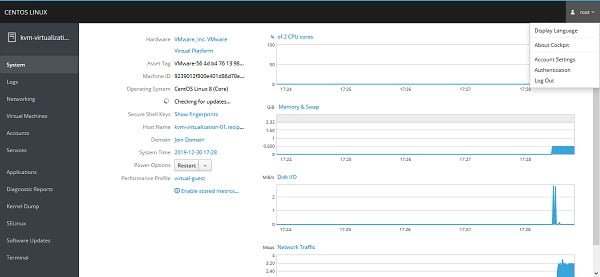
Login to Cockpit Web UI as root user.

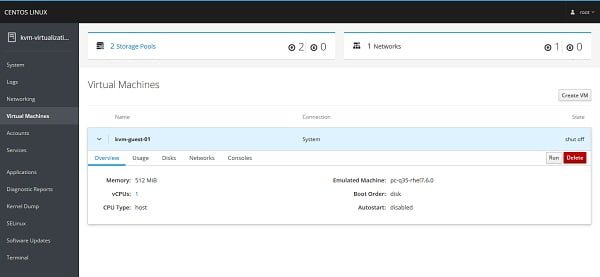
Click on the Virtual Machines from the left side-pane.

We are now at the Virtual Machines page. We can manage our KVM virtualization environment from here.
NotesApp.Simple yet Powerful time management free app.
$0.00 (as of September 17, 2025 19:07 GMT +00:00 – More infoProduct prices and availability are accurate as of the date/time indicated and are subject to change. Any price and availability information displayed on [relevant Amazon Site(s), as applicable] at the time of purchase will apply to the purchase of this product.)Frequently Asked Questions (FAQs)
1. What is KVM, and why should I use it on CentOS 8?
KVM (Kernel-based Virtual Machine) is a built-in virtualization solution for Linux that allows you to create and manage virtual machines (VMs) efficiently. It provides high performance, security, and scalability, making it ideal for both enterprise and personal use.
2. What are the system requirements for setting up KVM on CentOS 8?
To use KVM, your system must have a 64-bit CPU with hardware virtualization support (Intel VT-x or AMD-V), sufficient RAM and storage, and CentOS 8 installed with the latest updates.
3. How can I check if my system supports KVM virtualization?
You can check CPU compatibility by running a command to verify if hardware virtualization extensions (VT-x or AMD-V) are enabled. If supported, you can proceed with KVM installation.
4. What tools are used to manage virtual machines on KVM?
KVM VMs can be managed using tools like virsh (command-line interface), Virt-Manager (graphical interface), and Cockpit (web-based management tool), allowing easy VM creation and configuration.
5. How do I ensure optimal performance for KVM virtual machines?
To enhance KVM performance, allocate sufficient CPU and memory, use virtio drivers for improved disk and network efficiency, enable CPU pinning, and configure I/O optimizations based on workload requirements.
Read Also: How to install KVM on Rocky Linux 10
Final Thoughts
Setting up a KVM hypervisor on CentOS 8 can significantly enhance your virtualization capabilities, providing a robust and efficient platform for managing multiple virtual machines. By following the steps in this guide, you can successfully install and configure KVM, enabling you to maximize your server’s potential and streamline your IT operations.
Searching for a skilled Linux admin? From server management to security, I ensure seamless operations for your Linux systems. Find out more on my Freelancer profile!


Leave a Reply
Please log in to post a comment.