In this article, you will learn how to upgrade CentOS 7 to 8, including application software, that are already installed on your Linux operating system. #centlinux #linux
Table of Contents
How one can upgrade CentOS 7 to 8?
CentOS 8 has been released and most of the organizations looking forward to upgrade their existing installations of Linux servers.
Here, you will perform a complete upgrade of your operating system from CentOS 7 to 8 along with already installed applications (Apache web server) and databases (MySQL server).
There are many alternate ways to upgrade CentOS 7 to 8. The most popular and relatively easy method is to fresh install and configure CentOS 8 machine in parallel with our existing CentOS 7 machine and then migrate the applications and databases to the new upgraded machine each at a time.
But, we are executing an in-place upgrade of an existing CentOS 7 server with all installed applications and databases to the latest versions provided by CentOS 8 Linux operating system.
Since you are required to upgrade CentOS 7 to 8, therefore, it is recommended that you should also upgrade yourself and your technical resources as well.

Environment Specification
We are using a virtual machine with following specifications, You can provision a same Linux server by following our tutorial on how to install LAMP Stack on CentOS 7.
- CPU – 3.4 Ghz (2 cores)
- Memory – 2 GB
- Storage – 20 GB
- Operating System – CentOS 7.7
- Hostname – centos-7-server.centlinux.com
- IP Address – 192.168.116.215 /24
CentOS 8 requires a minimum of 2 GHz dual-core processor, 2 GB RAM, and at least 10 GB of free disk space for basic installation. For smoother and more responsive performance, especially when handling multiple applications or server workloads, 4 GB or more of RAM and 20 GB of disk space are recommended.
CentOS supports a wide range of hardware architectures, but confirming compatibility with your server hardware through official hardware lists is advisable. Using a mini PC or a reliable VPS such as Rose Hosting VPS provides a stable environment that meets these specifications, making it ideal for running CentOS servers remotely with dedicated resources and consistent uptime.
[Power Your Projects with the Best Mini PC – Shop Now!]
[Launch Your Own VPS with Rose Hosting – Click to Get Started!]
Disclaimer: This post contains affiliate links; using these links supports the blog at no extra cost to you.
Gather Linux System Information
Connect with centos-7-server.centlinux.com as root user by using a ssh client.
Check the current version of your Linux Kernel.
uname -rOutput:
3.10.0-1062.7.1.el7.x86_64
Check the current version of your Apache web server.
httpd -vOutput:
Server version: Apache/2.4.6 (CentOS)
Server built:   Aug  8 2019 11:41:18
Check the current version of your PHP programming language.
php -vOutput:
PHP 5.4.16 (cli) (built: Nov  1 2019 16:04:20)
Copyright (c) 1997-2013 The PHP Group
Zend Engine v2.4.0, Copyright (c) 1998-2013 Zend Technologies
Check the current version of your MySQL database server.
mysql -VOutput:
mysql Ver 15.1 Distrib 5.5.64-MariaDB, for Linux (x86_64) using readline 5.1
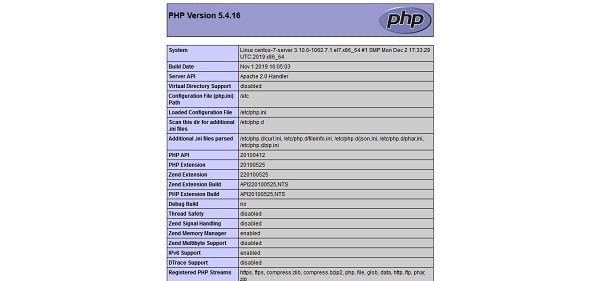
Open URL http://centos-7-server.centlinux.com in a web browser. You may need to create a phpinfo page just as we did in our another guide about how to install Multiple PHP versions on Linux.

Install EPEL Yum Repository
You are required some software packages that are not available in standard yum repositories therefore you have to install EPEL (Extra Packages for Enterprise Linux) yum repository before upgrade CentOS 7 to 8 operating system.
Install epel-release package to enable EPEL yum repository on your Linux operating system.
yum install -y epel-release.noarchBuild cache for EPEL yum repository.
yum makecache fastEPEL yum repository for CentOS 7 has been installed.
Install Required Packages on CentOS 7
You need rpmconf and yum-utils to upgrade CentOS 7 to 8. Therefore, install these software packages by using yum command.
yum install -y yum-utils rpmconfRemove Duplicate/Unused Packages and Configurations
Locate and remove conflicting configuration files (.rpmnew, .rpmsave and .rpmorigfiles) by using rpmconf command. These files are created by Linux Package Manager during installation of a new version of an already installed software package.
rpmconf -aOutput:
Configuration file `/etc/nsswitch.conf'
-rw-r--r--. 1 root root 1746 Dec 22  2018 /etc/nsswitch.conf
-rw-r--r--. 1 root root 1938 Aug  7 04:00 /etc/nsswitch.conf.rpmnew
 ==> Package distributor has shipped an updated version.
   What would you like to do about it ?  Your options are:
    Y or I  : install the package maintainer's version
    N or O  : keep your currently-installed version
      D     : show the differences between the versions
      M     : merge configuration files
      Z     : background this process to examine the situation
      S     : skip this file
 The default action is to keep your current version.
*** aliases (Y/I/N/O/D/Z/S) [default=N] ?
Your choice:
List down the packages that are not required by any other installed software.
package-cleanup --leavesOutput:
Loaded plugins: fastestmirror
bind-libs-lite-9.11.4-9.P2.el7.x86_64
libsysfs-2.1.0-16.el7.x86_64
List down older or duplicate software packages that are not available in active yum repositories.
package-cleanup --orphansOutput
Loaded plugins: fastestmirror
Loading mirror speeds from cached hostfile
 * base: mirrors.ges.net.pk
 * epel: my.fedora.ipserverone.com
 * extras: mirrors.ges.net.pk
 * updates: repo.isra.edu.pk
bind-libs-lite-9.11.4-9.P2.el7.x86_64
libsysfs-2.1.0-16.el7.x86_64
kernel-3.10.0-957.el7.x86_64
Uninstall all the software packages that are listed by the above package-cleanup commands.
yum remove -y \
bind-libs-lite-9.11.4-9.P2.el7.x86_64 \
libsysfs-2.1.0-16.el7.x86_64 \
kernel-3.10.0-957.el7.x86_64
Upgrade Package Manager from YUM to DNF
In CentOS 8, the default Linux package manager, yum has been replaced by the dnf (Dandified Yum).
Therefore, you have to switch to the dnf package manager before starting process to upgrade CentOS 7 to 8.
Install dnf package manager by using yum command.
yum install -y dnfYum is not required anymore, therefore you must remove it by executing dnf command.
dnf remove -y yum yum-metadata-parserRemove any left behind yum configurations.
rm -Rf /etc/yumRebuild cache for yum repositories.
dnf makecacheOutput:
Extra Packages for Enterprise Linux 7 - x86_64   54 kB/s |  16 MB     05:08
CentOS-7 - Base                                 991 kB/s |  10 MB     00:10
CentOS-7 - Updates                              1.2 MB/s | 7.0 MB     00:05
CentOS-7 - Extras                               1.5 MB/s | 251 kB     00:00
Metadata cache created.
Upgrade CentOS 7 Packages to Latest Stable versions
Your Linux server is now ready to upgrade to CentOS 8.
Execute the following command at Linux Bash to update software packages to latest versions as provided by CentOS 7 yum repositories.
dnf upgrade -yUpgrade Yum Repositories from CentOS 7 to 8
To upgrade your yum repositories, you have to upgrade centos-release package from CentOS 7 to 8.
dnf upgrade -y http://mirror.centos.org/centos/8/BaseOS/x86_64/os/Packages/{centos-release-8.1-1.1911.0.8.el8.x86_64.rpm,centos-gpg-keys-8.1-1.1911.0.8.el8.noarch.rpm,centos-repos-8.1-1.1911.0.8.el8.x86_64.rpm}Upgrade EPEL yum repository from EL 7 to EL 8.
dnf upgrade -y epel-releaseBuild cache for newly installed yum repositories.
dnf makecacheOutput:
Extra Packages for Enterprise Linux 8 - x86_64   30 kB/s | 5.2 MB     02:57
CentOS-8 - Base                                 0.0  B/s |   0  B     00:00
CentOS-8 - AppStream                            0.0  B/s |   0  B     00:00
CentOS-8 - Extras                               0.0  B/s |   0  B     00:00
Metadata cache created.
All of our yum repositories has been upgraded from CentOS 7 to CentOS 8.
Upgrade CentOS 7 to 8
Remove all installed kernels by executing following rpm command.
rpm -e `rpm -q kernel`If the above command provides any conflicting package, then you must to remove that package before uninstalling the Linux Kernels.
We have only one conflicting package i.e. sysvinit-tools, so we are removing it by using rpm command.
rpm -e --nodeps sysvinit-toolsPlease ensure that, you have removed all the conflicting software packages before moving forward. You have to repeat the rpm -e ‘rpm -q kernel’ command again after removing the conflicting packages.
Upgrade Linux operating system by executing following command at Linux Bash.
dnf -y --releasever=8 --allowerasing --setopt=deltarpm=false distro-syncAfter successful execution of previous command, install the new CentOS 8 kernel core. You can also read our previous article, if you want to upgrade to latest Linux kernel.
dnf install -y kernel-coreInstall Minimal and Core package groups on the server.
dnf -y groupupdate "Core" "Minimal Install"Reboot your operating system to load new Linux Kernel.
systemctl rebootVerify Software Versions after Upgrade
After reboot, check version of installed Linux Kernel.
uname -rOutput:
4.18.0-147.3.1.el8_1.x86_64
Check version of installed Apache web server.
httpd -vOutput:
Server version: Apache/2.4.37 (centos)
Server built:   Dec 23 2019 20:45:34
Check version of installed PHP programming language.
php -vOutput:
PHP 7.2.11 (cli) (built: Oct  9 2018 15:09:36) ( NTS )
Copyright (c) 1997-2018 The PHP Group
Zend Engine v3.2.0, Copyright (c) 1998-2018 Zend Technologies
Check version of installed MySQL database server.
mysql -VOutput:
mysql Ver 15.1 Distrib 10.3.17-MariaDB, for Linux (x86_64) using readline 5.1
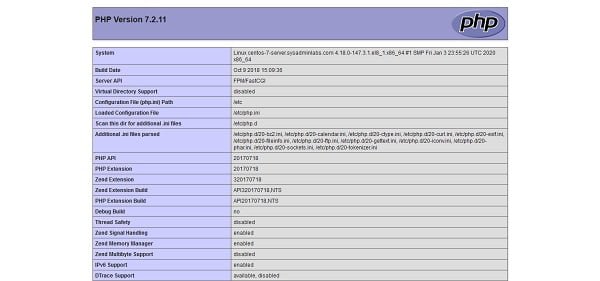
Open URL http://centos-7-server.centlinux.com in a web browser.

You have successfully upgrade CentOS 7 to 8, along with all the installed databases and applications.
Final Thoughts
Upgrading from CentOS 7 to CentOS 8 is a crucial step for keeping your system up-to-date with the latest features and security enhancements. This process involves careful planning, including backing up your data, checking the compatibility of applications, and following a systematic approach to ensure a smooth transition. By following this guide, you can successfully upgrade your system and take advantage of the improvements and advancements in CentOS 8. Remember, thorough preparation can help you avoid common pitfalls and ensure a seamless upgrade experience.
Struggling with AWS or Linux server issues? I specialize in configuration, troubleshooting, and security to keep your systems performing at their best. Check out my Freelancer profile for details.
Frequently Asked Questions (FAQs)
1. Can I directly upgrade CentOS 7 to CentOS 8?
No, CentOS does not support an in-place upgrade from CentOS 7 to CentOS 8. The recommended approach is to perform a fresh installation of CentOS 8 and migrate your data and configurations manually.
2. What should I do before upgrading from CentOS 7 to CentOS 8?
Before upgrading, it is essential to back up all critical data, list installed packages, and document system configurations to ensure a smooth transition. Also, verify software compatibility with CentOS 8.
3. Will my existing applications and services work after upgrading to CentOS 8?
Not necessarily. Some packages and services have changed between CentOS 7 and CentOS 8. You may need to reinstall certain applications or update configuration files to align with CentOS 8’s system changes.
4. How can I migrate my data from CentOS 7 to CentOS 8?
You can migrate data using tools like rsync, tar, or SCP. For databases, use proper backup and restore procedures. If using a virtual machine, consider taking a snapshot before migration.
5. What are the key differences between CentOS 7 and CentOS 8?
CentOS 8 introduces DNF as the default package manager, replaces iptables with nftables for firewall management, and includes an updated Linux kernel and software stack, providing better performance and security.
Recommended Courses
If you’re serious about leveling up your Linux skills, I highly recommend the Linux Mastery: Master the Linux Command Line in 11.5 Hours by Ziyad Yehia course. It’s a practical, beginner-friendly program that takes you from the basics to advanced command line usage with clear explanations and hands-on exercises. Whether you’re a student, sysadmin, or developer, this course will help you build the confidence to navigate Linux like a pro.
👉 Enroll now through my affiliate link and start mastering the Linux command line today!
Disclaimer: This post contains affiliate links. If you purchase through these links, I may earn a small commission at no extra cost to you, which helps support this blog.

Leave a Reply
You must be logged in to post a comment.