Learn how to install Cockpit, a powerful web GUI, for streamlined and efficient Linux server management. Simplify your server administration with this step-by-step guide. #centlinux #linux #cockpit
Table of Contents
What is Cockpit?
Cockpit is a web-based graphical user interface (GUI) that allows users to manage Linux servers easily and effectively. It provides an intuitive dashboard where administrators can perform various tasks without needing deep command-line knowledge. Key features of Cockpit include:
- Real-Time Monitoring: View real-time statistics and performance data for CPU, memory, disk usage, and network activity.
- System Logs: Access and manage system logs to diagnose issues and track system events.
- User Management: Create, modify, and delete user accounts, and manage user permissions.
- Service Management: Start, stop, and monitor system services and manage systemd units.
- Software Updates: Install and update software packages, ensuring your server is up to date.
- Storage Management: Manage disks and file systems, including creating and mounting new storage volumes.
- Networking: Configure network settings, manage interfaces, and troubleshoot network issues.
- Container Management: Administer containerized applications using Docker or Podman.
Cockpit is designed to be lightweight and efficient, making it suitable for both experienced administrators and those new to server management. It can be installed on various Linux distributions, including Fedora, Red Hat Enterprise Linux (RHEL), CentOS, Ubuntu, and Debian.
Read Also: How to install Linux Dash on Rocky Linux 8

Cockpit Alternatives
There are several alternatives to Cockpit for managing Linux servers through a web-based GUI. Here are some of the most popular ones:
Webmin
- A comprehensive web-based interface for system administration.
- Allows management of user accounts, Apache, DNS, file sharing, and more.
- Supports a wide range of modules for additional functionalities.
phpMyAdmin
- Primarily focused on MySQL and MariaDB administration through a web interface.
- Useful for database management tasks such as creating databases, running SQL queries, and managing tables and users.
Ajenti
- A modern, lightweight, and user-friendly web-based server management tool.
- Offers a range of plugins for managing various server functions, including web hosting, mail servers, and monitoring.
ISPConfig
- An open-source hosting control panel for Linux.
- Supports the management of multiple servers from a single interface.
- Provides features for web hosting, email, DNS, and FTP management.
cPanel/WHM
- A popular commercial web hosting control panel.
- Offers extensive features for managing web servers, domains, email accounts, and databases.
- Provides a user-friendly interface and extensive support.
Plesk
- Another commercial web hosting control panel.
- Designed to simplify the management of websites, domains, emails, and applications.
- Includes robust security features and supports a variety of extensions.
Zentyal
- An all-in-one Linux server management tool with a focus on small and medium-sized businesses.
- Integrates services such as directory and domain management, file sharing, email, and firewall.
OpenMediaVault
- Specifically designed for NAS (Network Attached Storage) management.
- Offers features for managing storage, user accounts, and file sharing protocols.
These alternatives offer different features and capabilities, catering to various server management needs and preferences. Depending on your specific requirements, one of these tools might be a better fit for your environment than Cockpit.
Recommended Training: The Linux Command Line Bootcamp: Beginner To Power User from Colt Steele

Environment Specification
We are utilizing a minimal installation of Rocky Linux 8 as the base virtual machine for this guide. This lightweight setup ensures a streamlined environment with only the essential components, providing an optimal platform for building and configuring specific use cases. Below are the specifications of our virtual machine setup, which serve as a foundation for the tasks demonstrated:
- CPU – 3.4 Ghz (2 cores)
- Memory – 2 GB
- Storage – 20 GB
- Operating System – Rocky Linux 8.5 (Green Obsidian)
- Hostname – rockylinux-01.centlinux.com
- IP Address – 192.168.116.128 /24
This minimal virtual machine configuration offers the perfect balance between resource efficiency and functionality, allowing us to focus solely on the task at hand while minimizing overhead. This setup is ideal for following along with tutorials, experimenting with new configurations, or running lightweight server workloads.
Charger for MacBook Air MacBook Pro 13 14 15 16 inch 2025 2024 2023 2022 2021 2020, M1 M2 M3 M4 Laptop 70W USB C Power Adapter, iPad, LED, 6.6FT USB-C Cable, Charging as Fast as Original Quality
$25.19 (as of July 9, 2025 21:12 GMT +00:00 – More infoProduct prices and availability are accurate as of the date/time indicated and are subject to change. Any price and availability information displayed on [relevant Amazon Site(s), as applicable] at the time of purchase will apply to the purchase of this product.)Update your Linux Server
To begin, connect to your Rocky Linux server (rockylinux-01.centlinux.com) as the root user using an SSH client of your choice, such as PuTTY, OpenSSH, or any terminal application. Establishing a secure SSH connection ensures that you can manage the server remotely while maintaining strong encryption for your session.
Once connected to your server, it is important to refresh the cache of your enabled yum repositories. This step ensures that the package manager has the most up-to-date metadata, which is critical for seamless installation and updates of software packages. Execute the following command at the Linux terminal to build and update the yum repository cache.
Refreshing the repository cache is a routine yet essential task that helps prevent issues related to outdated or missing package information. It prepares your system to efficiently retrieve and install software components during the setup or maintenance process.
dnf makecacheAs a best practice, update software packages in your Linux operating system before installing Cockpit web interface.
dnf update -yOur Linux server is fully updated with the latest available packages and system updates, ensuring optimal performance and compatibility for the tasks outlined in this guide. However, the results of these updates may vary depending on your specific operating system and its current state. If your server is not updated, it’s highly recommended to perform a full system update before proceeding to avoid potential compatibility issues during the installation process.
To provide clarity and reference for this guide, it is essential to verify the current Linux Kernel version and the operating system details being used. This helps ensure that your setup aligns with the steps outlined here and confirms the compatibility of the software and commands. Checking these versions not only validates your system’s readiness but also assists in troubleshooting and replicating configurations across multiple systems, if necessary.
uname -r
cat /etc/os-release
Output:
4.18.0-348.12.2.el8_5.x86_64
NAME="Rocky Linux"
VERSION="8.5 (Green Obsidian)"
ID="rocky"
ID_LIKE="rhel centos fedora"
VERSION_ID="8.5"
PLATFORM_ID="platform:el8"
PRETTY_NAME="Rocky Linux 8.5 (Green Obsidian)"
ANSI_COLOR="0;32"
CPE_NAME="cpe:/o:rocky:rocky:8:GA"
HOME_URL="https://rockylinux.org/"
BUG_REPORT_URL="https://bugs.rockylinux.org/"
ROCKY_SUPPORT_PRODUCT="Rocky Linux"
ROCKY_SUPPORT_PRODUCT_VERSION="8"
Install Cockpit on Rocky Linux 8
In Rocky Linux 8, Cockpit software is available in standard yum repositories. Therefore, you can easily install it by executing a dnf command.
dnf install -y cockpitAfter successful installation of web GUI management software, enable and start Cockpit service.
systemctl enable --now cockpit.socketCheck the status of Cockpit service.
systemctl status cockpit.socketOutput:
● cockpit.socket - Cockpit Web Service Socket
   Loaded: loaded (/usr/lib/systemd/system/cockpit.socket; enabled; vendor pres>
   Active: active (listening) since Mon 2022-02-21 19:48:06 PKT; 34s ago
     Docs: man:cockpit-ws(8)
   Listen: [::]:9090 (Stream)
  Process: 2150 ExecStartPost=/bin/ln -snf active.motd /run/cockpit/motd (code=>
  Process: 2143 ExecStartPost=/usr/share/cockpit/motd/update-motd  localhost (c>
    Tasks: 0 (limit: 5808)
   Memory: 4.0K
   CGroup: /system.slice/cockpit.socket

Feb 21 19:48:06 rockylinux-01.centlinux.com systemd[1]: Starting Cockpit Web Se>
Feb 21 19:48:06 rockylinux-01.centlinux.com systemd[1]: Listening on Cockpit We>
Configure Linux Firewall
Cockpit operates on the default service port 9090/tcp, which facilitates web-based server management. To ensure uninterrupted access to Cockpit’s web interface, you may need to configure your Linux firewall settings appropriately. This involves either enabling the specific port 9090/tcp or allowing the predefined Cockpit service in the firewall rules.
Properly configuring the firewall is crucial, especially if your server is running in a secure or production environment where strict firewall rules are in place. By enabling this port or service, you ensure that the Cockpit interface can be accessed over the network, allowing administrators to monitor, manage, and troubleshoot the server efficiently through a browser-based interface. This step is vital to maintain seamless connectivity to the Cockpit dashboard while adhering to your server’s security policies.
firewall-cmd --permanent --add-service=cockpitOutput:
Warning: ALREADY_ENABLED: cockpit
success
You can see that, the cockpit service is already enabled by the installer.
Accessing Cockpit Web GUI
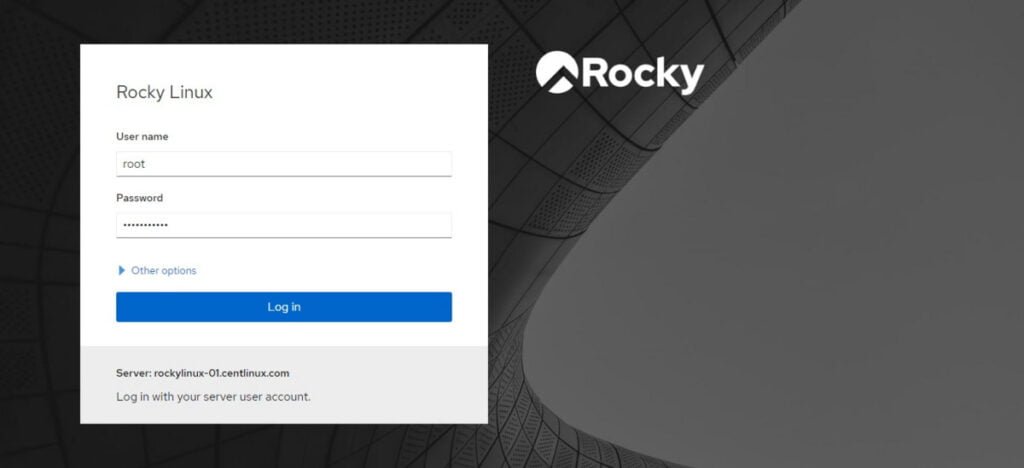
To access the Cockpit web interface, open the URL https://rockylinux-01.centlinux.com:9090 in your preferred web browser. When you attempt to load the page, you may encounter a privacy warning or a security alert. This occurs because the Cockpit software uses self-signed SSL/TLS certificates by default, which are not verified by a trusted Certificate Authority (CA).
While this warning might appear alarming, it is safe to proceed if you trust the server and know it is under your control. To continue, simply ignore the warning and add a security exception within your browser. This will allow you to bypass the SSL warning and securely access the Cockpit interface.
Once added, you can log in to the Cockpit dashboard to manage and monitor your Linux server with ease. For enhanced security, you may consider replacing the self-signed certificate with a trusted SSL/TLS certificate issued by a reliable CA in production environments.

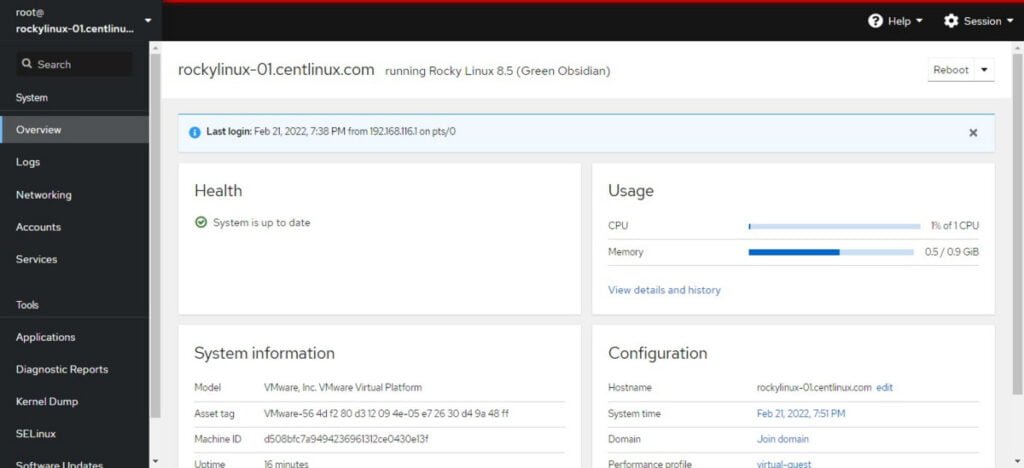
Login as root user.

You have successfully login to Cockpit Web GUI Management Software.
Yocto Project Customization for Linux: The Essential Guide for Embedded Developers
$47.49 (as of July 9, 2025 21:12 GMT +00:00 – More infoProduct prices and availability are accurate as of the date/time indicated and are subject to change. Any price and availability information displayed on [relevant Amazon Site(s), as applicable] at the time of purchase will apply to the purchase of this product.)Video: Install Cockpit on Rocky Linux 9
Read also: Complete Spacewalk installation on CentOS 7
Frequently Asked Questions (FAQs)
1. Why should I use Cockpit instead of command line?
Cockpit provides a user-friendly GUI for beginners while still allowing access to the terminal. It’s great for quick tasks like monitoring system performance, managing users, or configuring storage without memorizing commands.
2. Does Cockpit work on all Linux distributions?
Cockpit is widely supported on major distros like RHEL, CentOS, Fedora, Ubuntu, and Debian, but some features (e.g., specific storage drivers) may vary. Check your distro’s documentation for compatibility.
3. How do I access Cockpit?
After installation, open a browser and navigate to:
https://<your-server-IP>:9090Log in with a system user account (requires sudo privileges for admin tasks).
4. Is Cockpit secure?
Yes, Cockpit uses HTTPS (port 9090) by default and requires authentication with system credentials. Firewall rules may need adjustment to allow access.
5. Can I manage multiple servers with Cockpit?
Yes! Cockpit allows adding remote servers (via SSH) from the dashboard, enabling centralized management of multiple machines.
Final Thoughts
In conclusion, installing Cockpit provides an efficient and user-friendly interface for managing Linux servers. Its intuitive dashboard simplifies complex administrative tasks, from monitoring system performance to managing users, services, and storage.
Cockpit’s lightweight design and web-based accessibility make it an ideal solution for both seasoned administrators and newcomers seeking to streamline server management. By integrating Cockpit into your Linux environment, you can enhance productivity, improve oversight, and maintain a secure and well-optimized server infrastructure with ease.
Whether you need cloud optimization, server management, or automation, I provide comprehensive AWS and Linux services. Hire me on Fiverr to elevate your systems.


Leave a Reply
You must be logged in to post a comment.